2019 Students Part 1
Fahrin Patel
Fahrin Patel
Year: Senior
Area of Research: Opthalmology
Contact Information: fpatel29@uic.edu
Fahrin Patel Blog
Opthalmology
Week 1
Opthalmology
Opthalmology
Opthalmology
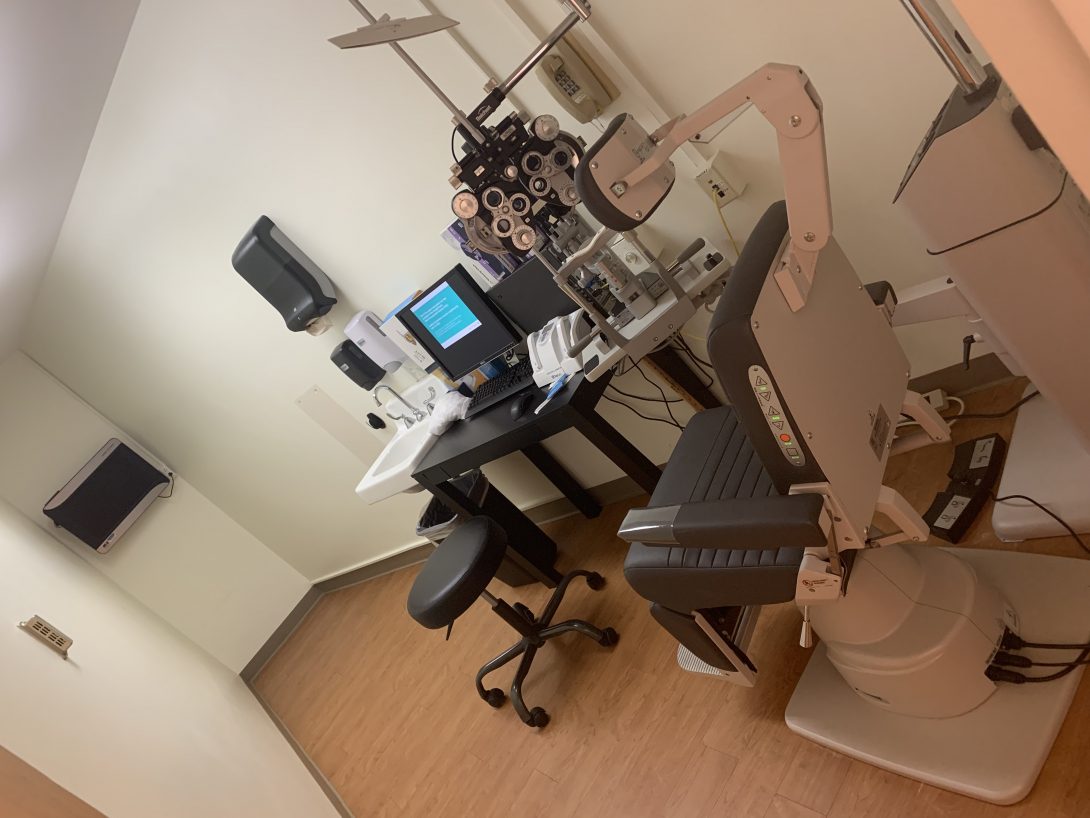
Dr. Jain from Lions of Illinois Eye Research Institute specializes in Dry Eye Disease. On a normal clinic day, each of the team members got to see about 10-15 patients. Dr. Jain always had two assistants present whenever he saw a patient. We saw tear collection, Oculus keratograph imaging, Lipiview imagaing, osmolarity test, pressure check, tear collection and eye staining.
Good Designs: Two waiting rooms which prevented overcrowding of the waiting room and faster flow of patients, presence of a pharmacy in the facility, presence of two assistants made the tear collection process more efficient, charging outlets in the waiting room kept the patients occupied on their phones while waiting, two examination rooms with larger length provided perfect distance for vision test.
Bad Design: Tear collection process required presence of two assistants which in small rooms created crowding, some imaging devices were only found in one examination room so if a patient needed a Lipiview imaging or Keratograph, the patient had to be moved. Photography equipment were only in one examination room that is why in all the other rooms the doctor could not take reference images to check for progress.
Storyboard
Tear Collection Process
Storyboard
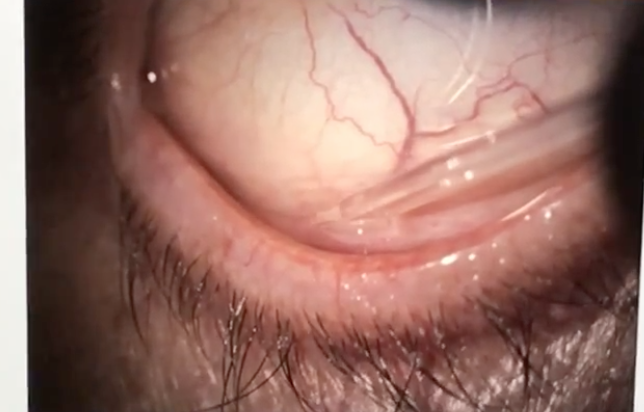
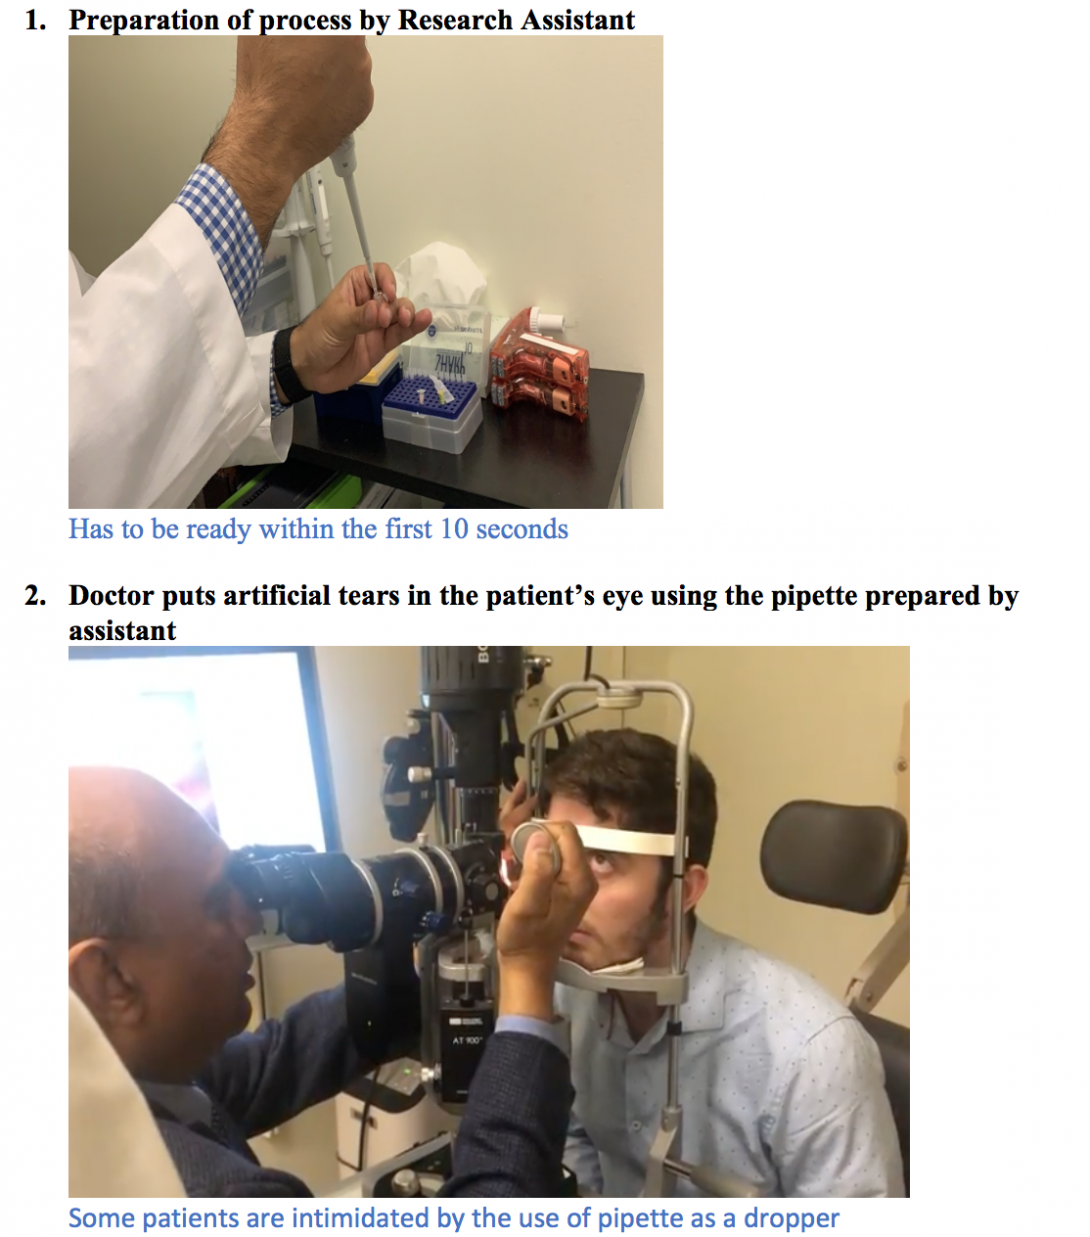
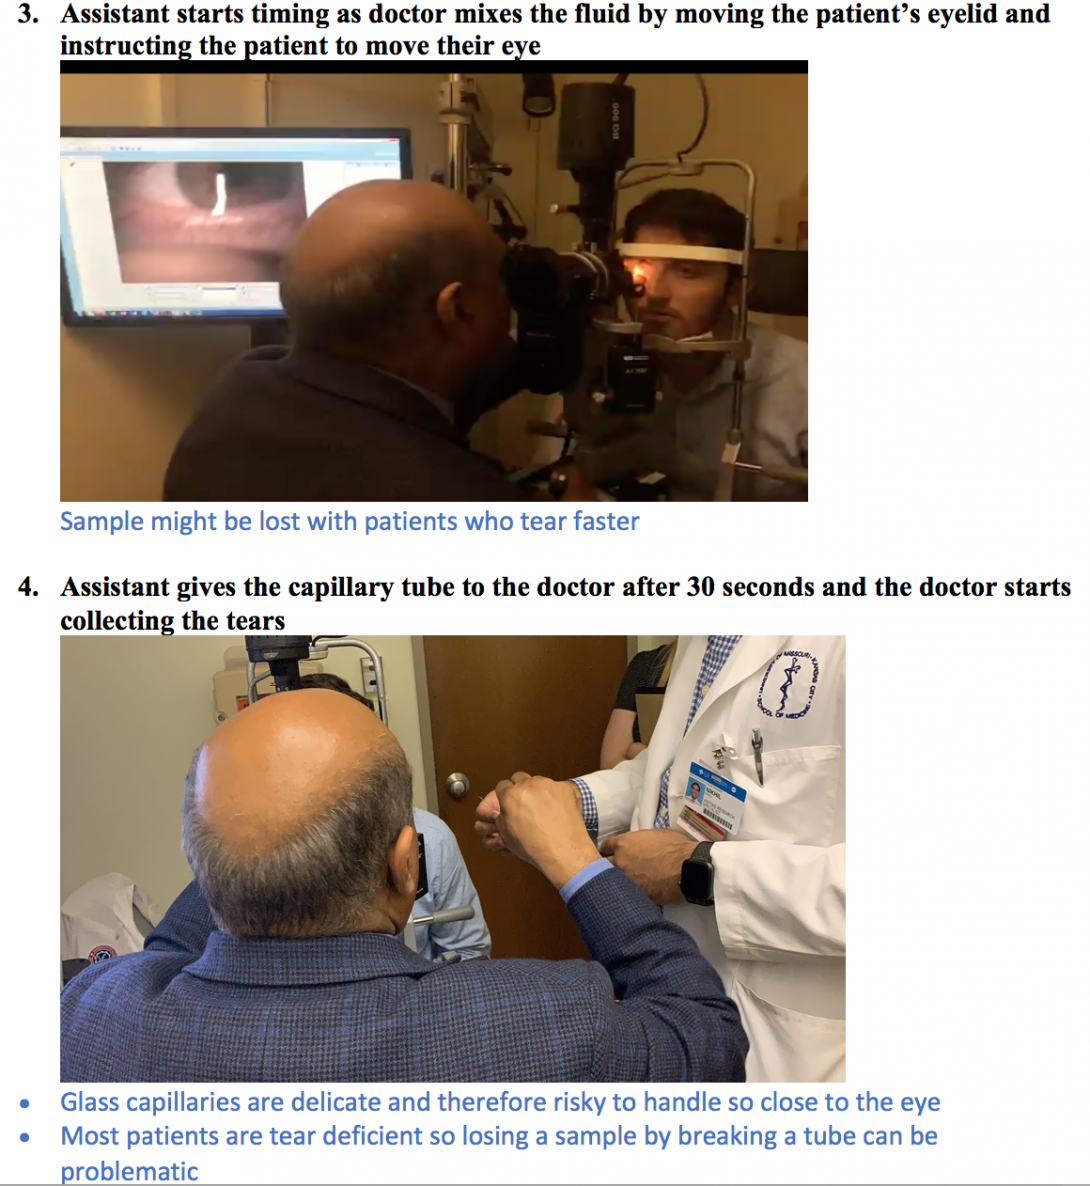
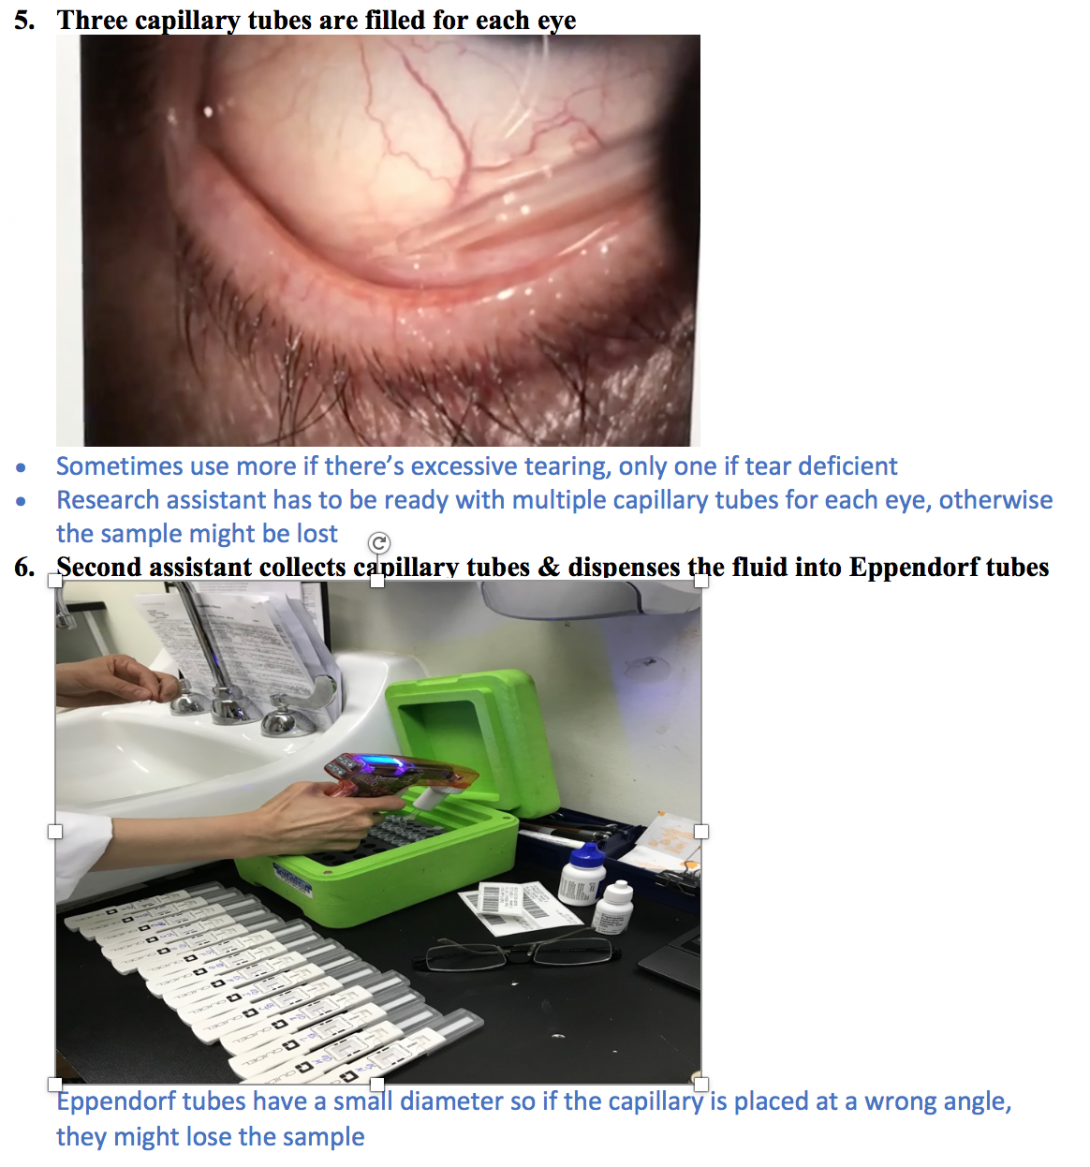
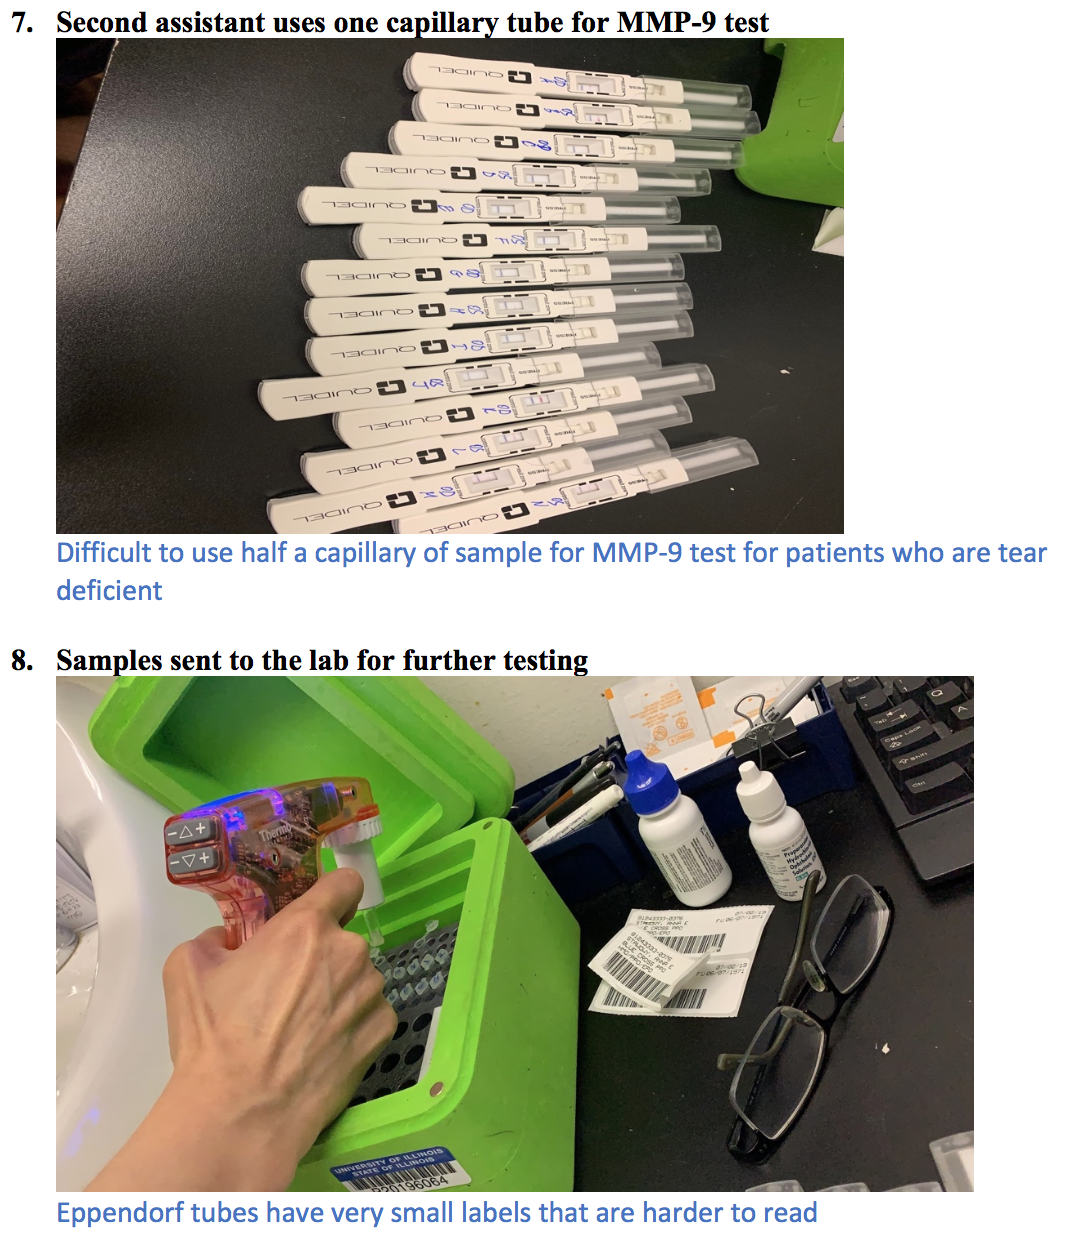
Tear collection is usually done in the presence of a doctor, patient and two assistants.
Storyboard
Storyboard
Storyboard
Storyboard
Needs Statement
Week 3
This week in opthalmology, my team and I worked on the needs statement and evaluated various problems. Dr. Jain performed two processes, the tear collection and lissamine green staining with all the patients so we got a good insight of the process. We noticed problems with both processes. However, we chose to proceed with the tear collection because it is very demanding and risky process.
Need Statement:
- To make the tear collection accessible for more healthcare workers and safe for patients
- To modify the tear collection process to make it user friendly for more healthcare workers to use safely on patients
- To create a more user-friendly tear collection process that allows any healthcare professional with minimal training to collect patients’ tears safely
Criteria and Specifications
Week 4
Finalizing the needs statement and brainstorming laid out the way for design criteria and specifications. My team and I categorized the specifications into four sections named comfort, efficiency, safety and accessibility.
Comfort Criteria:
- The device should remain in the eye for less than 10 seconds at a time.
Our eyes tend to get irritated once something stays in it for a while. Therefore, removing the device from the eye in 10 seconds ensures that it does not irritate the eye. Hence, making it comfortable for the patient.
Efficiency Criteria:
- The entire process of tear collection should be done within a minute
- The device should collect minimum 50 µL of tear sample from each eye in a healthy patient (with no dry eye conditions)
The current process of tear collection which requires the presence of two assistants in addition to the ophthalmologist, takes about 2 minutes in total. We want the device to collect the sample from one eye at once instead of using multiple capillaries. This should cut down the time for the tear collection process.
Safety Criteria:
- The device should not cause injury to the eye
- Materials that touch the eye should be sanitary
- Materials which come in contact with tears should be disposable
Safety of the user and the person the device is used upon is of utmost importance so we want to make sure the device does not cause any abrasions or bruising to the surrounding tissues. In addition to that, we want to ensure that the device has a part that is disposable/ recyclable in order for the process to be free of contamination.
Accessibility Criteria:
- Healthcare professionals should be able to use it after one demonstration
- Should be handled by one person without additional materials (slit lamp)
One of the main reasons why tear collection for tear analysis is not done by many healthcare professionals is because of lack of resources. The current process requires the use of slit lamp which is not available to all healthcare professionals. Training is also another problem. The use of glass capillaries requires utmost stability and precision which requires a lot of training. We want our design to aid with that so that the healthcare professionals are able to use after one illustration is done.
Concept Cards
Week 5
This week as each team member drew out a prototype on concept card, we realized that it was the best way to communicate it to my team members and others. We were advised to talk to our mentor and separate the good and the not so good features of the prototype. We were debating over using a motorized vs. mechanical design. After our meeting with Dr. Jain we concluded that motorized design was the better choice to make. We eliminated some features as well as it was not of much benefit as adding them was leading to a complicated design.
Our final need statement, “To create a more efficient tear collection process, increasing accessibility, while maintaining a safe and comfortable experience for patients,” and the design criteria were very helpful in refining our concept.
Allison Bayro
Allison Bayro
Basic Information about Student (Small Background introduction)
Year: Senior Undergraduate Bioengineering Student
Area of Research: Wearable Technology–specifically, tracking tongue and lip movements to develop a method to distinguish different phonemes in silent communication.
Contact Information: abayro2@uic.eduor https://www.linkedin.com/in/allison-bayro/
Allison Bayro Blog
Storyboarding
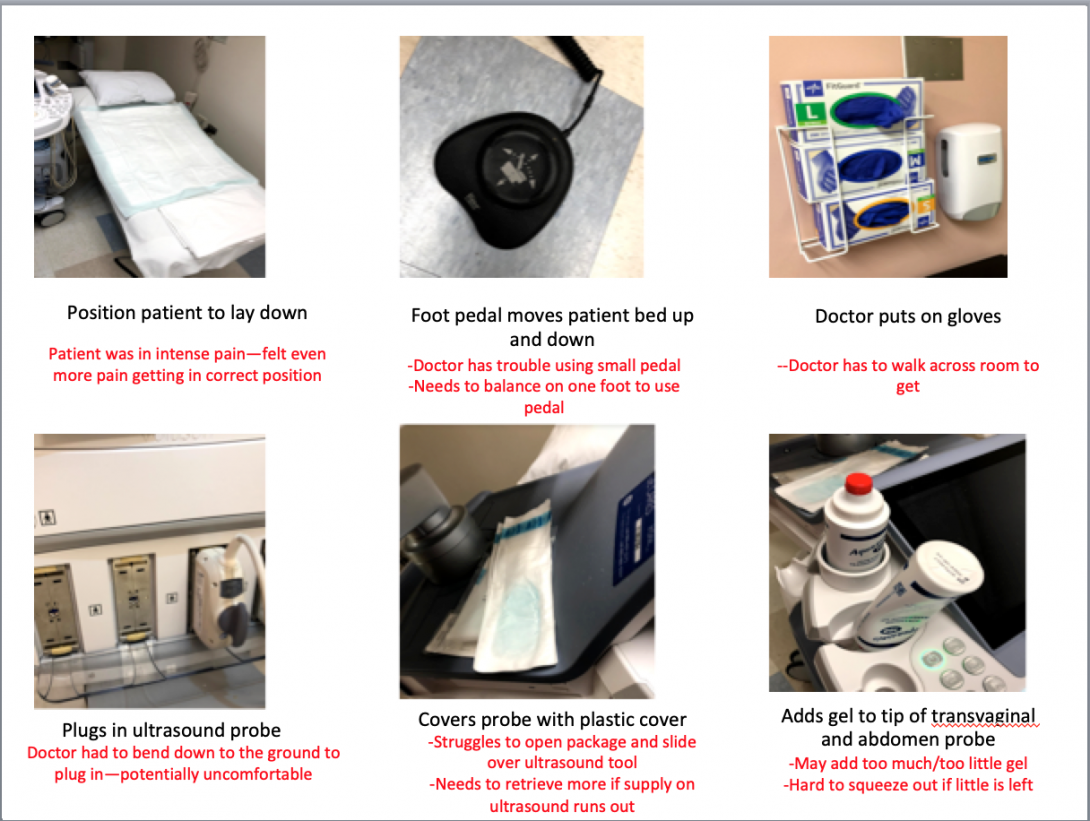
During this week in the Ob/Gyn department, my team and I focused on observations and interviews in the clinical environment. We were tasked to take an event observed last week and map it out step-by-step using a “storyboard” technique. In doing so, we were able to break from a process into its components and label different pain points. These pain points include steps that may contribute to discomfort, frustration, significant loss of time, and, of course, pain. Given how frequent ultrasounds are done in women’s health, I decided to storyboard its procedure:
Storyboarding
Storyboarding
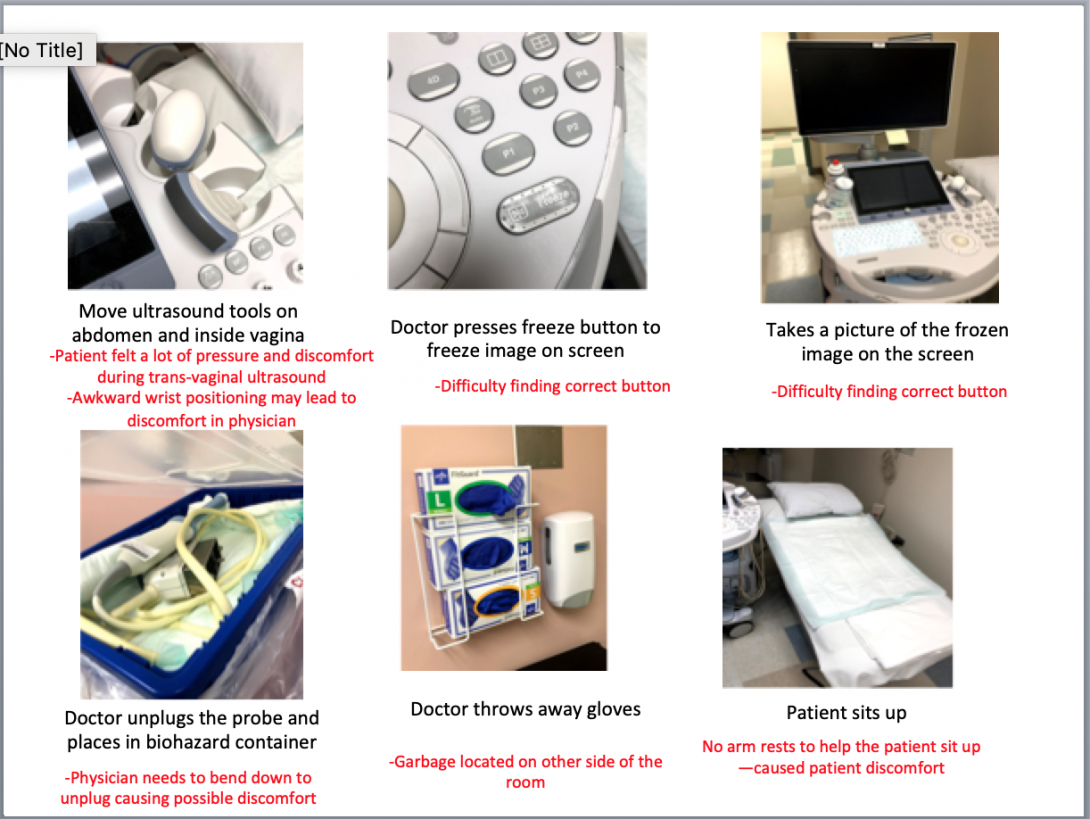
I was able to identify various pain points during the procedure, which caused the patient and physician to feel potential discomfort and pain. The initial patient positioning and final sitting up seemed to be common pain points among various other procedures. For example, my team also created a storyboard for a pap smear and noted similar points of struggle.
My team and I continued to make observations of the clinic, OB ER, and high-risk center. We were able to view new procedures such as a colposcopy, ultrasound, and loop electrosurgical excision procedure. We also had the opportunity to interview other physicians and medical students about their experiences in using specific instruments during procedures. For example, during an interview with an ob/gyn resident, she explained to my team and me the positive and negative experiences she has using the microscope in a colposcopy procedure. Because this interview was in context, she was able to show us the visual difficulties and obstacles. Through follow-up questions, we were able to determine that the primary obstruction of the microscope was the freedom of movement.
Good and Bad Designs
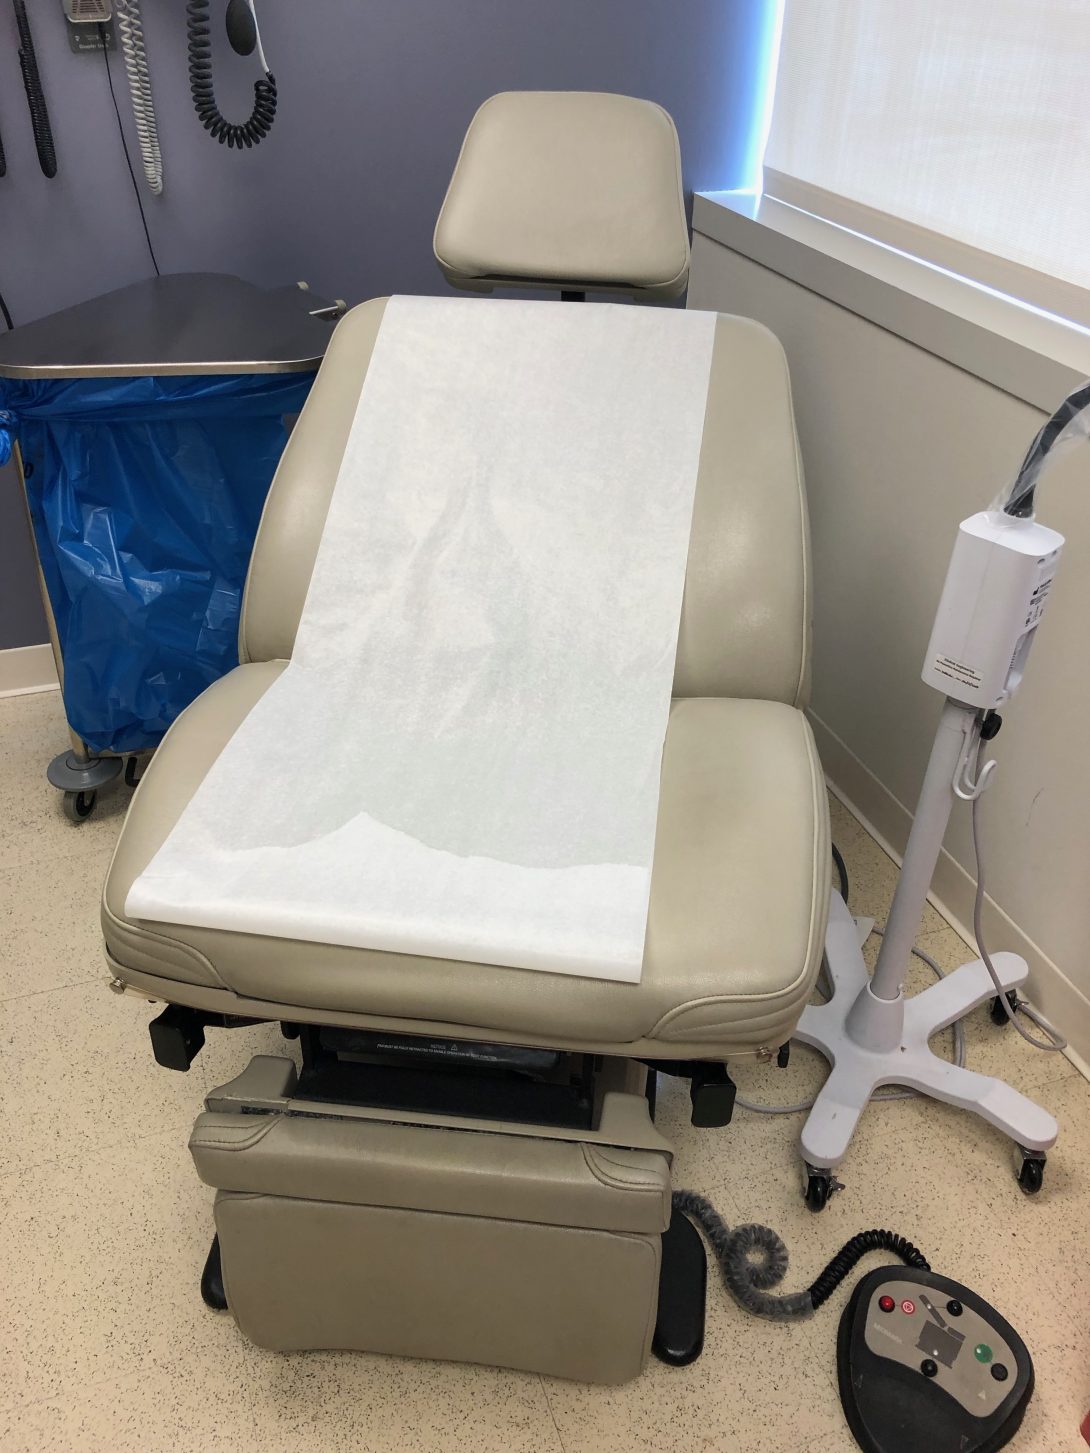
This past week was the first week of the Clinical Immersion Program. In such, my team and I shadowed Dr. Ramanathan in the Ob/Gyn department of UI Health. On Tuesday and Wednesday, we started in the clinic, where we observed several common procedures. Through the AEIOU framework, we took note of different activities, environments, interactions, objects, and users. In such, we used this tool to focus our attention on the search for good and bad designs. The environment of the clinic rooms was very organized and patient-friendly. The tools the physician needed to use were in easily accessible places, and the visits were quick and efficient. There were, however, some bad designs within the clinic. All of the rooms had patient examination chairs without armrests. The controls of the chairs were on the floor and lacked ease of use, as the buttons were poorly labeled. The physician had to press several different buttons before gaining an understanding of how to position the chair properly. Also, several pregnant patients needed to be assisted in sitting up as the examination chair had no handles. This appeared to be a poor design and discomfort for many patients.
Good and Bad Designs
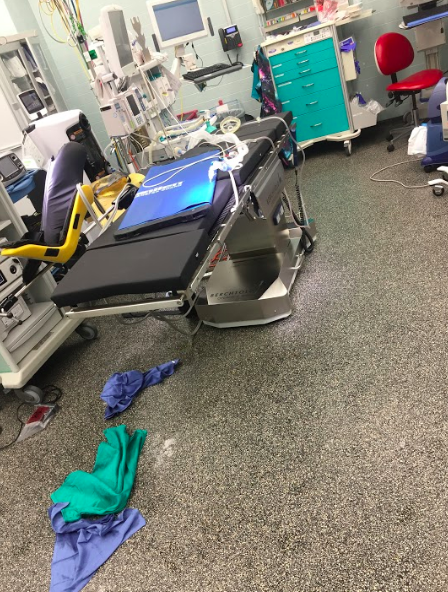
On Thursday, our team met in the OR and viewed several different procedures, including a hysterectomy and myomectomy. I walked into the operating room during the last half of the hysterectomy procedure and immediately noticed several tools and blood on the floor. Furthermore, the cover on the overhead light handle was falling off directly over the patient. During the myomectomy procedure, the drapes were suboptimal in that the opening was vertical and did not fully expose the horizontal surgical site on the abdomen. In such, Dr. Ramanathan needed to cut the drapes to suit the surgery better. In doing so, the adhesive on the drapes did not correctly stick to the patient allowing tools to fall through, which was a poor design.
Good and Bad Designs
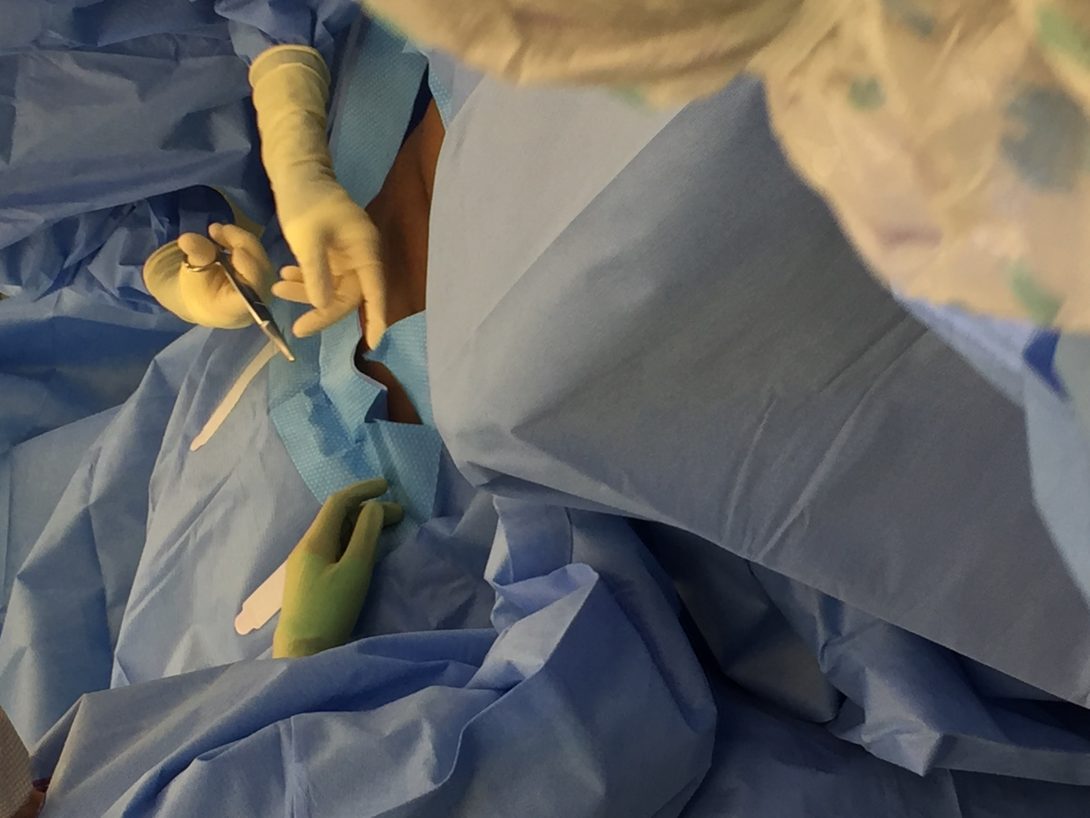
Our group considered the idea of designing a “one-size-fits-all” adjustable surgical drape that considered the type of surgery and size of the patient as well as maintained its proper adhesive function. Also, the nature of this procedure made the operation very bloody. While suction was used throughout the entire procedure, there was a lot of blood on the floor surrounding the surgeons. In fact, this became a slipping hazard. As a workaround, the surgeons used a patient blanket as a floor mat to stand on to avoid slipping.
Good and Bad Designs
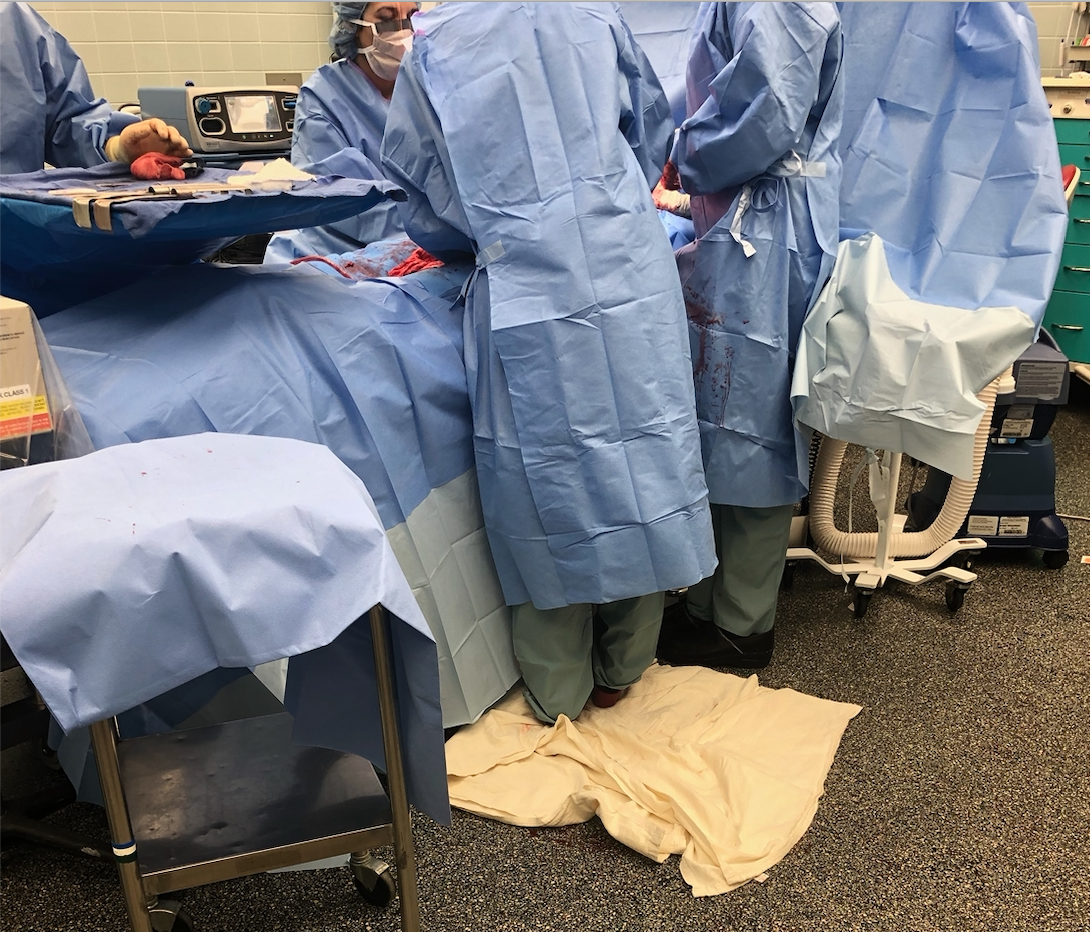
This activity provoked thought within our team of designing a gutter-like system to control blood spill. We also inquired how this design would potentially improve the estimated blood loss during procedures.
Our team noticed several good designs in the OR, including the operation table with many detachable components allowing for proper patient position, and lifted wall outlets causing less tangled wires on the floor.
Needs Statement
This week in the OB/Gyn department was one for the books! I had the privilege to see not one, but two births, during my observation in Labor and Delivery. It was a moment I was looking most forward to since I initially heard of my placement in the OB/Gyn department. During the first vaginal delivery, I nearly forgot to note my observations as I was so amazed by the beauty of life. Fortunately, I had another chance to use the AEIOU framework as well as notice good/bad designs in the second c-section delivery.
Some key observations I noticed during the procedure:
- The device used to monitor the heart rate of the patient had a cord that was plugged into a nearby computer station. This cord reached from the operating table, across the walking pathway next to the table, and into the computer. In doing so, the staff in the operating room unplugged and replugged the cord every time he/she wanted to walk through the pathway. I noted this action 12 times. It seemed like an INCREDIBLY, awkwardly placed cord.
- The patient needed a second epidural for the procedure. In such, she was situated in a sitting position with easy access to the lower spine. Due to her previous epidural, the patient struggled to hold herself upright. She slouched, which caused a limitation in the location where the epidural needed to be injected. Four individuals needed to help prop the patient in the correct position. In all, the epidural took 16 minutes.
- The drapes for the procedure had a tubing system. The tubes were used for suction purposes. This was the first procedure I have seen with a built-in system to help with estimated blood loss. In speaking with Dr. Ramanathan about why this procedure, in particular, has the tubes, but other procedures we have seen thus far do not, she said the blood loss in c-sections is a lot more significant in quantity.
- The surgical incision was very small compared to the exposed area of the drapes. In previous surgeries, I noticed that the surgeons needed to make the area larger by cutting the drapes. However, in this case, the area was too large.
The idea that the surgical drapes did not fit the size of the incision seems to be an ongoing issue among the past three weeks. Because of this, my team decided to form our needs statement based on the issue of the subpar exposed surgical area in the drapes.
Our first need state was the following (Problem, Population, Outcome) :
Needs Statement
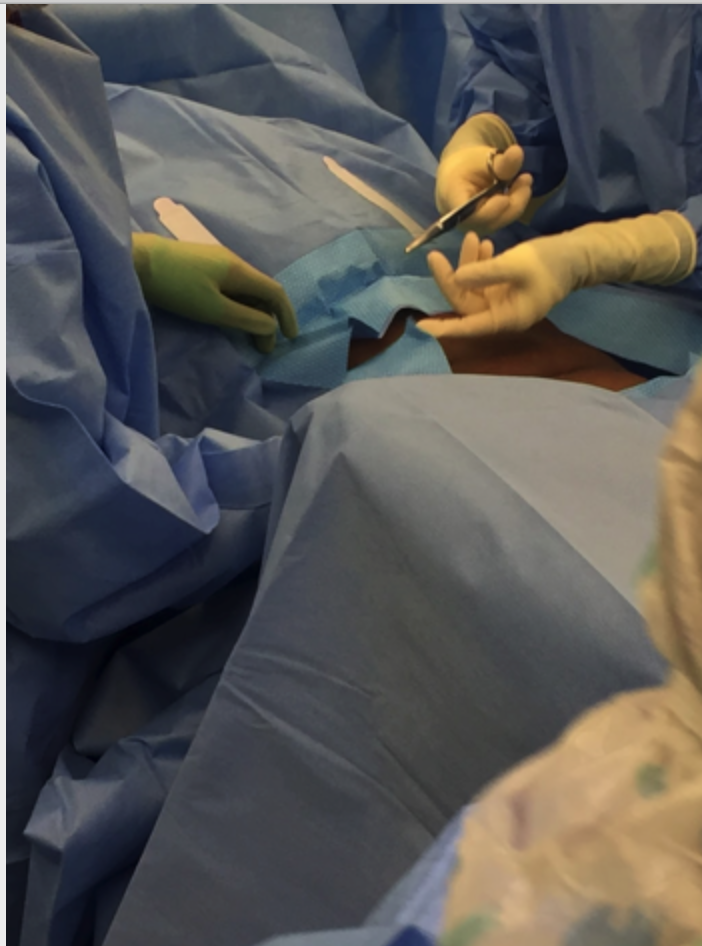
A way to address draping in patients during surgery that provides ideal surgical area
Upon reflecting on this needs statement, my team realized that we did not specify what is what wrong the drapes that cause an issue. Also, we felt that the phrase “ideal surgical area” was incredibly broad. We needed to describe what the term “ideal” meant in the context of the surgery to provide a better description of the outcome of the problem. These thoughts led us to our second iteration of the needs statement:
A way to address the need to cut surgical drapes to better expose the incision area for patients in surgery that do not minimize the adhesive property of the drape against the patient’s skin in cutting the drape.
We initially felt that this needs statement provided much more detailed information on the problem and outcome. However, the needs statement was still very broad with respect to our patient population. We pondered the question: What defines our patient population that causes need? Also, we rationalized that cutting the surgical drapes had other implications other than better exposing the incision area. This led us to our final needs statement:
A way to minimize the loss of time and adhesive properties that results from the cutting of standard-sized surgical drapes to fit an incision area in patients of different stature during various gynecological surgical procedures.
Criteria and Product Design Definitions
Another exciting week in the OB/Gyn department! I was able to witness another birth, which was just as mesmerizing as the first. I truly enjoy the experiences that CIP has been able to offer thus far!
During the second week of this internship, my team and I met an approximately 20-week pregnant patient who was deaf. She reached out to Dr. Ramanathan to ask how she could interact with the fetal heart rate during the appointment, as she could not hear it. When Dr. Ramanathan told us about this opportunity, we used our critical thinking and bioengineering skill set to formulate an immediate solution. As the appointment to see this patient was scheduled for a couple of days later, we worked on creating an app that would visually and tangibly show the baby’s heartbeat. The app did this by allowing the user to input a fetal heart rate, and then a heart on the screen beat and the phone vibrated to this specific heart rate. We received such positive feedback that we decided to seek more information on prenatal support for deaf individuals. During our chance to interview the deaf patient and through secondary research, we found that there are very little education and technologies available to support deaf pregnant patients. Being said, my team decided that there is an evident need in this area of obstetrics. We created a new needs statement based on this finding:
A method to improve the interaction between the fetus and deaf pregnant individuals that increases maternal involvement in the prenatal experience.
Our initial app idea gave my team and I a great starting point to formulate design criteria and product requirement definitions (PRD) for our prototype. Our current design that allows for deaf pregnant individuals to interact with fetal heart rate consists of two devices connected via Bluetooth. The following are design criteria and PRD’s for the first device:
Part 1 Criteria: Microcontroller & Sound Sensor
- A hand-held device that the user holds
- A clip-on device to doppler that captures sound
- Uses Bluetooth technology to link the two devices
- Cost-effective
- Intuitive -easy on/off switch
- Easy-storage
- Easily Replaceable Battery – Battery Operated
- Visual Heart Rate (depending on device)
Criteria and Product Design Definitions
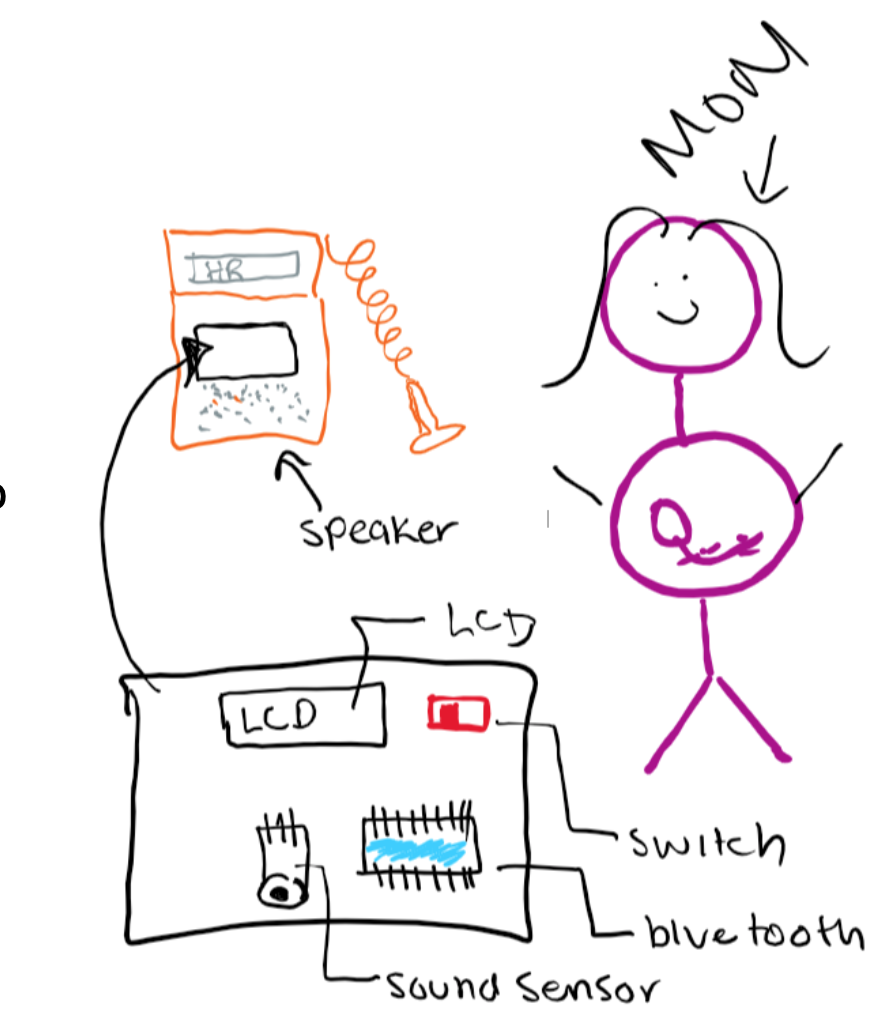
The following image was hand-drawn to show the criteria for the first part of the device, which clips on to the fetal Doppler to capture heart sounds. To further explore the specifications of this device, we populated quantitative, highly technical requirements:
Part 1 PRDs: Microcontroller & Sound Sensor
- External volume shall be 2.5”x3”x3”
- Housing shall be constructed of PLA and insulating Styrofoam that encompasses all parts besides the sound sensor
- Weight shall be under 2lb
- PLA housing shall attach to doppler around speaker via 2”x1” stick-on plastic velcro
- Bluetooth transmitter within circuitry shall transmit information to Part 2 receiver, which shall remain less than 10’ away
- On/off switch shall be located on the external portion of the housing, shall be 0.5”x0.25”, binary, colored red, labeled, and associated with an LED to signal switch status.
- Can fit in a 5”x5”x5” storage container
- Device shall be operated by a rechargeable 5V battery pack
As previously mentioned, our device will have two parts. The first part will be directly connected to the Doppler to capture sounds, while the second will be held by the patient to visually and tangibly feel the captured heart sounds. The following are our criteria and PRDs for the second part of the device:
Part 2 Criteria: Led & Vibration
- A hand-held device that the user holds
- Uses Bluetooth technology to link the two devices
- Friendly appearance
- Cost-effective
- Intuitive -easy on/off switch
- Easy-storage
- Easily Replaceable Battery – Battery Operated
- The output is interactive via vibration and LED
- Visual Heart Rate (depending on device)
Criteria and Product Design Definitions
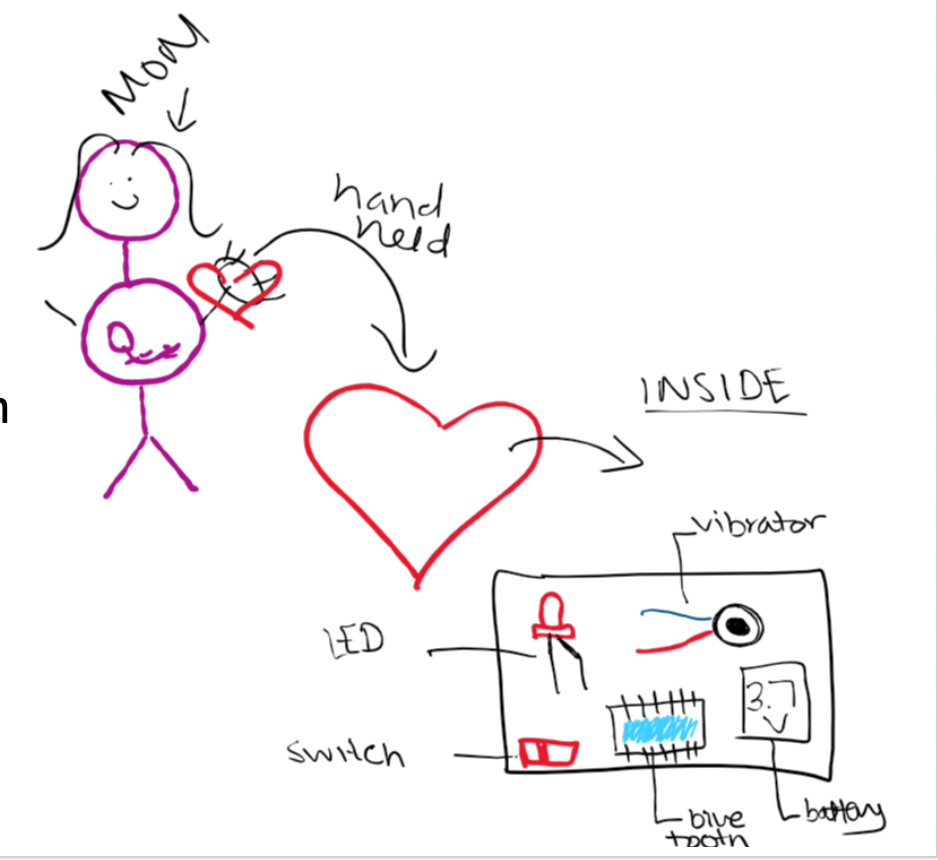
Part 2 PRDs: Led & Vibration
- Device shall be housed in a 4” width heart-shaped (non-anatomical) PLA box
- Device shall contain Bluetooth receiver that shall receive information from the transmitter in the Part 1 circuitry.
- Friendly appearance- red with a smiley face
- Device shall be under $15
- On/off switch shall be located on the external portion of the housing, shall be 0.5”x0.25”, binary, colored red, labeled, and associated with an LED to signal switch status.
- Can fit in a 5”x5”x5” storage container
- Device shall be operated by a rechargeable 3.7V battery pack
Concept Cards
This week in the OB/Gyn department, the focus of my team and I shifted. As we solidified our needs statement and began brainstorming ideas this past week, we really started to refine our concepts. During the lecture on Monday, we learned how to create and use concept cards as a way to communicate our ideas to stakeholders. We performed a beneficial activity where we brainstormed different concepts based on our needs statement:
A method to improve the interaction between the fetus and deaf pregnant individuals that increases maternal involvement in the prenatal experience.
My team and I decided to explore the avenue in which fetal dopplers commonly used in the clinic, and L & D are limited to only audio output. For a patient who is deaf or hard of hearing, this is not ideal as they are unable to hear one of the fundamental milestones of the prenatal experience: the fetal heartbeat. We aim to develop a device, which transmits ultrasound signals of the fetal heartbeat into a visual, audible, and tangible output. Development of concept cards allowed my team and me to break the broader concept in smaller components and ideate from there. Some of the ideas we used the following concepts card template for was:
Concept Cards
-Method to collect information on heart rate from the Doppler (tap into the circuitry, sound sensors, etc.)
-A handheld component that the patient holds that allows a visual representation of the fetal heartbeat
-A handheld component that the patient holds that allows a tactile representation of the fetal heartbeat
-An app that collects and stores data for the patient to use
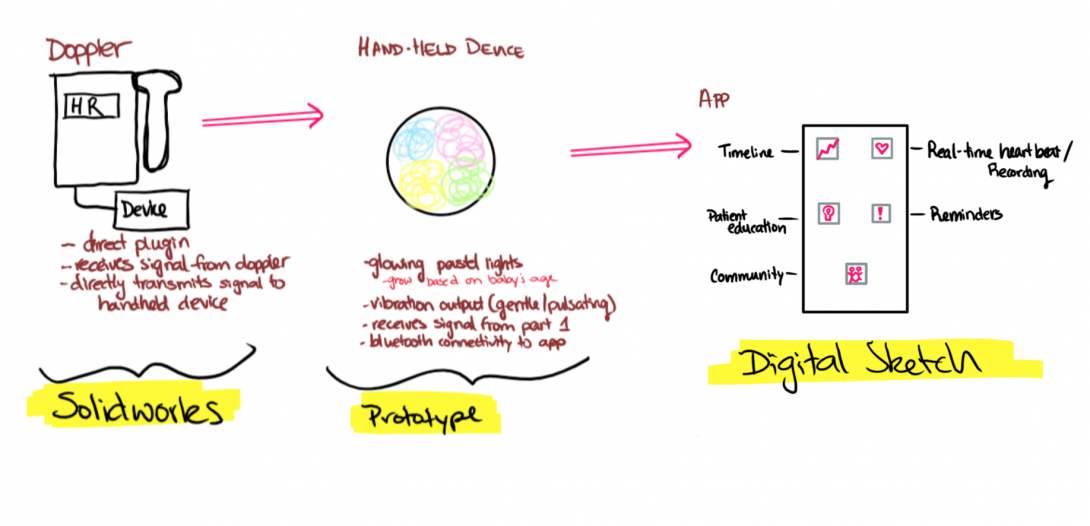
From these cards and speaking with Dr. Ramanathan, we developed more solid ideation of the components of our device. One of the ideas that really benefited from the concept cards was our app. Our original plan was purely a visual display of the heart rate on an app-platform. Through discussing possible benefits of the app, we came up with other ideas:
-A timeline of fetal heart rates that the mother can see and feel outside of the hospital
-Patient education articles to provide information throughout pregnancy progression
-A reminder feature that reminds of appointments, daily prenatal vitamins, etc.
-A community forum that connects other women with similar disabilities, barriers to pregnancy, and questions.
Concept Cards
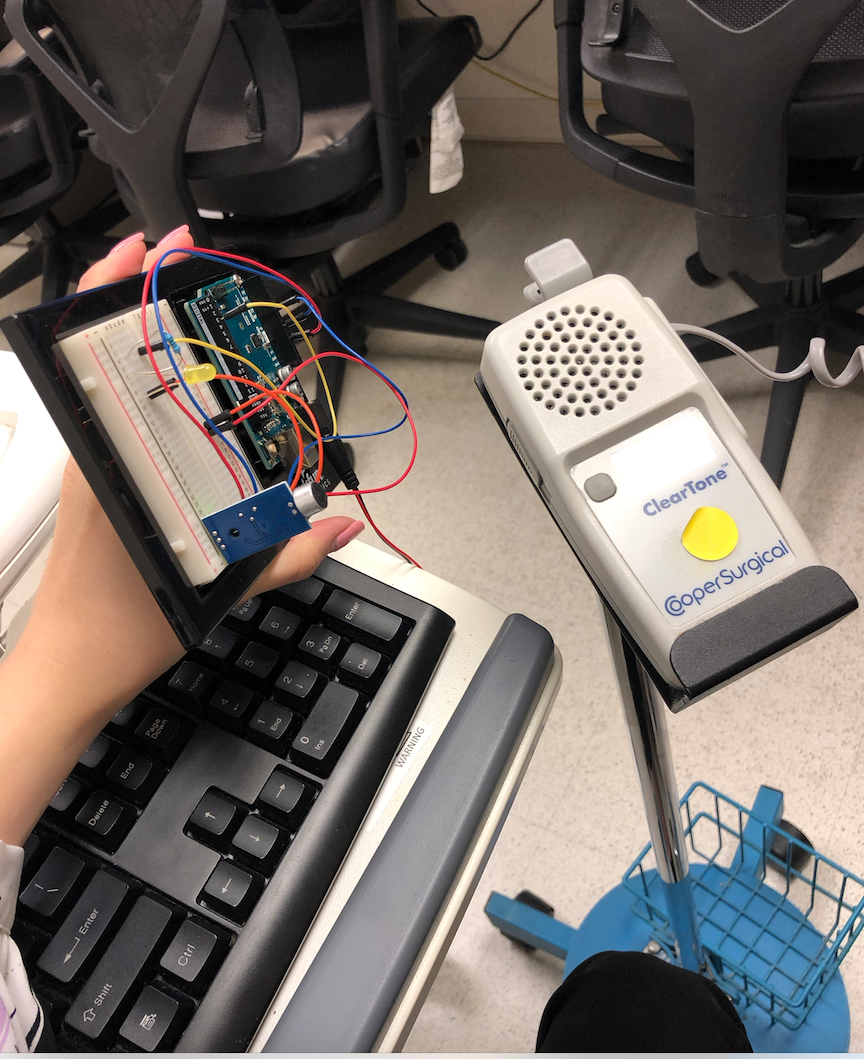
We also had a chance this week to utilize a portable Doppler on ourselves to determine how well our Arduino prototype picks up fetal heart rate sounds. We are looking forward to developing our idea further and presenting this upcoming week!
Concept Cards
Dionna Bidny
Dionna Bidny
Basic Information about Student (Small Background introduction)
Dionna Bidny Blog
Week 1: In which I helped reach the surgical light, and felt useful
The Good and Bad
Week 1: In which I helped reach the surgical light, and felt useful
I don’t usually get nervous, but on Monday of this week I was, admittedly, slightly nervous. Starting Clinical Immersion only one week before my MCAT, I was concerned for my capacity to be creative due to the particularly fried state of my brain. However, the diversity of what we excperienced in Ob-Gyn was in fact a welcome reprieve from the rote boredome of standardized testing that has been momentarily consuming the use of my neurons.
In just our first week, I have witnessed numerous clinical procedures and a number of surgeries, I have seen first hand that a uterus somewhat resembles a chicken leg, and I have felt useful by being the only one in the OR tall enough to be able to reach the joint of the overhead light to move it into position, if i jumped (bad design?)– What an adventure!
I love shadowing in Ob-Gyn for the massive variety of procedures, instruments, and techniques that play a role in patient care here. Even in a short time, our team has already experienced enough to start brainstorming ideas of where the next five weeks may lead us.
Here are a few of my personal favorite good and bad designs we compiled over the last week:
GOOD: I liked the adjustability of the surgical beds. Because Gyn surgery often needs vagianal access, being able to comfortably lay down a patient and then removing the lower part of the bed for easy access made a lot of sense.
BAD: For me, the most interesting bad design was the cords on the SCD (sequential compression device). The SCDs are placed around the legs to maintain blood flow and prevent clotting during surgery. The cords run down from the legs, which are often propped up during gyn surgery. This causes a tripping hazard.
Week 2: In which we play hide-and-seek with the OBER ultrasound
Storyboarding the search
What a perfect time for storyboarding processes we witness in the hospital to be introduced to us– who knew this handy tool could help me assess the messy process of locating the portable ultrasound in the Obstetrics ER.
Let me give you a little backstory:
The OBER is armed with two ultrasounds: a large one equipped with a vaginal probe that lives in its own lovely and spacious room, and a second smaller, portable, and very high demand ultrasound (US) that is possibly the busiest employee of the entire department. The portable US is used for any quick standard US procedure in the ER (when the vaginal probe is not needed).
Mid Tuesday morning, my attending and I left the staffroom to go in search of this very device, starting with exam room 1, its typical parking spot.
It wasn’t there.
After asking the nurses if they had any idea in regards to its location (they didn’t), we returned to the staffroom to discover that the portable US was in use. As we awaited its availability, another team of students entered requesting to use it as well, making us aware that this device truly embodied the popularity level we all aspired to in life. We had to explain that it was in use, we would use it next, and only then would it be available.
When the initial team finally finished, my attending and I returned to exam room 1 expecting it to be patiently waiting for us. But, as these things go, it was not.
Ultimately, we learned from someone we bumped into in the hall that it was directly placed into the exam room that was housing our patient.
Realizing the convoluted mess that was involved in locating the portable ultrasound, I quickly listed out the steps we took from the moment we decided we needed the ultrasound to finally obtaining the ultrasound. Storyboarding this process truly gave me a clear picture of the problem points, and helped me brainstorm how a possible tracking system or digital sign-up system for the usage of the device could be immensely helpful.
Week 3: In which we write a needs statement, but still have too many ideas
Needs statement
Developing a needs statement was more convoluted than expected.
But then again, I suppose that’s how life generally works.
In the end, we had far more than 3 iterations of our statement, with many still to likely come in the future. Also, progress was not linear; some later versions completely failed at improving previous ones. To display our progress, we selected three iterations that seemed to best exemplify the development of our thought process.
We decided to tackle a problem we’ve continuously come back to over the course of the internship thus far: surgical drape sizing. With nearly every surgery we’ve watched, the intended incision did not perfectly fit the standard opening of the surgical drape. When the surgeon cuts the drape opening to fit the incision area and mitigate this, the adhesive properties and cohesiveness of the drape opening is compromised, thus risking the loss of tools between the patient and the drape through the opening.
The hardest part of this process was truly to pick one need, as there are so many we want to tackle! But, I suppose it’s better to have identified too many rather than too few.
Iteration 1:
A way to address draping in patients during surgery that provides ideal surgical area
Problems with this needs statement :
What is wrong with the drapes?
What defines ideal surgical area?
What is a more specific outcome of the problem?
Iteration 2:
A way to address the need to cut surgical drapes to better expose incision area for patients in surgery that does not minimize the adhesive property of the drape against the patient’s skin in cutting the drape.
Problems with this need statement:
What defines your patient population?
What kind of surgeries?
What are other implications of cutting the drape?
Iteration 3:
A way to minimize the loss of time and adhesive properties that result from the cutting of standard-sized surgical drapes to fit an incision area in patients of different stature during various gynecological surgical procedures.
Week 4: "Imagine if we had spent this whole time still talking about drapes."
My current goal is to re-learn how circuits do things and what arduino is so we can really start prototyping– because I hate admitting I spent five minutes troubleshooting a circuit when the only problem was a backwards LED.
With no hard feelings toward the surgical drape idea in the previous post, the decision to move onto something else as our final project was easy.
Brainstorming around our new idea has proven difficult.
But such is the engineering life.
A quick flashback before I dive into our new approach: Around week 2 of the program, we were notified that our attending would be seeing a deaf pregnant patient, who would like a better way to interact with her baby’s heartbeat. We developed a quick app prototype that allowed the patient to feel a vibration at approximately the rate of her baby’s heartbeat (Our attending used the doppler to estimate the heartbeat and we input the pace into the app).
The patient was delighted, and we had a chance to interview her about her prenatal experience as a deaf individual, which was incredibly enlightening.
If anything exemplified user-centered design, it was this. When an often-overlooked population is identified, something as simple as altering existing designs for that population’s needs can open up a whole avenue of straightforward but impactful innovation.
This got us thinking: How can we further improve deaf pregnant patients’ use of the fetal doppler? How could they interact with it in real time? Could we go above and beyond just a vibrational output, and create something even hearing patients would benefit from?
With that, we settled on our new needs statement:
‘A method to improve interaction between fetus and deaf pregnant individuals that increases maternal involvement in the prenatal experience.’
I’m genuinely very delighted about this new problem to tackle. While our brainstorming and basic prototyping sessions have been far from perfect, we’re all vested in it–and it was incredible to see a hint of what it’s like to directly impact an individual with something we’ve created.
Week 5: In which I give up my medical school dreams because I want to be an engineer forever
As you may have guessed by the title, this week was very fulfilling in terms of innovation and collaboration outside of the clinic.
Being the starry-eyed and enthusiastic budding engineers that we are, my team reached out to a number of individuals that work in disability resources to discuss our idea with them. It has been amazing how positive people have been toward our project, and our Monday meeting at the Innovation Center this week has inspired us to think even bigger than we had planned. I am beyond excited to share our final project with the other teams and the people we’ve connected with through this program.
Meanwhile, it’s time to sort through our ideas, put them on paper in an organized write-up, and remember how to use solidworks.
Though this experience may have made me second guess my career choices (in the best possible way), here’s to a successful CIP finale.
Amna Hoda

Amna Hoda
Basic Information about Student (Small Background introduction)
Year: Senior
Area of Research: OBGYN/GYN
Contact Information: ahoda2@uic.edu
Amna Hoda Blog
Week 1 - Clinics
First Day on the Job
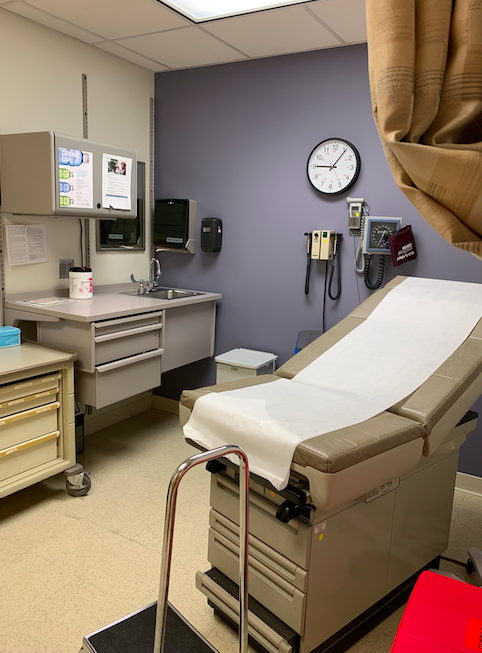
On June 25, we started our first day in the High-Risk Clinic of the hospital. Throughout the first day, our team saw a total of 8 patients. We saw an IUD insertion, biopsy, follow-ups, and colposcopy.
Somethings that we noticed right away in terms of bad designs is how small the rooms are. Often times, for procedures like biopsy and colposcopy, it often includes the patient, doctor, and a medical assistant. The room also has a tray that has all the tools needed for procedures being performed and takes up a large amount of space. Another thing noticed was how the discomfort for patients to be laying down for the procedures. Especially when pregnant patients came in, they struggled in laying down for examination and getting back up. It often required the help of the doctor while also causing discomfort for the patients.
Week 1 - OR Observation

Hysteroscopy & Hysterectomy
On June 27, we saw a hysteroscopy and a hysterectomy. The hysteroscopy removed two polyps and took approximately one hour to complete. The hysterectomy removed the uterus, fallopian tubes, and one ovary and took approximately three hours.
The good designs practice seen in the OR included and organization of surgical tools laid out prior to the surgery with an inventory check. The lights were placed high up in the OR room with electrical sockets high up on the wall for easy access. For these procedures as well, the operating bed was easily removable to allow for easy access to the patients.
The bad designs practice seen in the operating room were things like surgical tools and needles falling to the ground during certain procedures. One of the attendees mentioned that devices like the retractors could be designed with more ergonomics. Another bad design seen was that SDC cords were all tangled up at the bottom and could easily be seen as a tripping hazard.
These observations in our first week helped us brainstorm ideas of what we can change in the OR to help doctors and further improve surgery performances.
Week 2 - Storyboard
Leep Procedure
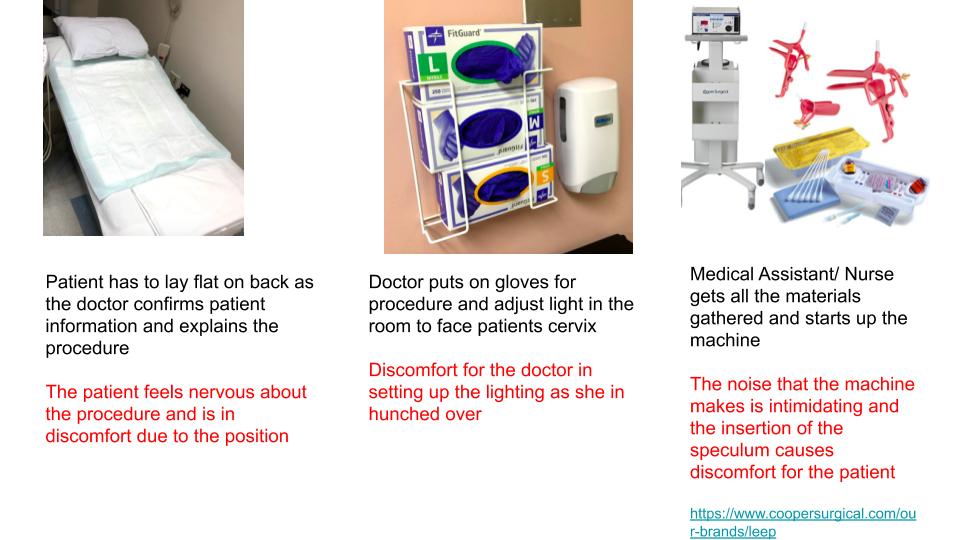
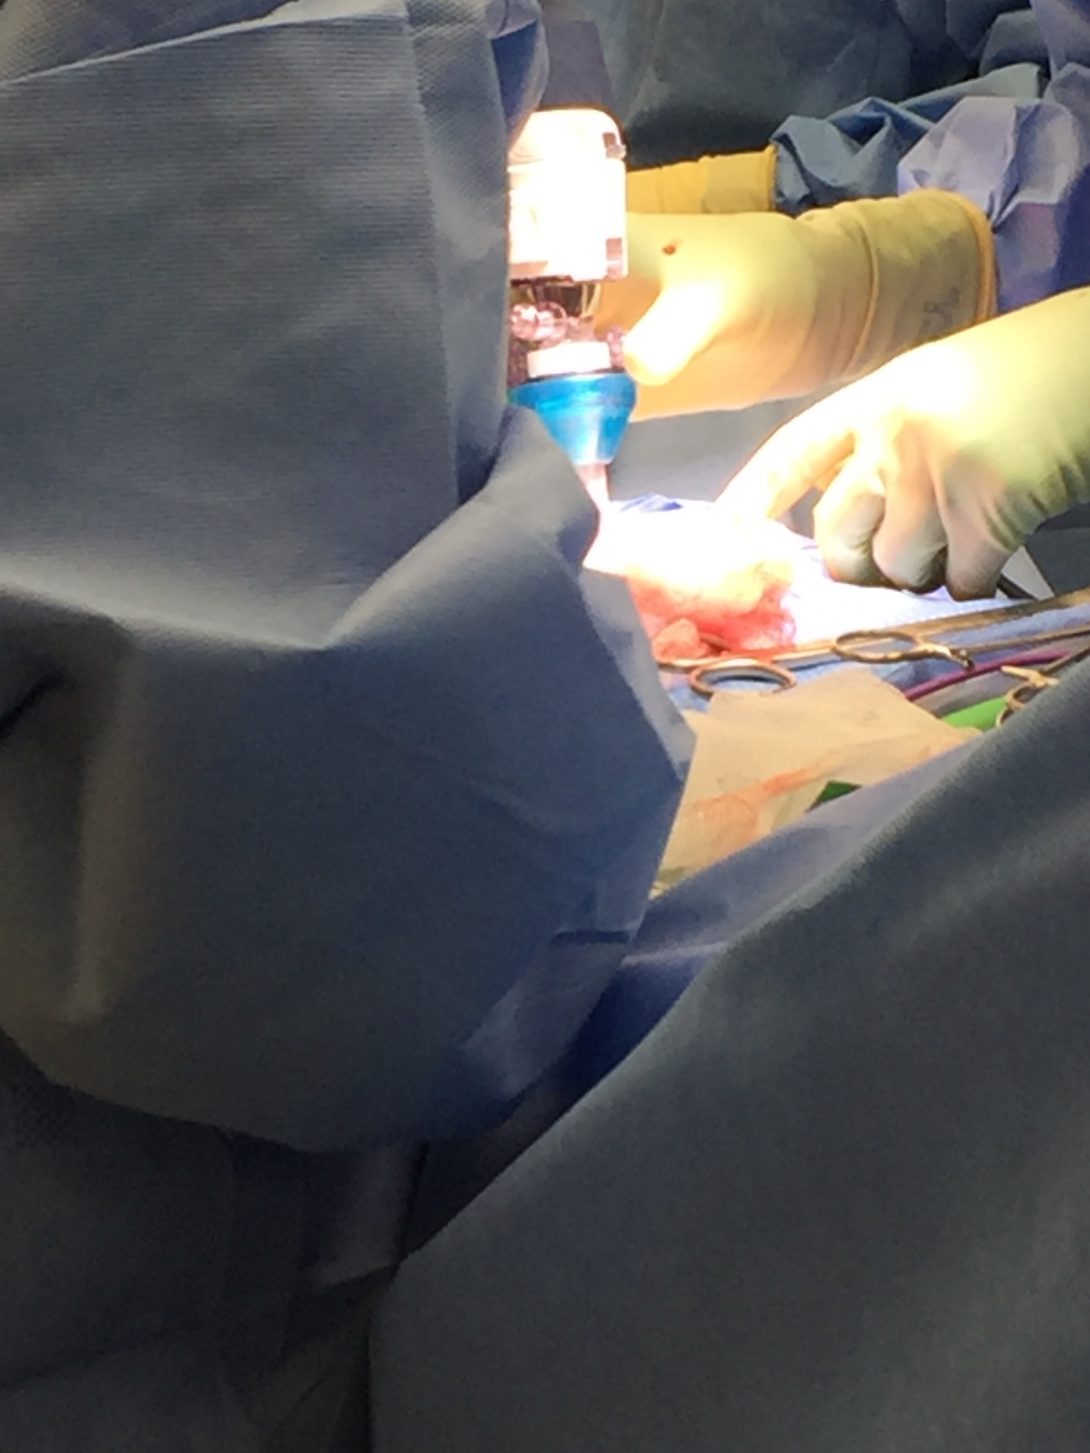
This week our team was tasked with breaking down a procedure we have observed during the week. The “break-down” of a process is known as a storyboard which allows us to identify pain points during certain procedures. This week I had the opportunity to see a LEEP which stands for Loop Electrosurgical Excision Procedure. The procedure is often done after an abnormal finding in a biopsy. The process involved many steps but I have created a simplified storyboard.
Week 2 - Storyboard
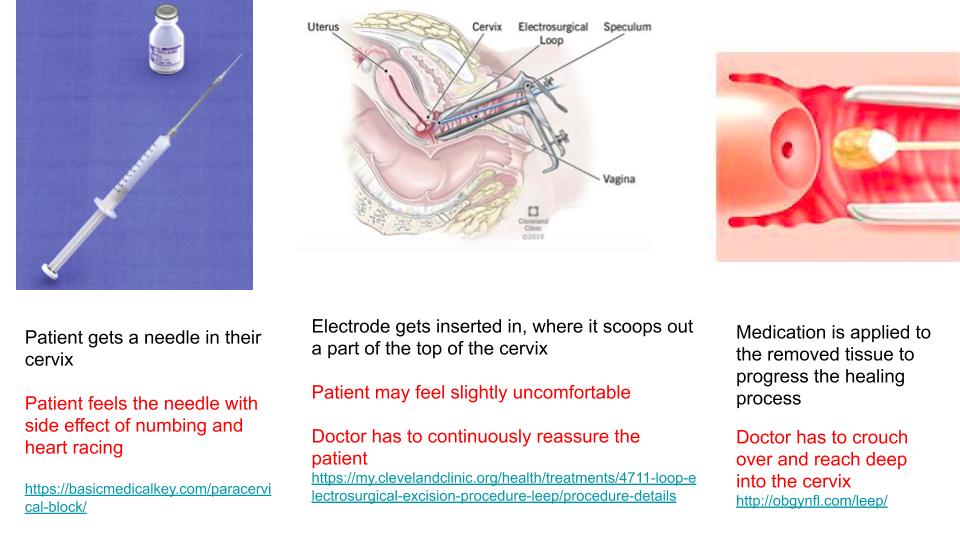
The doctor prior to using the tools also has to measure it to the patient’s cervix size.
Week 2 - Storyboard
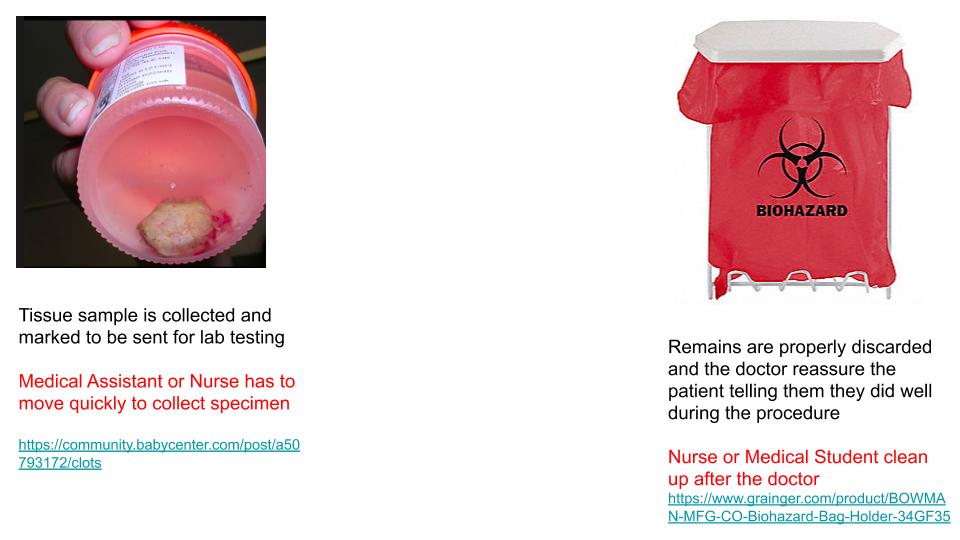
The Medical Assistant or Nurse is multi-tasking at this point as they are prepping the next collection of tissue sample while also labeling the current sample that is collected. At least three tissue samples were collected.
Week 3 - Need Statement
This week we learned about developing a need statement and what goes into creating them. A good need statement addresses a population and foreshadows an outcome. We also learned that the first need statement will not be perfect, rather as you do more research, the scope of your need statement should narrow to address a very specific case.
In our weeks at the hospital, an issue that I have seen is blood loss. Blood loss can be seen in both Gynecological Operation, Labor and Delivery, and Clinic Settings. I talked in more detail with a third-year medical student and a midwife about the importance of blood loss. Both mentioned and agreed that it is important because the quantity of blood loss determines the care a patient receives, such as a blood transfusion. The medical student mentioned that during vaginal birth if a woman loses more than 500 mL of blood it is a concern. During a C-section, a woman can lose 1,000 mL.
The midwife mentioned that there is no proper way to calculate blood loss. They either estimate how much gauzes they use or weigh the dry gauzes and then subtract from the weight of the wet gauze.
The first very broad need statement regarding this can be:
A way to address the estimation of blood loss in a pregnant patient
An improvement:
A way to better estimate blood loss in surgical and non-surgical procedures.
third times the charm:
How to better the quantification of blood loss during operative and non-operative procedure to better tailor post-operative care.
Week 4 - Product Requirement Definition and Design Criteria

This week we learned about Product Requirement Definition (PRD) and Design Criteria. The main difference between the two is one focuses on the qualitative aspects of designing while the other in quantitative.
Our need statement changed over the weeks to a topic we are more passionate about and our new focus is:
“A method to improve the interaction between the fetus and deaf pregnant individuals that increases maternal involvement in the prenatal experience.”
Keeping this in mind we are going to build a two-part device. One that is attached to the doppler with the purpose of listening to sound from the doppler. The second part will be held in the mother’s hand that will vibrate and light up to the sound coming out of the doppler.
The Design Criteria for the device is as follows:
Part 1: Microcontroller & Sound Sensor
- A hand-held device that the user holds
- A clip-on device to doppler that captures sound
- Uses Bluetooth technology to link the two devices
- Cost-effective
- Intuitive -easy on/off switch
- Easy-storage
- Easily Replaceable Battery – Battery Operated
- Visual Heart Rate (depending on the device)
Part 2: Led & Vibration
- A hand-held device that the user holds
- Uses Bluetooth technology to link the two devices
- Friendly appearance
- Cost-effective
- Intuitive -easy on/off switch
- Easy-storage
- Easily Replaceable Battery – Battery Operated
- The output is interactive via vibration and LED
- Visual Heart Rate (depending on device)
Week 4 - Product Requirement Definition and Design Criteria

The PRDs for the device is:
Part 1: Microcontroller & Sound Sensor
- External volume shall be 2.5”x3”x3”
- Housing shall be constructed of PLA and insulating Styrofoam that encompasses all parts besides the sound sensor
- Weight shall be under 2lb
- PLA housing shall attach to doppler around speaker via 2”x1” stick-on plastic velcro
- Bluetooth transmitter within circuitry shall transmit information to Part 2 receiver, which shall remain less than 10’ away
- Part 1 shall cost less than $75
- On/off switch shall be located on the external portion of the housing, shall be 0.5”x0.25”, binary, colored red, labeled, and associated with an LED to signal switch status.
- Can fit in a 5”x5”x5” storage container
- Device shall be operated by a rechargeable 5V battery pack
- Heart rate shall be displayed on a 3”x1.5” LCD display mounted on the external side of the housing.
Part 2: Led & Vibration
- Device shall be housed in a 4” width heart-shaped (non-anatomical) PLA box
- Device shall contain Bluetooth receiver that shall receive information from the transmitter in the Part 1 circuitry.
- Friendly appearance- red with a smiley face
- Device shall be under $15
- On/off switch shall be located on the external portion of the housing, shall be 0.5”x0.25”, binary, colored red, labeled, and associated with an LED to signal switch status.
- Can fit in a 5”x5”x5” storage container
- Device shall be operated by a rechargeable 3.7V battery pack
- The output is interactive via vibration(3V) and LED (1.6V)
Week 5 - Concepts Card

This week, we learned about concepts cards and the important role they play in visualizing an idea. This week our team created concepts cards based on the feature of our device we wished to incorporate into our final device. We started off by revisiting our needs statement:
A method to improve the interaction between the fetus and deaf pregnant individuals that increases maternal involvement in the prenatal experience.
By creating concept cards we learned that there were a lot of things we could do to improve the first-app created that only showed a visual display of the heart rate. One new idea that came to light this week was developing an app that will allow mothers to track the fetus heart rate and provide a community for other deaf patients with an open forum. The app will also feature many other components to allow easy access to the mothers to access information about the fetus during the different stages.
This week was also beneficial because our team conducted an interview with Danielle Miller, the Assistant Director for the Office of Access & Equity. By talking to her, we learned about the problems deaf patients face in hospital settings and what are the accommodations they receive. The feedback also made us realize what things to consider in finalizing the features of our device and how to plan for the future.
Jacob Gasienica
Jacob Gasienica
Year: Senior (BioE)
Area of Research: Urology
Contact Information:
jgasie3@uic.edu; jgasienica17@gmail.com
Jacob Gasienica Blog
May 15, 2019
First Day on the Job
Today was the first day on site. We tested…………
May 15, 2019
May 15, 2019
And the story continues as such…
May 17, 2019

Testing Day
As we continued out research on…..
June 28, 2019
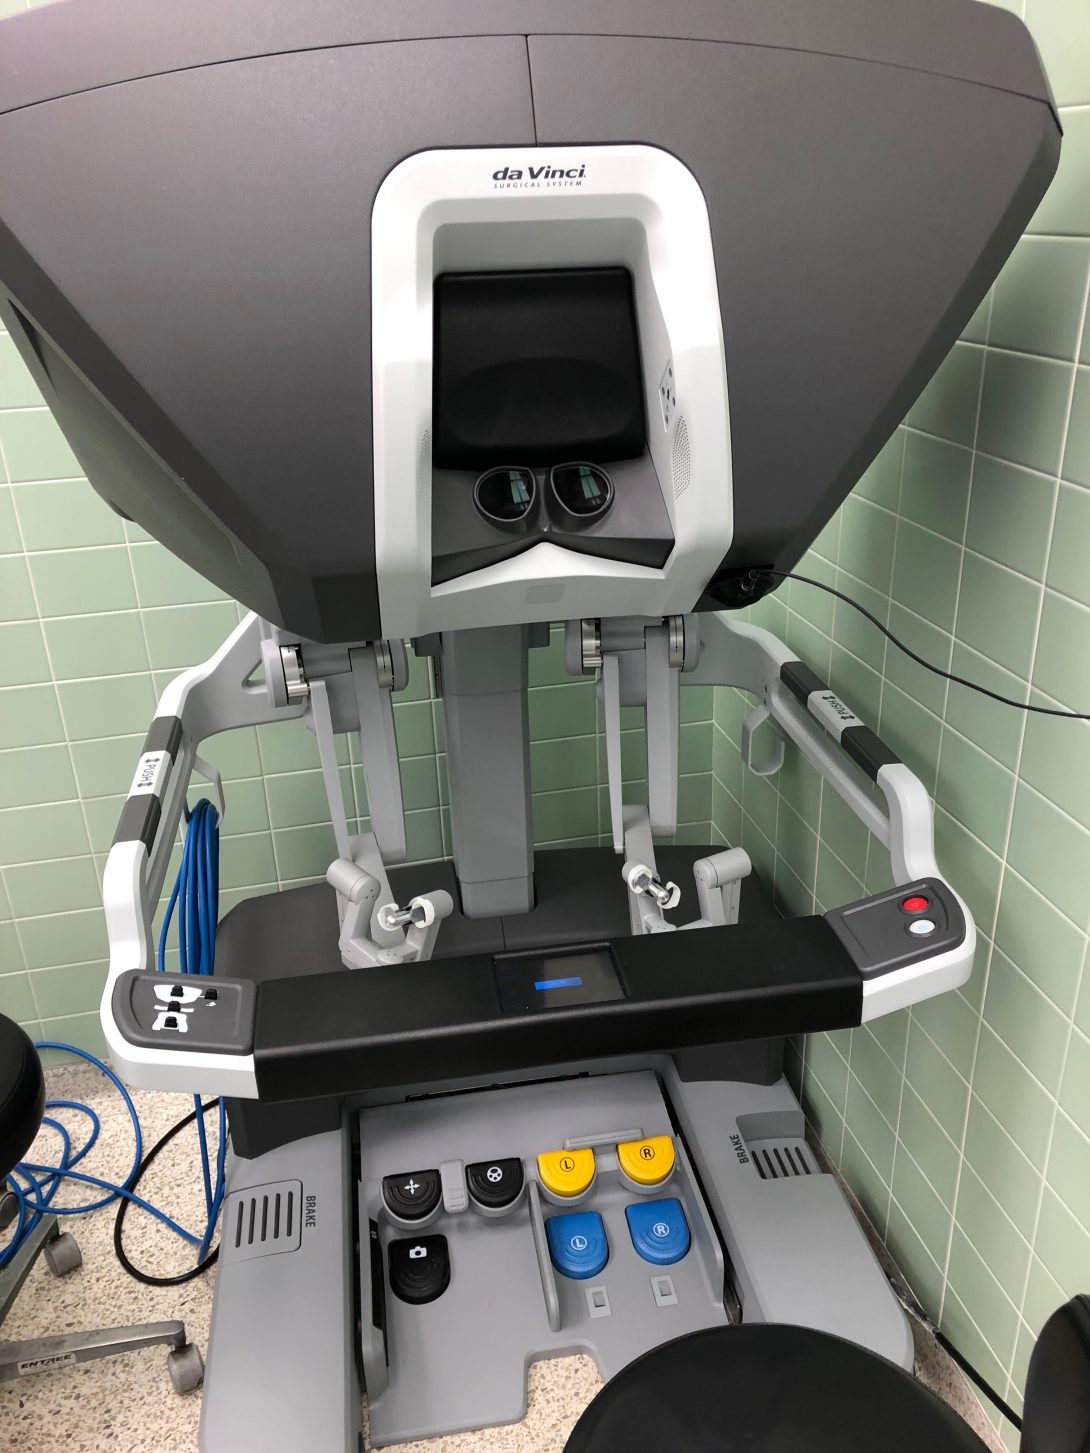
First week in Urology:
In my first week in the Urology Department, I was pleasantly surprised by how much I enjoyed observing in this field. I was also surprised by how much bioengineering innovation is utilized within the clinic and in the operating room. This department is highly adaptive to advances in bioengineering and technology and provides cutting-edge patient care.
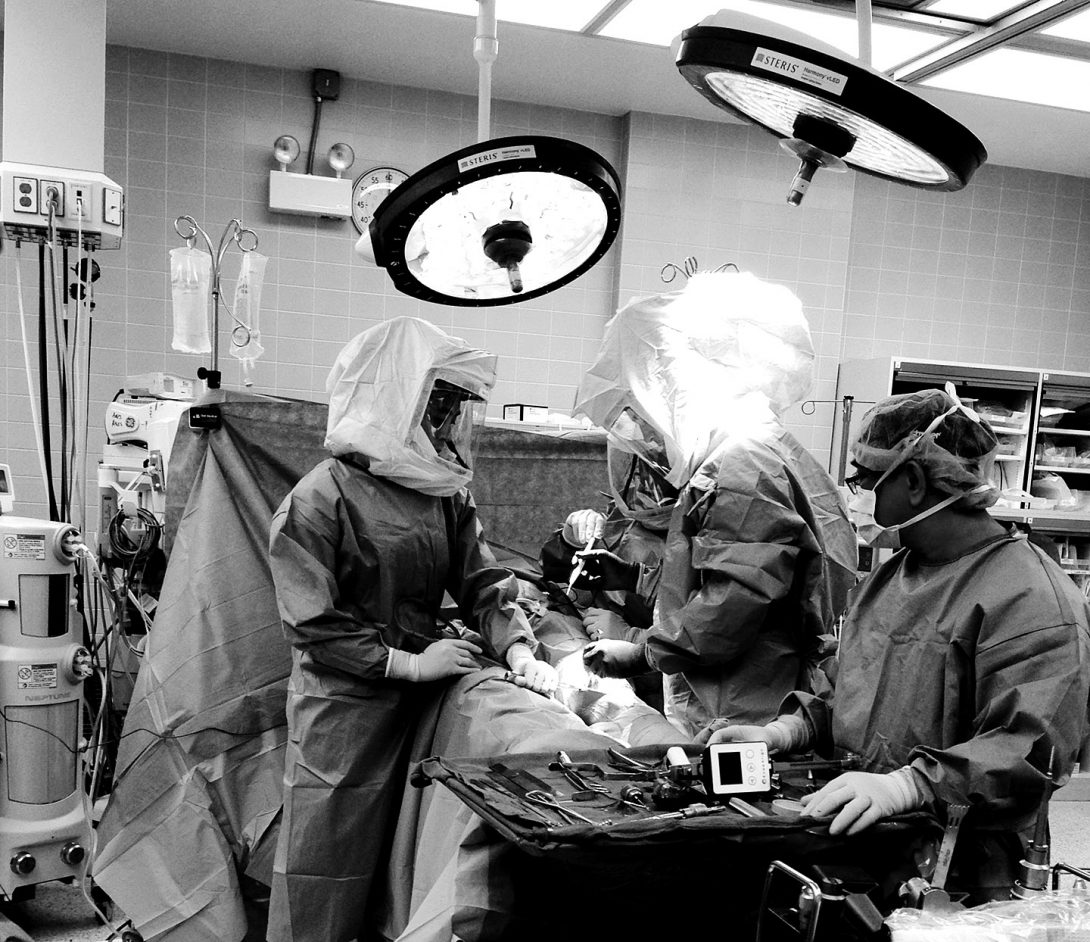
With regards to good engineering I observed during my rotations this week, a notable example would be the single port da Vinci robotic surgical system for performing a nephrectomy. The device requires a single incision through which a camera and three rotatable, exchangeable arms can enter the body to perform the operation. From a remote operating station (see the above image), the surgeon can control the robot to precisely make the incisions to detach the kidney. By exchanging the detachable arms of the robot, the robot can then also be used to bag the kidney; pulling the robot out of the incision, the surgeon could then grab the bag and pull the kidney through the same incision. This system allows for this complex operation to be performed without the need for an open surgery. In the hands of a trained surgeon, this system can be used to navigate around the body and make minimally-invasive precise changes. Drawbacks to this system include its price and the extensive training required to utilize it effectively. In all, this system is a bioengineering feat which greatly advances our surgical capabilities, specifically in urology.
A bad engineering example includes the biopsy gun utilized for transrectal ultrasound-guided prostate biopsy. This technique is used to screen for prostate cancer. Using the ultrasound probe, the prostate can be located and locally anesthetized. Through the probe, a biopsy gun can be inserted and is used to collected 12 samples. Thus far, this may seem like a well configured process; however, the issue presents itself in the noise produced by the biopsy gun. When a sample is collected, the spring-powered biopsy gun lets out a loud snap which a majority of time causes the patient to be startled. Even though they are anesthetized, the noise alone can cause significant distress for the patient. This has been known to lower patient satisfaction, and I noticed that their movement requires that the physician reposition the probe after each collection, taking additional time. The overall experience for both the physicians and the patients would be significantly improved by developing a quieter biopsy gun.
July 5, 2019
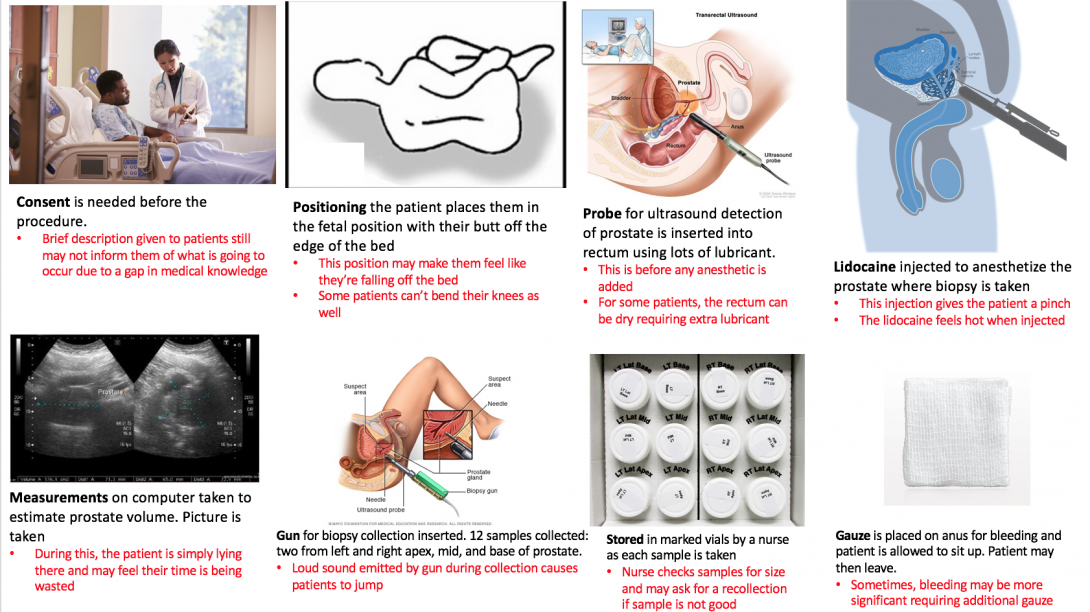
Storyboard for transrectal ultrasound-guided prostate biopsy
A transcrectal ultrasound-guided prostate biopsy is a procedure performed for random screening of the prostate for cancer. It is random as the samples are collected from 6 generalized locations on the prostate: left apex, left mid, left base, right apex, right mid, right base. In most cases, patients undergoing a prostate biopsy have already underwent a protein specific antigen test (PSA), a highly sensitive yet none-specific test which tells the physician something might be going on with the patient’s prostate. The three most common causes for a heightened PSA is 1) an enlarged prostate due to aging 2) a prostate infection or 3) prostate cancer. In order to eliminate prostate cancer as the cause of the high PSA, this random prostate biopsy is performed. The samples collected are sent to the lab where they are analyzed specifically for the presence of cancer.
July 5, 2019
Sources for images from left to right:
- https://formfast.com/top-6-reasons-healthcare-organizations-should-automate-the-informed-consent-process/
- https://www.researchgate.net/figure/Patient-positioning-1-Left-lateral-position-patient-on-his-left-side-with-legs-flexed_fig3_244989280
- https://www.cancer.gov/publications/dictionaries/cancer-terms/def/endorectal-ultrasound
- http://www.procure.ca/en/2018/06/28/scared-stiff-prostate-biopsy/
- https://www.researchgate.net/figure/Dimensions-used-to-measure-prostate-volume-by-trans-abdominal-ultrasound_fig8_291748115
- https://www.mayoclinic.org/tests-procedures/prostate-biopsy/about/pac-20384734
- https://www.dpmginc.com/supply-orders/
- https://www.qosmedix.com/intrinsics-4-ply-gauze-pad-93301
July 12, 2019
Forming a need statement
This week, the major focus was writing tentative needs statements from which the scope of our observation in clinic could be focused. Below are three iterations of a need statement relating to the transrectal ultrasound-guided prostate biopsy procedure performed with patients suspected to have bladder cancer. With all changes made through this iterative process, the rationale for the changes made are provided.
1. A device to obtain a prostate biopsy sample in patients suspected to have prostate cancer that increases patient satisfaction with the procedure.
2. A method to obtain a prostate biopsy sample in patients suspected to have prostate cancer that increases patient satisfaction and compliance with the prostate biopsy collection process.
• “Device” was changed to “method” to be more all-encompassing. Rather than changing the device for the sample collection, perhaps a change is required for the more general process of prostate biopsy. Also “compliance” was added as it is an important outcome that patients come in for their biopsy in order to screen for prostate cancer.
3. A method to obtain prostate biopsy samples in patients whose PSA test result is greater than 4 that increases patient satisfaction and compliance with the prostate biopsy collection process.
• “Sample” was changed to “samples” to allow for the possible case in which multiple biopsy samples are acquired simultaneously. Also “patients suspected of prostate cancer” was changed to “patients whose PSA test result is greater than 4” to narrow the population of interest.
July 19, 2019
Analyzing the need
This week, we were majorly tasked with analyzed our selected need, the transrectal prostate biopsy gun, and develop criteria for a solution concept to fulfill. This criteria took the form of product requirement definitions (PRDs) which we wrote as quantitative metrics by which our device can be constrained. We then used these criteria to refine some brainstorming. The PRDs provide a filter through which ideas which were generated during brainstorming can be refined. Below are the PRDs which were written for this need:
- The device shall be used for prostate biopsy.
- The device shall be used in clinic on patients who have a PSA over 4.
- The device shall collect biopsy cores one at a time.
- Each region collection (RA, RM, etc.) shall take at most one minute.
- The device shall be operable by one physician.
- The device shall fit within a 5000 cm^3 volume, excluding the length of any needles.
- The device shall be spring-loaded but also contain an electrical power source in the form of a battery.
- Any electrical source (ie. battery) shall last at least 2 hours.
- The device body shall be plastic and any needles shall be metal.
- The device shall be no louder than 50 dB.
- The device shall cause patient to lose no more than 5 cc blood.
- The device shall weigh no more than 1000 g.
- The device should allow concurrent use of a transrectal ultrasound transducer.
Utilizing these criteria as a filter, our initial ideas from brainstorming were refined down to an enhanced biopsy gun used concurrently with ultrasound. The actual mechanism and specifics by which the gun operates were a major point of brainstorming. We considered spring-powering, electrically powering, or magnetically powering the biopsy mechanism. We also have considered methods of loading vials directly into the gun itself so that a core can be stored immediately following its collection, requiring less personnel to perform this collection. We thought of the use of padding or some form of gel to prevent the sound from going over 50 dB for each core collection. We also considered several mechanisms for allowing the physician to cock the biopsy gun with one hand which allows him or her to maintain the other hand on the ultrasound probe. This could be a sort of hammer mechanism which the physician could reach with a thumb. Altogether, the PRDs we developed led us to think that the best concept would be a reiteration on the current biopsy gun procedure used, improving the major flaws we found with the current standard.
July 26, 2019
Conceptualizing a better prostate biopsy
Last week, our team had mulled over the many needs we found during our time observing in the Urology clinic and OR at UI Hospital. Ultimately, we decided that the most impactful and tractable need was the transrectal ultrasound-guided prostate biopsy procedure.
While developing the criteria and specifications for our improved concept, three major areas in need of improvement became clear: the sound of the device, the ergonomics/ease of physician use, and the speed with which the device can complete the procedure.
Our subsequent conceptualization focuses on these three areas, and we developed crude concepts to address each. Firstly, upon further investigation of a biopsy gun that is currently used in the hospital, we discovered that the loud sound was a product of two plastic components coming into contact when the gun was fired. Therefore, the simplest concept was to place some sort of shock-absorbing material between these components to mitigate the sound. Secondly, using the insights of several urologists, we determined that the rotating mechanism used to currently ready the gun for firing was ill-suited to a physician wearing latex gloves covered in lubricant. Thus, we propose a pull or cocking mechanism which should allow the physician to more easily and swiftly ready the biopsy gun. Lastly, I had noticed that with each biopsy core collected, the gun had to be removed from the patient so that the core could be stored in a vial. This procedure necessitates the collection of 12 cores; therefore, it is easy to see how this constant removal and replacement delays the end of the procedure. We conceptualized a method to quickly extract the core sample once it is acquired such that the biopsy gun can be left inside the patient and more quickly collect all samples.
We then scheduled a meeting with a urologist mentor, to present our concepts and receive feedback. He advised us to focus on prototyping one of the aforementioned concepts due to the limited time frame of this program. He went on to say that the issue of sound was the most inviting area for us to prototype. Taking his advice, we did just that. We had two biopsy guns with which to conduct simple experiments to prove our concept. One biopsy gun was left intact and served as our control. Using a decibel-measuring application, over several trials, we determined the original biopsy gun to emit sound at an average of 106 dB. Using a soldering iron, we were able to melt and remove a panel on our test biopsy gun to reveal the two plastic components which were making contact and emitting the sound. In the sparse materials we had available to us, we found some foam, which we preceded to place between the two plastic components. We then ran several more trials and determined the padded gun to emit sound at an average of 96 dB. Thus, with just the miscellaneous materials we could acquire, we were able to reduce the sound emitted by an order of magnitude. Reiterations of this design utilizing viscoelastic materials in the place of the foam should be even better able to mitigate the sound.
While this was simply a proof-of-concept, a final prototype would need to be changed further to maintain the mechanics of the biopsy gun itself. As we are effectively shortening the firing chamber with our padding material, a final prototype would either require this chamber to be lengthened or the needle itself to be lengthened. The amount of length required would be equivalent to the width of the padding placed in the device.
Below are images showing our initial concept images. The second set of images depict the inner mechanics of the prostate biopsy gun, as well as the altered gun.
Image: Concept Card Quieter
July 26, 2019
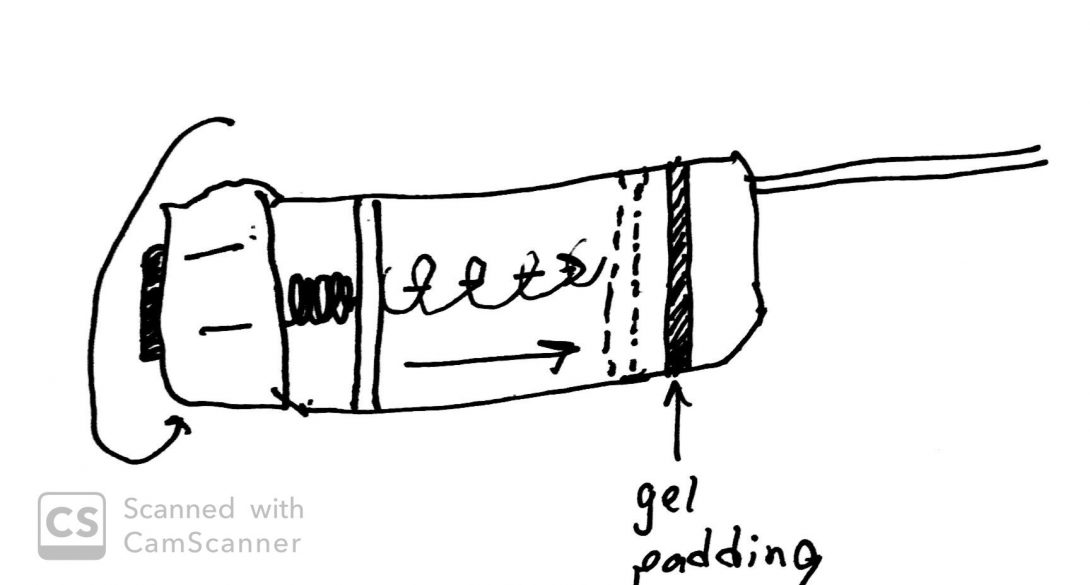
Concept for improving sound characteristics of the biopsy gun
Concept Card Ergonomics
July 26, 2019
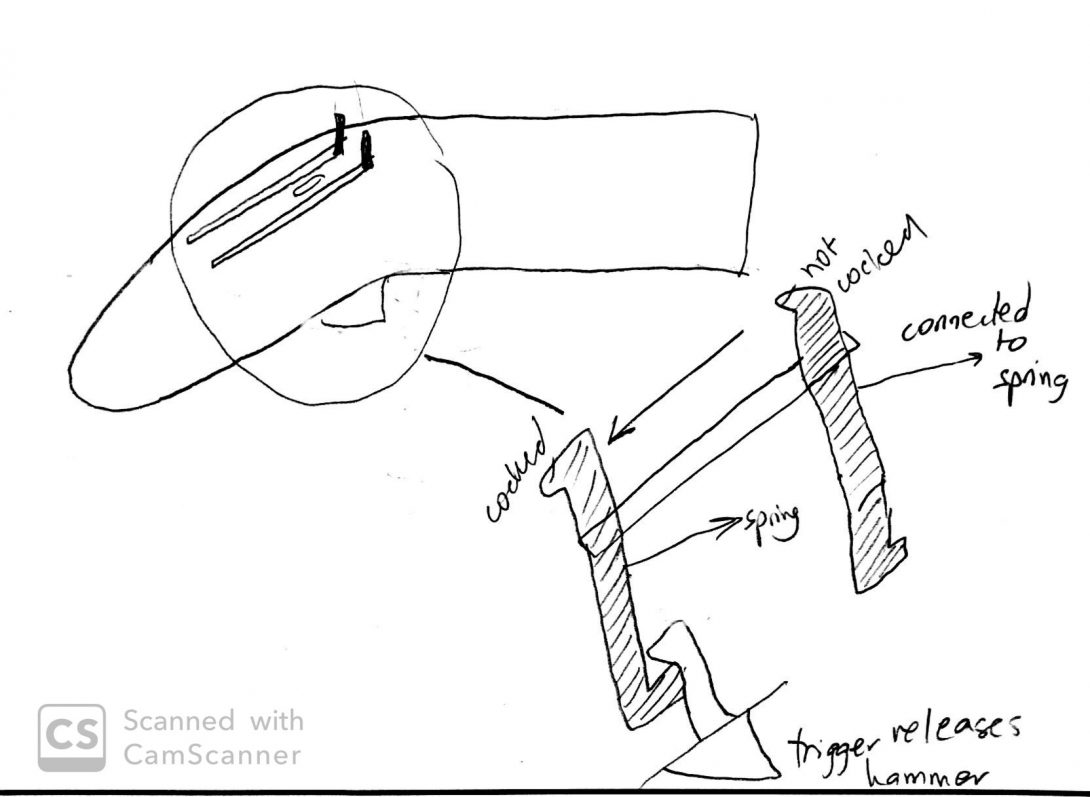
Concept for improving physician’s ease of use of the biopsy gun
Concept Cards: Speed
July 26, 2019
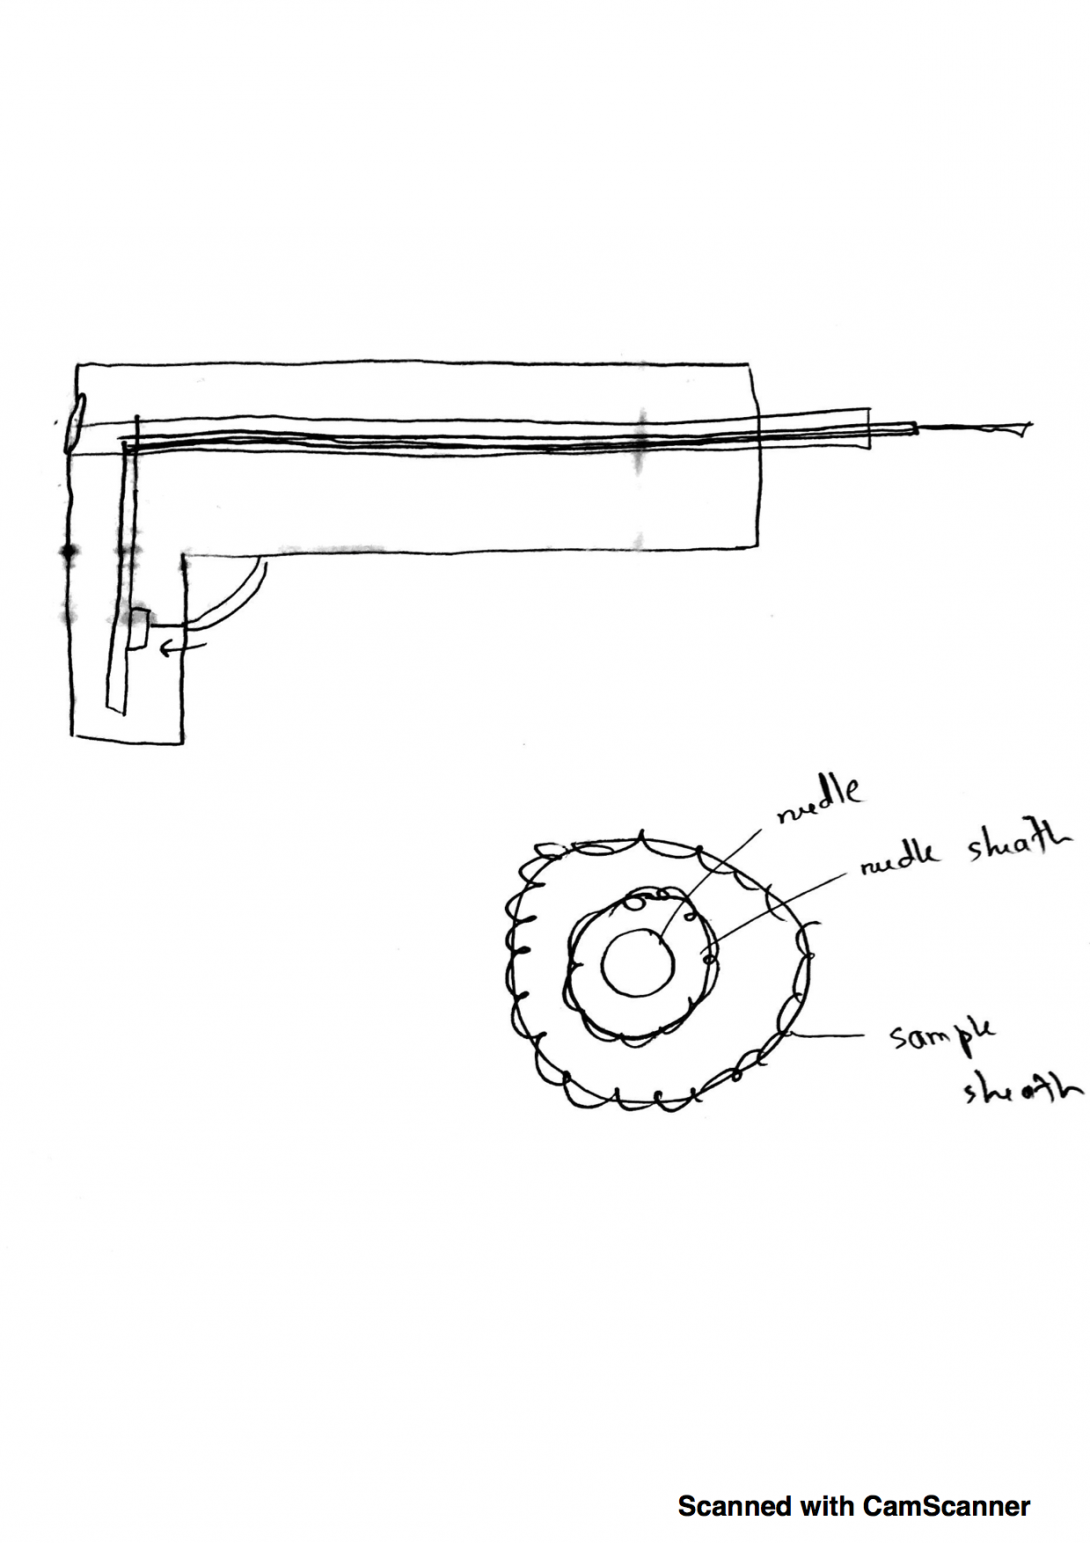
Concept for improving the speed with which the biopsy gun can acquire samples
July 26, 2019
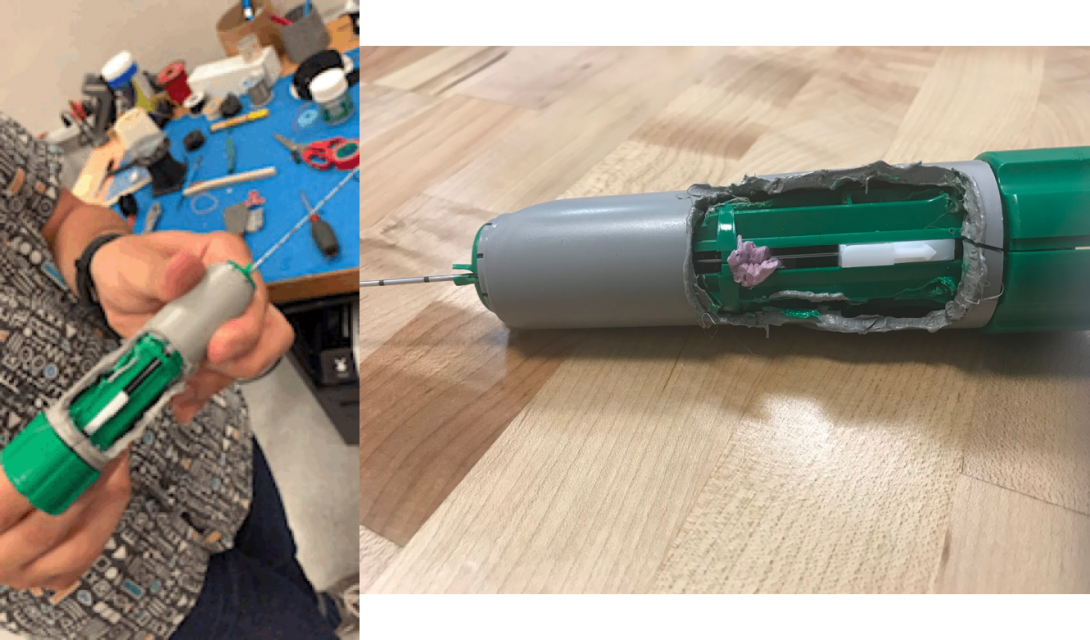
The inner mechanics of the biopsy gun revealed (left) and the addition of foam to mitigate escape of sound
Jailene Silveri

Jailene Silveri
Jailene is native Illinoian born in Chicago but raised in small town Channahon. She is a 4th year UIC undergraduate student pursuing a Bachelor of Science in Bioengineering with a concentration in Neural Engineering, all in preparation to receive a Master’s in Bioinformatics at UIC in the near future. Jailene enjoys drawing realism, hiking, rock climbing, weightlifting, and eating good food.
As of now, Jailene conducts research with Dr. Hetling, UIC Associate Professor & Director of Bioengineering Undergraduate Studies, at the Neural Engineering Vision Laboratory (NEVL), assessing the application of therapeutic hypothermia to reduce retinal ischemia following traumatic injury to the eyes.
During the extent of the Clinical Immersion Program, Jailene will be participating in the Pulmonary Critical Care Unit.
Year: 2021
Area of Research: Neural Engineering and Bioinformatics
Contact Information:
jsilve2@uic.edu (Email)
Jailene Silveri LinkedIn (Professional Profile)
Jailene Silveri Blog
July 1, 2019: Good and Bad Designs
Embarking on a New Journey
Over the course of this first week, I encountered another world hidden behind concrete walls, overwhelmed with chatter, buzzes and bings, and clanking footsteps. Fortunately, I had only visited the hospital a few times in the past for personal appointments or to see a beloved; however, I had never wandered past the wide, clear doors embellished with the words “Restricted Access.”
On Tuesday, Dr. Dudek, Chief of the Pulmonary Critical Care Department, introduced himself and provided a brief (roughly 2-hour-long) discussion pertaining to the complications he had encountered within the hospital. It was a bit funny to all of us at first, considering that Dr. Felder explicitly told us that the doctors had been informed to guide the students instead of spoon feed them solutions, but the conversation delivered an insightful perspective as to what we would be dealing with during these 6 weeks. After the meeting, we were left to venture on our own to meet the attending physicians, fellows, and nurses buzzing around the MICU (Medical Intensive Care Unit). Within the entire week, we had tentatively made our way into the MICU, Outpatient Care Clinic, Sleep Center Clinic, and Pulmonary Function Testing (PFT) Lab.
Good Design: In the Outpatient Care Center, most of the patients admitted have some variation of Chronic Obstructive Pulmonary Disease (COPD) or asthma. Essentially, patients struggle to either exhale or inhale the air within their lungs, respectively. As you walk through the hallways, you will see a variety of posters pinned up for the patients to learn about what respiratory treatments may work well for them. The posters are formatted to preview the most common and popular medications, noting the brand and type of delivery system for each, in color categorization. Likewise, large diagrams demonstrating the general strategy utilized to properly operate these delivery systems were scattered along the walls as well.
Bad Design: In the MICU, residents lug around this large, cumbersome work station on wheels (WOW). The primary function of these mobile units is to electronically access patient medical records and display pertinent exams or charts for the attending physician to review. Honestly, the implementation of this cart is pretty impressive. However, it’s clunky and, at times, obsolete, considering that the operator of the machine must swivel the station around for the rest of the team to see the displays. Moreover, nothing regulates the foot traffic that crowds the MICU, so maneuvering large devices and machineries will only further the present overcrowding.
In short, this summary presents only a fragment of good and bad designs implemented within the clinical setting. But for now, we’ll see what I can observe and absorb within week 2!
July 8, 2019: Storyboarding
Tales of a Little Spirometry Test
Spirometry Test: This procedure measures the amount (volume) of air and speed in which you can move air into (inspiration) and out (expiration) of your lungs. While the measurements are taken, a graph visually displays the results. From this graph, doctor may diagnose pulmonary diseases depending on certain abnormal patterns.
During the first and second weeks of observing the Outpatient Care (OC) Clinic and Pulmonary Function Testing (PFT) Lab, all of us were fortunate enough to witness spirometry tests. At the OC, the spirometry tests were given through a small hand held device versus at the PFT Lab, the spirometry test performed consisted of larger equipment with more advanced capabilities to measure lung capacity.
The following storyboard provides an account of our very own student (Colin, BIOE) performing a spirometry test.
Step 1: Greeting the Patient and Procedure Briefing
July 8, 2019: Storyboarding
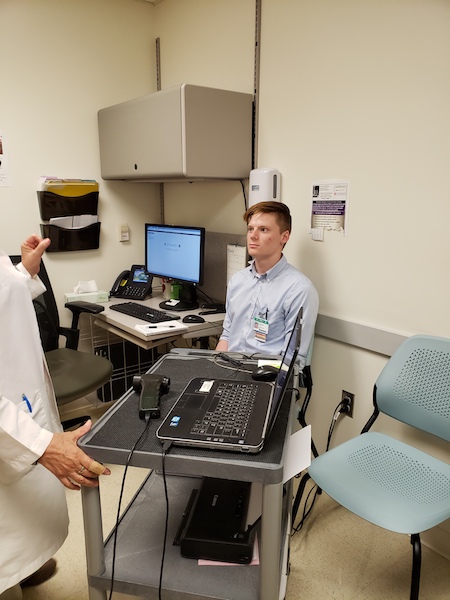
Step 2: Prepping the patient
July 8, 2019: Storyboarding
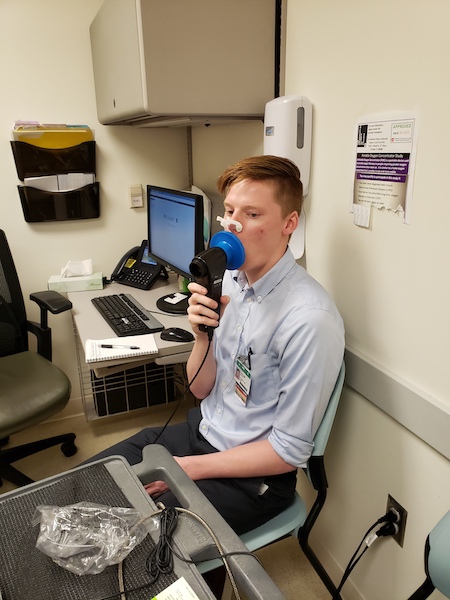
Step 3: Normal Breathing
July 8, 2019: Storyboarding
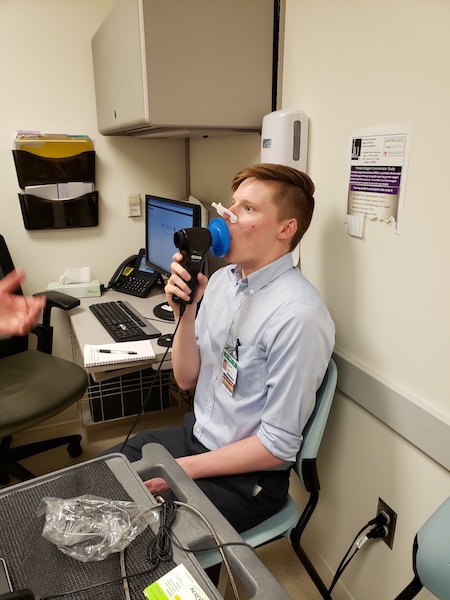
Step 4: Quick Inspiration, Rapid Expiration
July 8, 2019: Storyboarding
![After 2 seconds of inspiration, patient is asked to “blast it [air inhaled] out” as hard as he can.](https://clinicalimmersion.uic.edu/wp-content/uploads/sites/419/2019/07/fourim.jpg)
Step 5: Maximum Expulsion of Air
July 8, 2019: Storyboarding
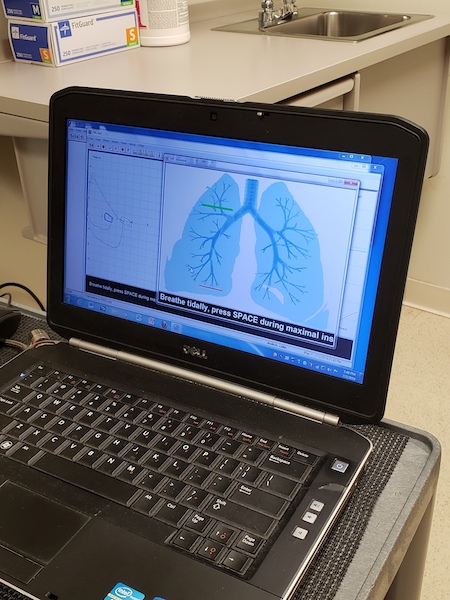
Step 6: Immediate Results
July 8, 2019: Storyboarding
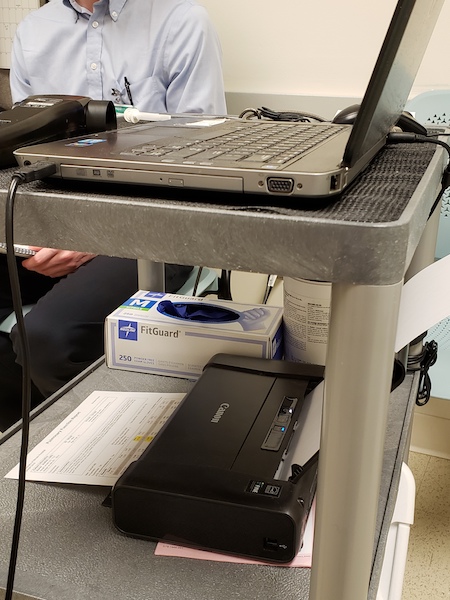
Diagnosis utilizing following flow curves:
July 8, 2019: Storyboarding
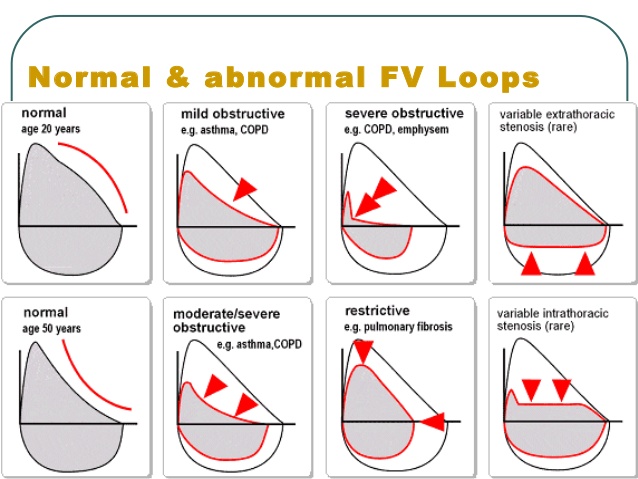
Take home: Although this procedure is non-invasive, many of the patients, especially those suffering from Chronic Obstructive Pulmonary Disease (COPD) or asthma, may feel exhaustion accompanied with lightheadedness. In the past, some patients have passed out from their efforts. Consequentially, the nurse/technician would have to administer “smelling salts.” Thus, this method may prohibit the effectiveness of the test and attaining adequate measurements.
July 15, 2019: Needs Statements
In Need of a Need
Although working within the Pulmonary Critical Care Unit has been quite educational, our group has been scavenging the ICU hallways for potential project leads. To be honest, most of the problems we have targeted have already been solved simply by the means of money. At UIC, some of the equipment demonstrating low performance can easily be replaced by more advanced technology, yet the budget set out to acquire these new toys seemingly shrinks more and more each day, rendering innovation impossible.
So, we took a step back to re-evaluate what produced the highest hanging fruit for us to dissect and analyze. None of the procedures we observed at the ICU were up for a face-lift, but at the Sleep Center Clinic, we had one project worthy of renovation: the CPAP and BiPAP machine customizability.
1st Iteration: A method to administer adjustable non-invasive ventilation to treat individuals suffering Obstructive Sleep Apnea
- “non-invasive ventilation” is rather ambiguous, as there are many forms of ventilation prescribed for treatment
- Problem: OSA patients need breathing support–>Already an identified problem. This need can be refined
- Target population: individuals suffering from Obstructive Sleep Apnea
- Outcome: none
- This iteration needs to focus a bit more on the patients’ needs and focus on a delivery system that ensures a positive patient experience
2nd Iteration: A customizable mask designed to timely dispense gradual increments of positive airway pressure to treat individuals suffering from Obstructive Sleep Apnea and to promote patient-compliancy
- “customizable mask” pigeon-holes us into approaching this need by one method: through a mask
- Problem: in this case, a mask that can ramp up airway pressure at pre-determined times–> This idea has already been proposed and has failed many individuals
- Target population: individuals suffering from Obstructive Sleep Apnea
- Outcome: patient compliancy with method–> No consideration for comfort or quality of treatment/patient experience
3rd Iteration: A method that affords customizability for patients with Obstructive Sleep Apnea designed to gauge patient sleep patterns and auto-adjust gradual increments of positive airway pressure ventilation to promote user-comfort and compliance during sleep cycle
- Although the syntax of this statement may be altered, this iteration does not pigeon-hole us into one proposed solution
- Problem: patients need something that can be customized to accommodate differences in facial/bodily proportions and something that can take feedback from their bodies to provide sufficient treatment
- Target population: individuals suffering from Obstructive Sleep Apnea
- Outcome: patients can feel more comfortable while sleeping, promoting user-compliance with such method
July 22, 2019: Prototype Requirement Definition
Defining Our Constraints
This past week had a lot in store for us to do. We were done framing the foundation to construct our project for the upcoming weeks and quickly transitioned into the analysis phase of this six-week journey. During weeks 3 and 4, we focused on Bronchoscopies, Thoracenteses, and the compliance rates for CPAP (Constant Positive Air Pressure) machine; yet, after hours of evaluation, we decided that the CPAP machine provided the highest hanging fruit in regards to our skill level as a team and the amount of time remaining to complete the prototyping segment of this program. Thus, our new agenda consisted of brainstorming, identifying the constraints of our project, and formulating the requirements outlined for our prototype.
At first, I presumed this would be second-nature since we had already spent weeks recognizing needs in hopes to attain a purposeful solution. However, after refining our Prototype Requirement Definition (PRD), we quickly realized how oblivious we were to certain aspects pertaining to patient care and the prototype’s clinical practicality. Most of our conceived “solutions” had already been in practice or were under review. So, we either had to completely reinvent treatment for Obstructive Sleep Apnea or modify the current technology to an extent in which no other competitor within the market could offer our version of precision medicine.
To start, we spent hours researching and collecting evidence needed to craft a list of our prototype’s requirements, characteristics, function, and features. The final prototype would consist of a wedge pillow with elevation capabilities and a CPAP machine capable of adjusting to real-time feedback from a third component.
Written below is the performance requirements and characteristics envisioned for our prototype system:
- The solution needs to be comfortable and should not contribute to patient irritability –> such as nasal inflammation, mouth dryness, skin irritation from abrasive surfaces
- The solution needs to work throughout the entire sleep cycle –> no systematic errors or temporary shut-downs, needs to administer continuous treatment
- The solution needs to improve sleep quality –> ensuring full progression of 90-minute sleep cycles without disruptions
- The solution needs to be customizable for each patient –> compatible with facial/bodily proportions and capable of adjusting to doctor’s prescribed settings and patient’s ideal sleeping conditions
- The solution needs to function at the patient’s home –> or where the patient currently resides
- The solution needs to be safe to use –> no tangled wires/cords/hoses, clean and smooth apparatus avoiding pinching/cutting of the skin, causing no hazardous obstacles for non-users
- The solution needs to work better than current CPAP machines –> compliance rates need to be >50%
Lastly, our features and functions for the Prototype Requirement Definition (PRD) consists of the following:
The CPAP system is intended to treat patients with Obstructive Sleep Apnea, however, incorporates a methodical approach to reducing discomfort during treatment and increasing the compliance rates of the CPAP machine. The system will include a wedge pillow that comfortably suits the trunk of each patient and slowly adjusts in elevation during the span of one’s sleep session, a wearable technology measuring a patient’s vitals to analyze stages of sleep, and a modified CPAP machine capable of modulating pressure changes based on feedback from the wearable. Under this apparatus, treatment will be tailored to each patient’s experience and preferences to effectively promote comfort during the process of falling asleep.
This system must “ramp-up” pressure settings as a patient falls asleep, detect when a patient is awake to shut off or reduce airflow, monitor heart-rate, respirations and movement, and elevate an individual to open their airway and reduce intensity of CPAP machine.
July 29, 2019: Concept Cards
Envisioning Our Prototype
During these last few days conceptualizing and prototyping, I realized how extraordinarily beneficial concept cards have been in facilitating one’s thought process. I am an extremely visual learner who prefers audio over written descriptions to complement images and diagrams. Honestly, I spent a majority of this program watching videos that explained the anatomy and physiology of the lungs after we had finished clinical rotations because I was consumed with understanding everything that occurred beneath the skin. For my teammates, it had been easier for them to simply discuss their ideas, but I needed to draw images so that these concepts could become tangible in my mind.
After practicing these rough sketches, I began to flesh out my thoughts and create new questions that needed to be answered before I could validate a design. Yet again, we needed to revisit the clinics to confirm the specifications for our prototype. Once we were done communicating with the physicians and technologists, we briefly re-entered the concept generation phase. However, this time, we spent a few hours drawing out our ideas and delivering a so called “elevator speech” about our concepts to each other, emphasizing the needs being addressed and the project’s viability.
All in all, this projected us forward in finalizing the details of our prototype. It’s easy to simply communicate a lavish idea with words, but to take that verbatim and actually transform it into a physical object was much more difficult than we had predicted. These handheld cards could demonstrate the objective of the project, benefits, and drawbacks in an effortless, simple manner, allowing the audience to understand a summary of your thought process immediately.
Agata Bogdanowicz
Agata Bogdanowicz
Basic Information about Student (Small Background introduction)
I am thrilled to be part of the Clinical Immersion Program this summer and see first-hand the valuable dynamic between clinical observation and engineering. Having a particular interest in medical devices, I feel that there is no better way to learn about their design and development stages, as well as how they can be improved, than to observe the interactions that healthcare professionals have with them, specifically in the GI/Liver Department. Not only that, but by being a ‘fly on the wall’ and observing clinical operations and workflow, my team will have the opportunity to hopefully improve the efficiency of the overall work environment and therefore the quality of patient care.
I am currently in my final year as an undergraduate student looking to pursue a career in the medical device industry upon graduation. Being interested in the technical aspects of medical instruments and hardware, I have also picked up a minor in Electrical Engineering that I am hoping I can put to good use during this program. During my free time I am heavily involved with Biomedical Engineering Society as its current President and work as a Pharmacy Technician, not to mention enjoy hanging out with friends and family, going to concerts, and spending time exploring Chicago and its many coffee shops.
Year: Senior Undergraduate Bioengineering Student
Area of Research: Medical Devices & Bioinstrumentation
Department: Gastroenterology & Hepatology
Contact Information: abogda7@uic.edu
Agata Bogdanowicz Blog
Week 1: Good & Bad Designs
A Lot to Digest
This first week of clinical shadowing proved to me that I have a lot to see and even more to learn. With each day bringing new procedures, new patient interactions and new engineering problems to dwell on, my first days were a culmination of confusion and amazement. I have quickly come to see that GI/Hepatology are much more complex branches of medicine than previously thought that examine the intricate symphony between various organs and what repercussions follow if these systems encounter disease or complications. More specifically, I have realized the immense value of this specialty after seeing routine colonoscopy screenings turn into urgent polypectomies, the importance of endoscopic procedures like EGDs and ERCPs and their role in the diagnosis of conditions such as ulcerative colitis and Crohn’s Disease, as well as the imperative interplay between medical instruments like scopes and the sophisticated techniques employed when using them to get optimal results. Being present in the clinic and viewing procedures has also opened my eyes to the significance of patient-physician communication, patient education, and how even the communication between physicians from various departments can impact patient outcomes. Despite a hefty load of medical jargon to digest, I am grateful that our assigned team of doctors has taken the time to expose us to various procedures like esophageal dilation, EVL, pouchoscopies, as well as the repositioning of colonic stents and has played an active role in teaching us about what is happening as we observe.
Although only a few days into the program, so far my time in the clinic and scoping lab has been nothing but thought-provoking and has led me to identify a number of potential issues and areas for improvement, some more straightforward to fix than others. From an engineering perspective, my group has utilized the AEIOU concept which involves evaluation of activities, environment, interactions, objects and users to begin organizing and framing our observations. This structure will lead us to successfully integrate user-centered design principles to develop solutions to such problems. Preliminary assessments in our experience have revealed good and bad designs all throughout the AEIOU framework.
Bad Design Characteristics: After a discussion with one physician, it was mentioned that Gastroenterologists are especially prone to developing conditions like carpel tunnel and tendonitis in their hands due to extensive and repetitive turning and twisting of dials and knobs. This issue indicates poor ergonomics and designs of common scopes which can be improved by simply paying closer attention to how they are held and modifying their features. We also noticed that inefficient scope designs can easily lead to obstructions consequently limiting the field of vision of the user. Another problem we encountered time and time again was the cable-tangling fiasco. Not only were wires exposed on the ground, a potential tripping hazard in a small space, but were also tangled on patients. This was especially noticeable after a patient was being repositioned and proceeded to say “something just got unplugged from my arm”. Although this may be a complicated issue to fix it is still problematic and can cause major issues for hospital staff during patient transport, procedure organization and even staff safety. Furthermore, we also noticed that procedure rooms are relatively small for the amount of equipment, supplies and individuals that are inside at a time. During a procedure, it took the nurse almost two minutes to walk over, locate and prepare an instrument simply because she had limited space to do so.
Good Design Characteristics: Observations have also confirmed that the overall workflow of UI Health is both sophisticated, thorough, and incredibly efficient. Prior to each procedure the team takes a “time out” to confirm each patient and fills them in on what exactly is going to happen. The software that the department employs to organize patients is also very explicit in detailing what room the procedure is in, the operating physician, what procedure is taking place and whether it has started, where the patient is currently located, as well as implementing color coding to specify if the patient is entirely ready. In addition, scope sanitation procedures are also very meticulous and extensive to ensure risk of contamination and infection are minimized.
Week 2: Procedure Storyboard
Endoscopic Ultrasound (EUS)
Fiducial Marker Placement Procedure
Procedure Background: Endoscopic Ultrasounds are minimally invasive advanced procedures that combine detailed imaging techniques of endoscopies with ultrasound capabilities. Using this method, a delivery system similar to a biopsy needle places small inert metallic markers termed ‘fiducials’ locally or inside a tumor via a scope’s instrument channel port. Successful placement of the fiducials allows for improved accuracy of tumor location during imaging as well as more focused and precise introduction of drug therapies to the targeted tumor.
1. Ultrasound Endoscope Setup
Week 2: Procedure Storyboard
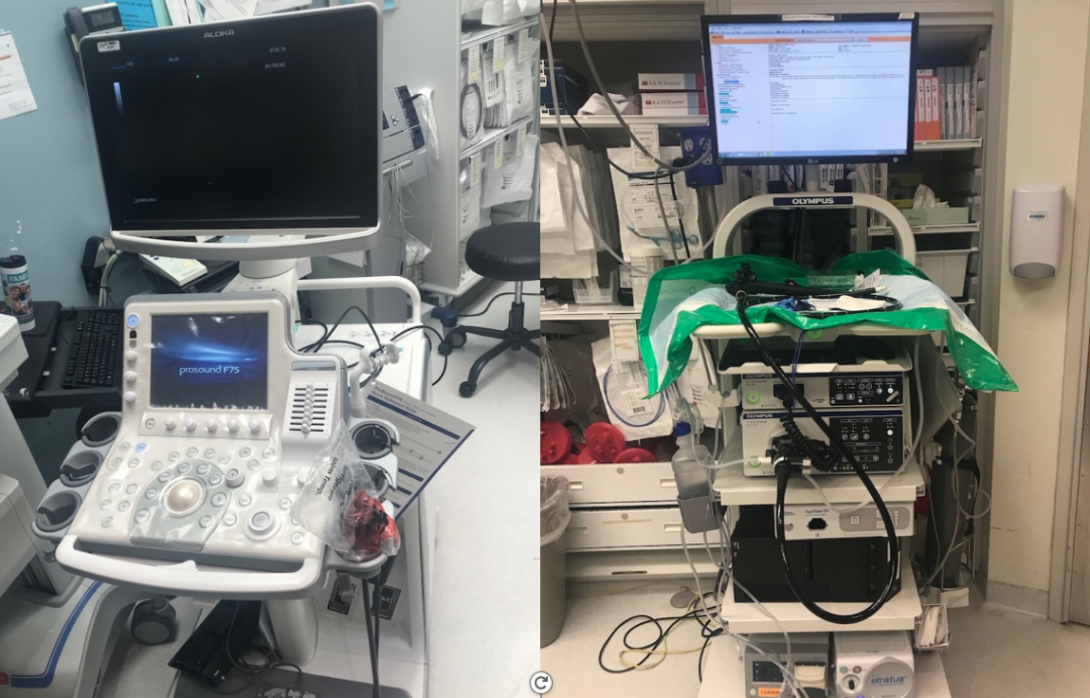
AEIOU Summary: Clinical staff connects ultrasound to endoscope and sets up physician user’s operation preferences such as water pressure and carbon dioxide.
Pain Points: Potential implications of monitor or system failure or malfunction, insufficient knowledge of hardware operations as well as confusing button labels and overall layout.
2. Initial EGD Secondary Ultrasound
Week 2: Procedure Storyboard
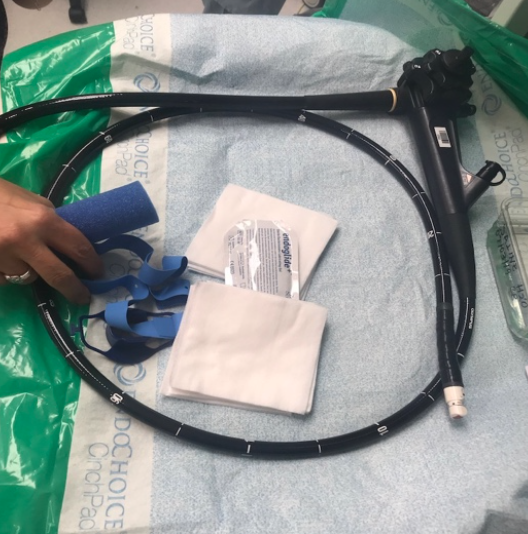
AEIOU Summary: Initially, the endoscope is inserted into the mouth and is inserted until the desired location is reached (EGD -esophagus, stomach, duodenum). This allows for visualization of the area and location of the mass. Once found, the scope is exchanged for one with an ultrasound probe on its tip.
Pain Points: Due to minimal guidelines outlining sedation protocols for patients undergoing such procedures, patients may wake up during the procedure or have little to no response to the given anesthesia. Also, once the mass is located with the endoscope, finding it again with an ultrasound probed scope is not guaranteed and may be difficult.
3. Locating of Tumor
Week 2: Procedure Storyboard
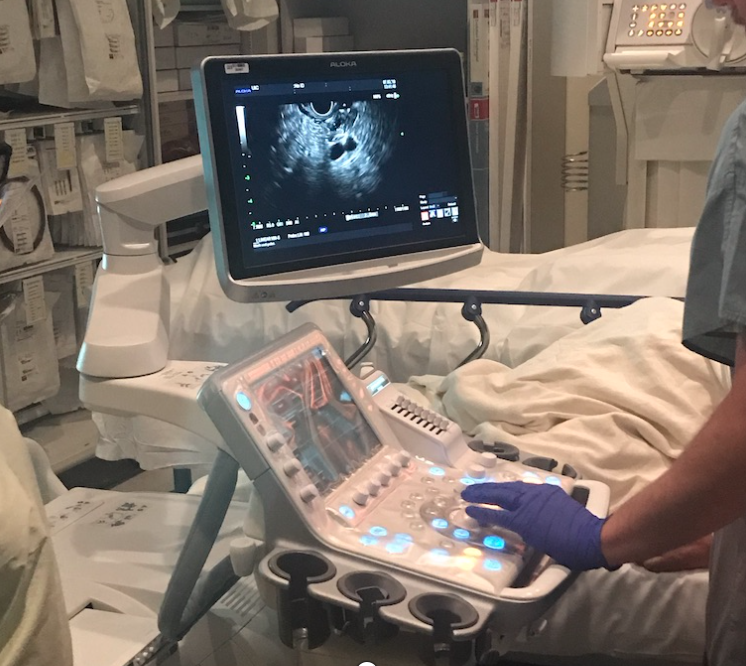
AEIOU Summary: Attending Physician/ Fellow locates tumor using ultrasound and determines its size while echogenic properties reveal degree to which mass has invaded surrounding tissue.
Pain Points: Readings and images are unstable on ultrasound monitor due to incurring movements, patient positioning, or location of particular mass.
4. Fiducial Delivery Device Prep
Week 2: Procedure Storyboard
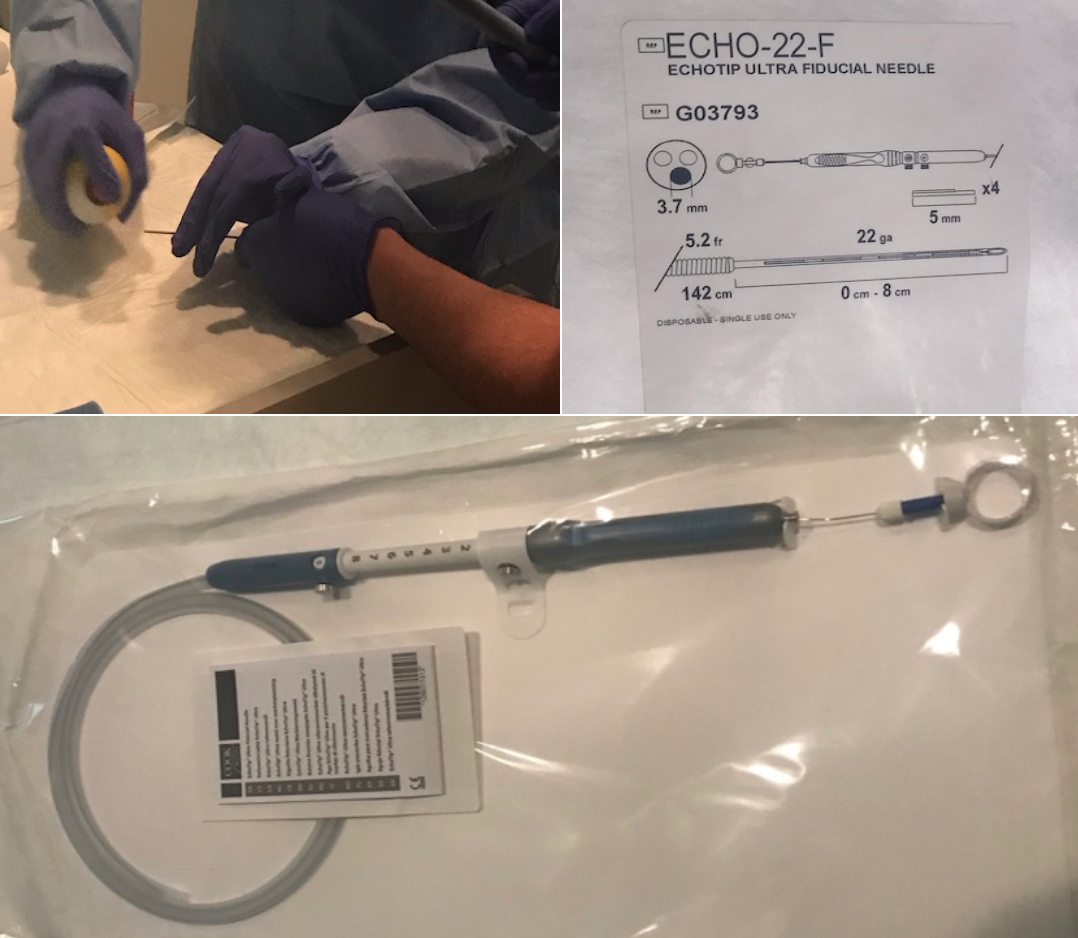
AEIOU Summary: Fiducial delivery system prepared by nurse at instrument holding table, additional lubrication is needed and then needle is fed through scope’s channel port to targeted tumor site.
Pain Points: For improved deployment of markers needle is lubricated with PAM cooking spray.
5. Deployment of Fiducial Marker
Week 2: Procedure Storyboard
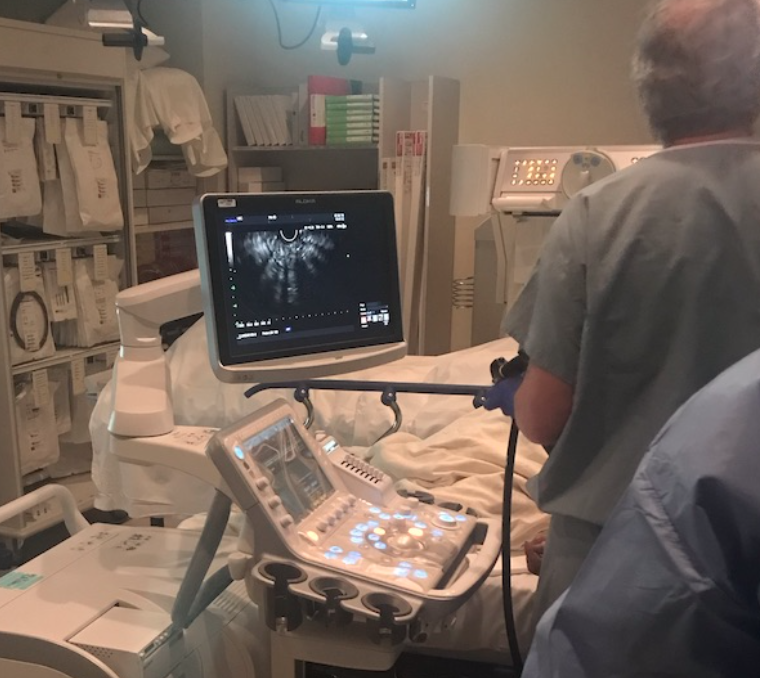
AEIOU Summary: Deployment of fiducial markers locally or directly into tumor using needle fed through scope’s port. Successful implantation is confirmed via ultrasound scope.
Pain Points: Possibility of surrounding blood vessel puncture or hitting of already present stent.
6. Holding of Patient’s Jaw
Week 2: Procedure Storyboard
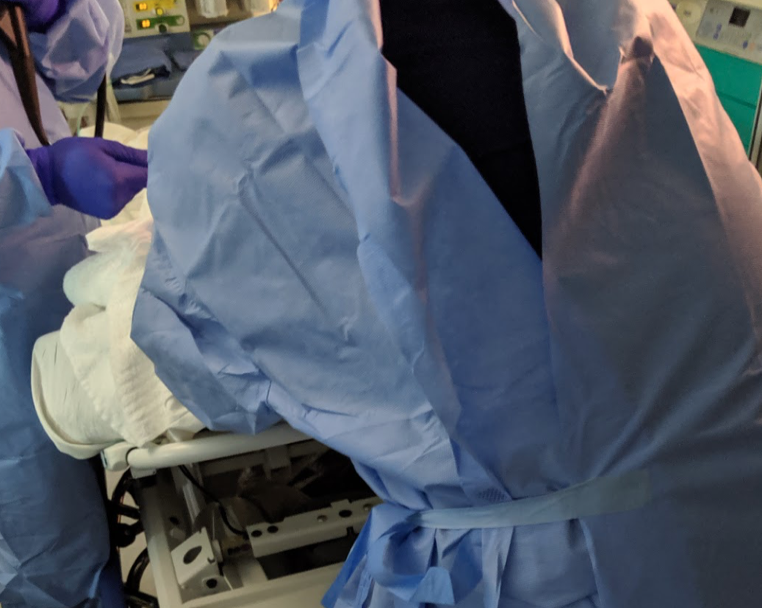
AEIOU Summary: Staff nurse standing behind bed holding patient’s jaw forward for approximately 15 minutes to avoid airway obstruction which may lead to potential intubation. This was done throughout the entirety of the procedure.
Pain Points:This action results in a more crowded environment inside an already small lab room. During this EUS procedure, two different staff nurses had to be involved in this activity after the first one became fatigued from holding the jaw for a prolonged period of time.
Week 3: Identification of Needs Statement
Nurses Have A Lot of Upper Body Strength
Close observation in the clinic these past three weeks has led to me to notice a very apparent trend in the way that hospital staff, especially nurses, interact with patients undergoing upper endoscopic procedures. That being said, these procedures may pose a risk to patients, namely those with underlying pulmonary conditions like asthma or COPD, leading to compromised airways and then causing them to go into severe respiratory depression. This abrupt change in their breathing pattern may ultimately cause them to need intubation and full anesthetic sedation, something that is not ideal for the patient and overall procedure. On several occasions where patients were beginning to have trouble breathing during their procedure due to their position, a nurse was instructed leave her designated location and other responsibilities to stand at the head of the patients bed to push the patient’s jaw forward with full force in in order to mitigate the airway obstruction and improve respiration. In certain cases the nurse did this for over 15 minutes, until she became exhausted and her arms were so fatigued that they were shaking at which point the anesthesia team was called in to intubate and fully sedate leading me to conclude that: nurses do in fact have a lot of upper body strength. It should be noted that in certain situations before deciding to intubate the patient, if the first nurse got so tired she could no longer hold the patient’s jaw with full force, another nurse was called in to do the same.
These observations lead me to beg the question if this process can be circumvented and if there can not only be a decreased dependence on staff for sustaining manual manipulation of patients during procedures, but also a decrease in the physical burden placed on this staff. Moreover, if addressing these issues would eliminate the need for an extra individual in an already crowded environment pigeonholed into doing one task.
Engineering Process Application:
As discussed in this week’s workshop, a successful and effective needs statement should be framed in an appropriate context within a particular design stage and is comprised of three components; a problem, population, and outcome. As more data is collected and information is gathered, new iterations of this statement should be created to narrow the scope and specificity of the needs being addressed.
Problem: airway obstructions
Population: patients with underlying obstructive airway conditions
Outcome: decreased dependence of sustained manual manipulation of patients during procedures
Iteration #1:
A way to eliminate airway obstructions in patients with underlying obstruction inducing pulmonary conditions that decreases dependence of staff sustained manual manipulation of patients during procedures.
Iteration #2:
A way to minimize airway obstructions and need for intubation in patients with underlying obstruction inducing pulmonary conditions that decreases dependence of staff sustained manual manipulation of patients during upper endoscopic procedures.
*Here we narrow the scope of our population emphasizing that these individuals will eventually require intubation if the obstructed airway is not cleared and respiratory depression persists. Moreover, this needs statement clarifies that the problem is specifically correlated to upper endoscopic procedures.
Iteration #3:
A way to minimize airway obstructions and need for intubation in patients with underlying obstruction inducing pulmonary conditions that decreases physical burden on staff during sustained manual manipulation of patients as well as number of people in procedure room at a given time during upper endoscopic procedures.
*Here we further specify the outcome of the needs statement indicating that not only is the dependence on staff minimized but also the physical burden of applying their full strength for prolonged periods of time as well as the number of people in an already crowded procedure room.
Week 4: Concept Ideation - Criteria & Restraints
Narrowing the Scope of Our Ideas and Getting a Taste of Some Real Engineering
I can undoubtedly say that this week was a major turning point in our Clinical Immersion experience, both in and outside the clinical environment. Interestingly enough, our focus shifted from procedure observation, which was mildly placed on the back burner, to analysis, in which we were hit with a mega dose of engineering and brainstorming. In that regard, I can say, in confidence, that our brains were flooded with ideas, decisions, and outside feedback. Most importantly, this week presented us with new challenges and gave my team a valuable glimpse of what real-world applications of engineering and product development look like. In terms of narrowing the scope of our ideas and choosing a final direction, what started off with two strong competing ideas, an airway support device or a revamped ERCP guide-wire with improved control, ended in victory for the airway support apparatus. Although not a simple decision to make, my team employed a specification matrix and individual ranking system to aid us in making a final decision with which need we wanted to pursue.
Week 4: Concept Ideation - Criteria & Restraints
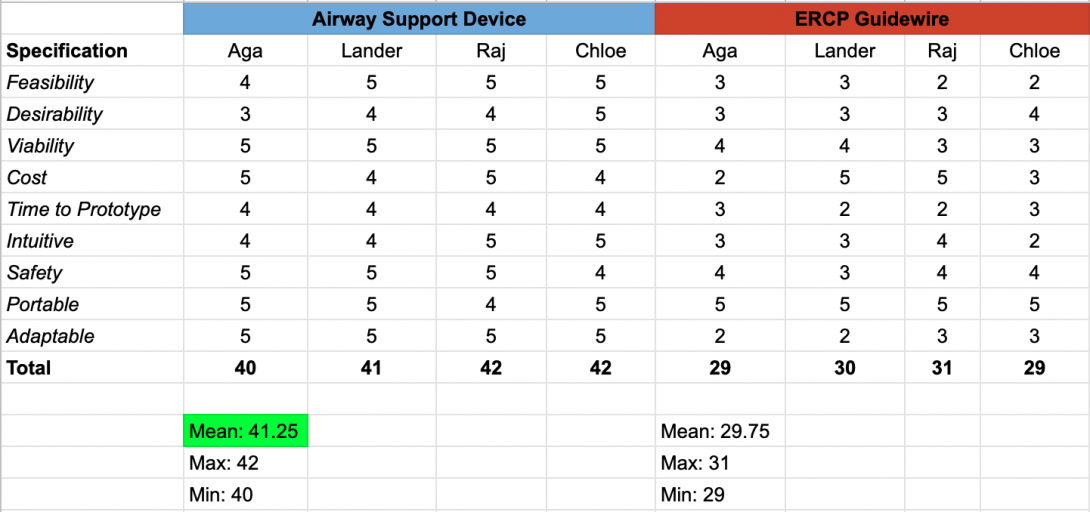
Once finalized, we went straight to the drawing board and purged all possible ideas, good and bad, as far as how a jaw thrust could be replicated in patients without the need for an individual to perform one. This process eventually plateaued as we had limited knowledge of already existing technologies, anatomical characteristics and barriers, as well as how a device, if implemented in the particular circumstance, would impact an upper endoscopic procedure. These shortcomings became the impetus to secondary research and a motivation to conduct interviews with physicians, nurses, and medical assistants to understand their first hand experiences with airway obstructions and manual jaw thrusting. After compiling all of our findings, we were able to all agree that a now abandoned patent for an airway support device initially designed by Keven Ward et al. from the University of Michigan would be the source of our preliminary concept. Although not exactly what my team and I envision for our final solution, this is an approach that we will certainly consider as we continue to develop a prototype.
Week 4: Concept Ideation - Criteria & Restraints
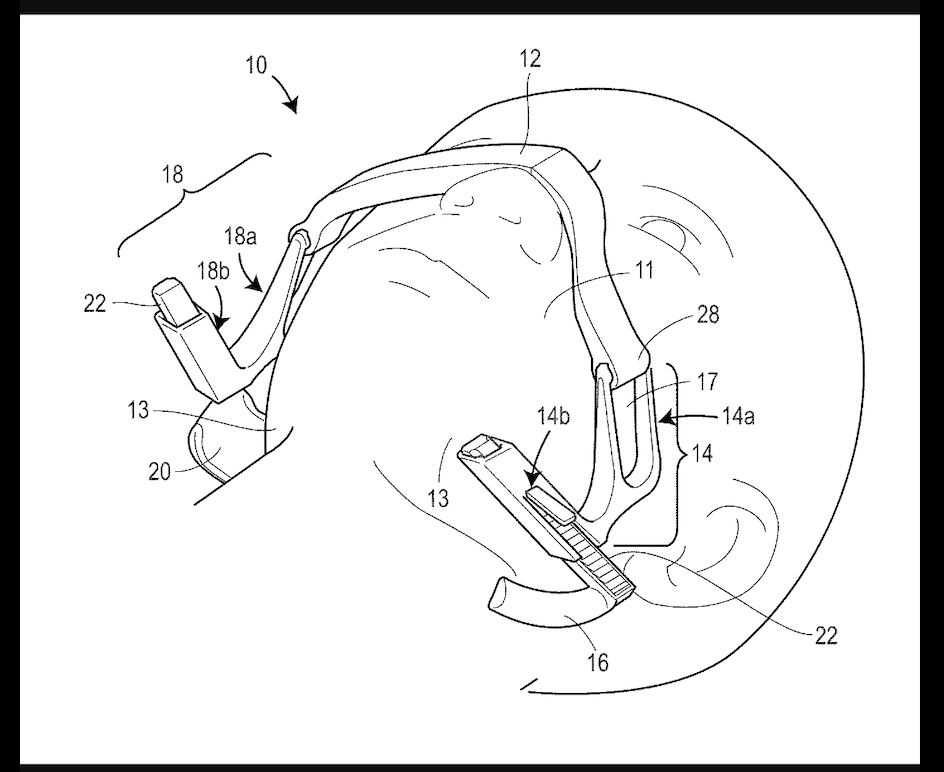
Week 5: Refinement of Final Concept
Conceptualization of Jaw Thrusting Apparatus
This week was geared toward finalizing the direction of our project and using the criteria and specifications we defined last week to begin the early design stages of our system. The insight and feedback we received from Dr. McGorisk, Dr. Trivedi, staff nurses who administer sedation drugs during procedures, and other hospital staff who have been involved in patient jaw thrusting situations, served as a valuable tool in helping my team and I realize what aspects would be desired in the final product. For instance, there was an emphasis on keeping the apparatus adjustable for varying anatomical facial features, fast to apply, and low-cost to make. We were even given the idea to define a metric that would determine which patients would be at risk for airway obstructions and who would most likely benefit from the device. With that said we hit the drawing board, both figuratively and literally.
With the existing patent in mind, although we were confident that our design would have to be secured on the front of the face, we felt that using the nose as a fulcrum for device support posed a risk for discomfort and even pain. Moreover, we wanted to minimize any other components that would disrupt the physician’s working field near the mouth so moving the support mechanism to the forehead would be most effective. We were also in agreement that the strap should be adjustable or even stretchy and that a support bar extending from behind each ear to the jaw pushing component would provide the forward thrust needed to clear an airway obstruction. Knowing that the amount of thrust should be determined on a patient-by-patient basis, we also felt that a screw-to-tighten mechanism would work best when trying to increase force on the jaw and optimize results. Furthermore, designing well- contoured jaw cups would maximize jaw surface area contact and result in a more effective and comfortable jaw thrusting maneuver. Generating these initial concept ideas gave us a platform to translate the thoughts we had on paper to a tangible design.
Prototyping (Low Fidelity > High Fidelity)
Week 5: Refinement of Final Concept
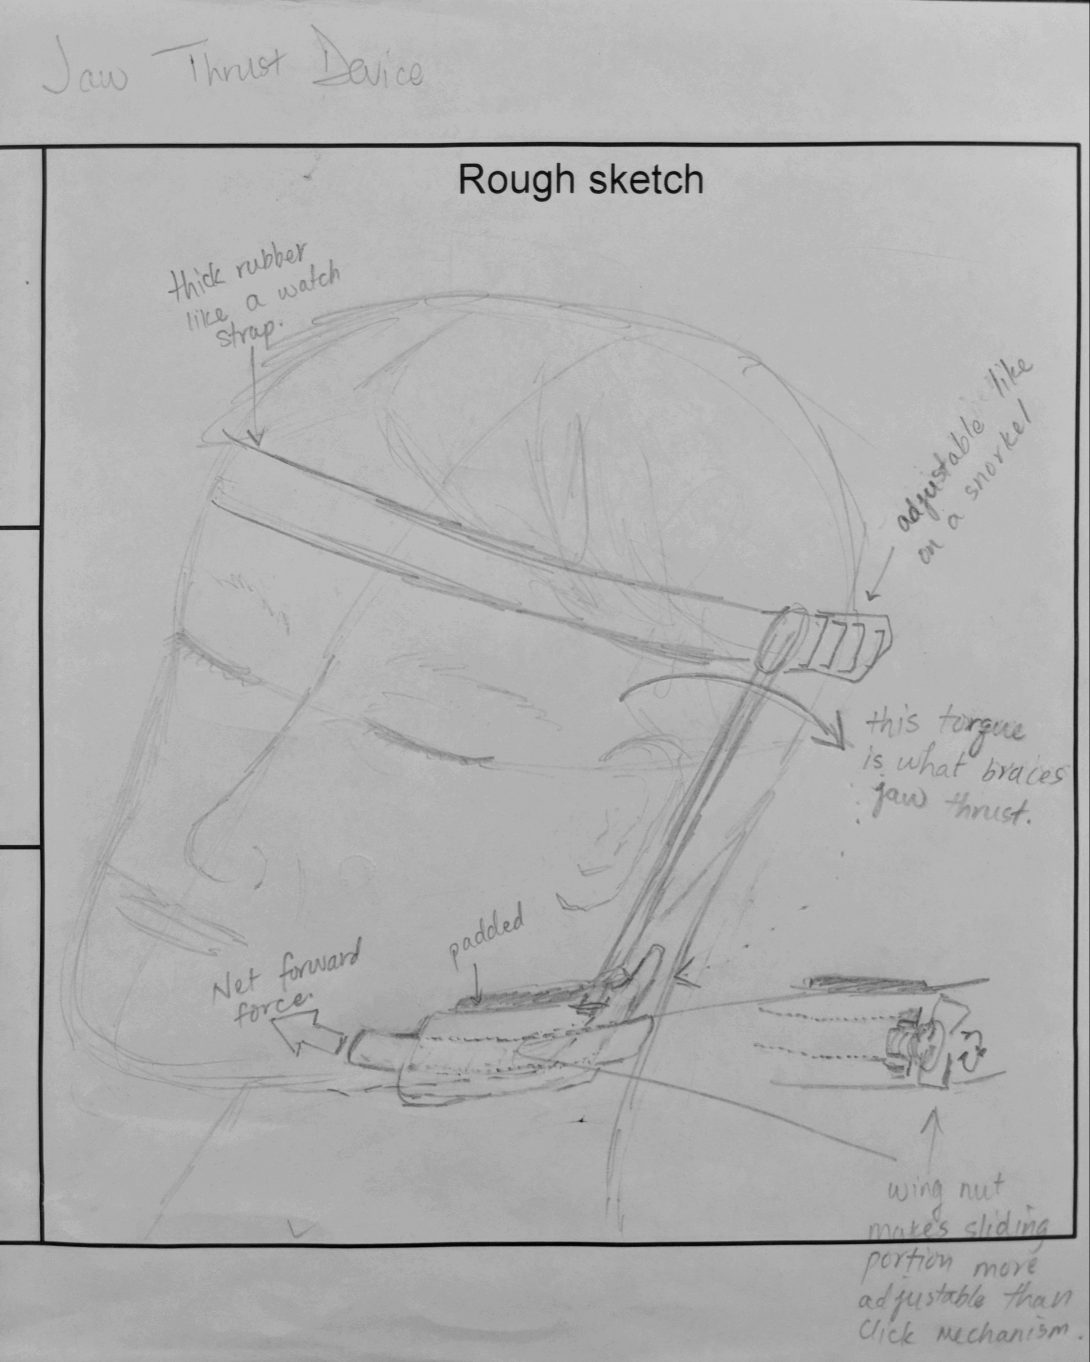
As most devices aiming for success begin with low fidelity popsicle stick and pipe cleaner models, our arts and crafts skills were put to the test over the next several days. We dedicated our time to tinkering with elastic resistance bands, wooden dowels, styrofoam, hot glue and foam padding until we gathered a clear enough idea of what our final product would look like. Following several iterations of our basic design, we began the search for CAD components that we could 3D print to ramp up our fidelity level. Eventually we 3D printed a pair of ladder-lock buckles, and designed multiple versions of our own jaw cups using CAD software. Once satisfied with the cups, we turned our attention to developing a screw-to-tighten mechanism using nuts and bolts that would be braced against a rigid bar following the lateral side of head allowing for intuitive thrust level adjustment.
Moving Forward
Week 5: Refinement of Final Concept

Moving forward, in the final week of the program, we hope to revisit our prototype and ensure that the support bar maintains rigidity during patient movement and during the entirety of a procedure. We also aim to define a metric to determine which patients would need the device as well as further contemplate whether or not a strap only extending across the forehead is enough to sustain full tension and thrust or if a full-circumference strap is ultimately required to achieve adequate support.
Although still far from mass manufacturing and investing in a start-up space, my team and I are optimistic that our invented apparatus could serve as a low cost, effective, innovative and impactful alternative to staff maintained manual manipulation of patients and decrease the physical burden that it has on hospital staff.
Ameera Lodhi

Ameera Lodhi
Basic Information about Student
I am a senior Bioengineering student with a concentration in imaging. I am also on the Pre-Medicine track.
Ameera Lodhi Blog
July 26, 2019
After brainstorming, we made concept cards of our ideas. We had three options utilized in four different devices: collecting tears using capillary action, mechanical suction, or motorized suction. After laying out the benefits of each idea, we presented Dr. Jain with our concepts. He was very eager to see how a motorized option would work since he knew the downside of capillary action and mechanical suction from practice. From that session with Dr. Jain, we came up with some more criteria and, using that, eliminated all but one idea which we are currently trying to refine and prototype.
The new criteria we developed from the meeting with Dr. Jain are:
- Anything that touches the eye should be soft
- Anything collecting tears should be detachable and easily replaceable
- The material touching the collected tears should be non-adherent to proteins and water
July 19, 2019
After more refinement, our final need statement reads:
“To create a more efficient tear collection process, increasing accessibility, while maintaining a safe and comfortable experience for patients.”
This new statement encapsulates the need for a more widespread method of tear collection as well as a more pleasant experience for the patient. With a finalized need statement, we could brainstorm some potential solutions that fall into the criteria we chose. These criteria were selected based on requirements in our need statement that seemed broad, including “efficient,” “accessibility,” “safe,” and “comfortable.”
For efficiency, our requirements were that the tear collection process:
- Should be done within one minute
- Should collect 50 microliters of tear sample from each eye in a healthy patient with no dry eye conditions
For accessibility, we chose specifications which would spread the user beyond specialists and ophthalmologists, including the requirements that:
- Healthcare professionals should be able to do it after one use
- Should be handled by one person without additional materials (such as a slit lamp)
For safety, we specified that:
- The new process should not cause injury to the eye
- Materials that touch the eye should be sanitary
- Materials which come in contact with tears should be disposable
Last, our comfort criteria was that:
- Anything in the eye should remain in the eye for less than 10 seconds at a time
Based on these specifications, we brainstormed potential solutions using the “crazy 8” method. Then, we each chose at least one of those solutions and did some additional research as to how it could work. All of our potential solutions which fit the above criteria were single, handheld devices.
July 12, 2019
The assignment for this week was to write a needs statement based on problems we saw in our time shadowing Dr. Jain. At the end of this week, after multiple revisions, our final needs statement was:
To create a more user-friendly tear collection process that allows any healthcare professional with minimal training to collect patients’ tears safely
My original needs statement read: “To make the tear collection process more accessible for clinicians and patients with limited resources.”
After consulting as a group, we changed it to: “To modify the tear collection process to make it user friendly for more healthcare workers to use safely on patients.”
This is because, although the population affected would include both the patient benefiting from tear collection and the healthcare worker who would be utilizing the process, we decided to limit it to the professional’s use of the device and the patient’s safety since those are the primary concerns we would have when improving on the process.
However, the statement did not yet encapsulate the ease of use of the process. To illustrate that, we added “minimal training.”
July 5, 2019
This week’s observation and interviews provided insight into the tear collection process. Using this information, we developed a storyboard and highlighted potential pain points.
July 5, 2019
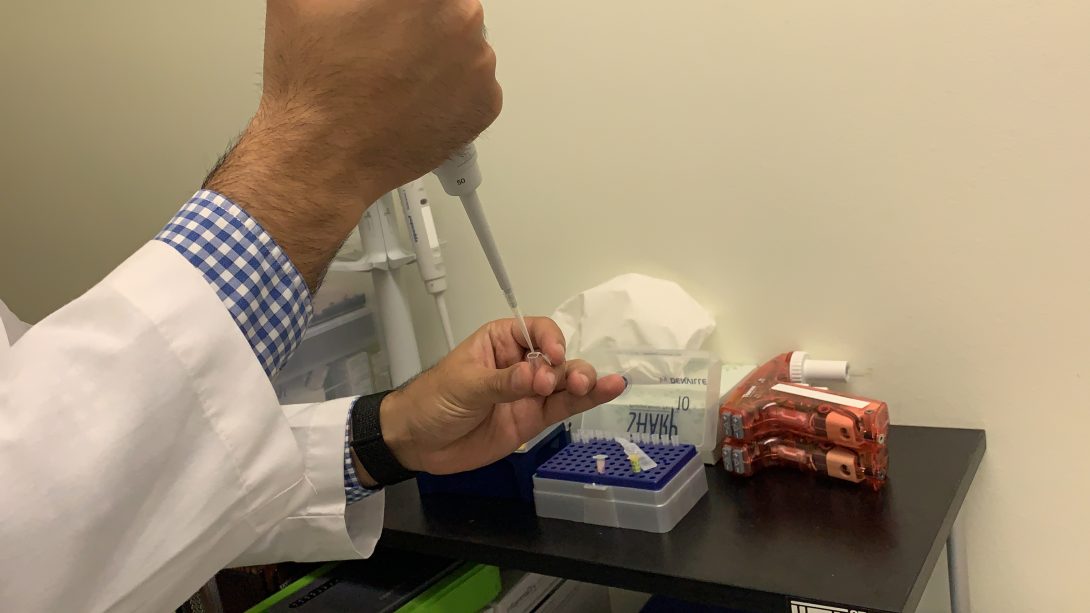
The first step is the preparation, which includes the collection of many “found objects.” For instance, micropipettes are prepared with 5 microliters of artificial tears for each eye. Also, capillary tubes are used to collect the tears from the lower eyelid, and a pipette controller is used to dispense the tears from the capillary tubes into Eppendorf tubes.
July 5, 2019
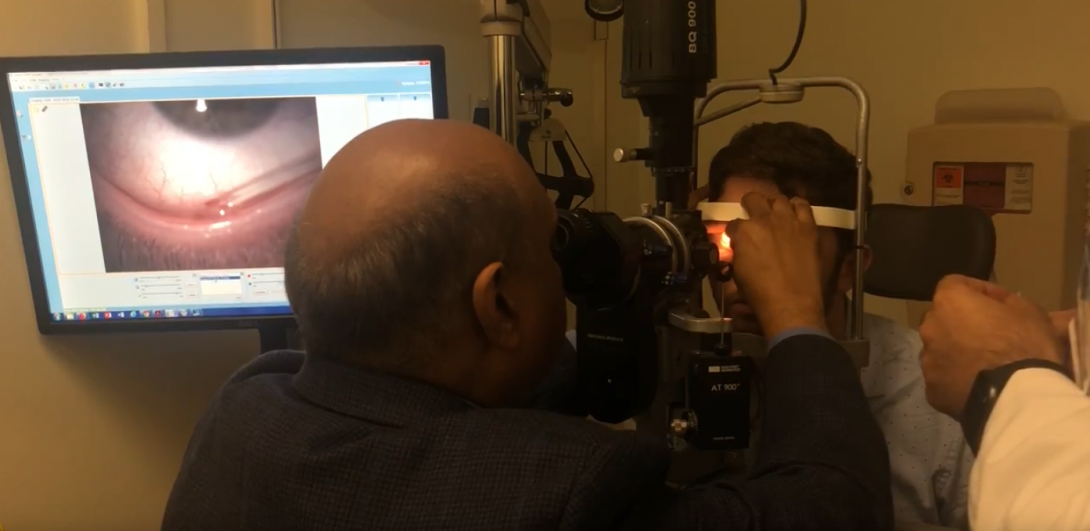
The next steps involve Dr. Jain dispensing the tears in the eye, the research assistant timing the distribution of the tears, Dr. Jain’s collection of the tears, and the research assistant handing the empty capillary tubes to Dr. Jain and retrieving the full ones for testing. There are many pain points in these steps for 3 of the users: the doctor, the research assistant, and the patient.
During all these steps, the doctor is reaching around the slit lamp and holding the eyelid in order to ensure the pipette and capillary tubes are placed in the correct location to safely dispense and collect the tears. This is laborious, as seen from the photo above, but a necessary measure due to the risk associated with placing fragile glass so close to the eye.
It is also necessary for the research assistant to exhibit caution when handling the full capillary tubes. During another interview with an assistant, they mentioned the possibility of breaking a tube and losing an irretrievable sample from patients with tear deficiencies.
Patient interviews were used to illustrate pain points for the patients. While established patients have full confidence in Dr. Jain and don’t think twice about tear collection, new patients mention the difficulty of seeing glass approach their eye and wanting to blink during collection. Additionally, during an interview with a research assistant, we were informed that use of lab equipment, specifically micropipettes, has scared some patients.
July 5, 2019
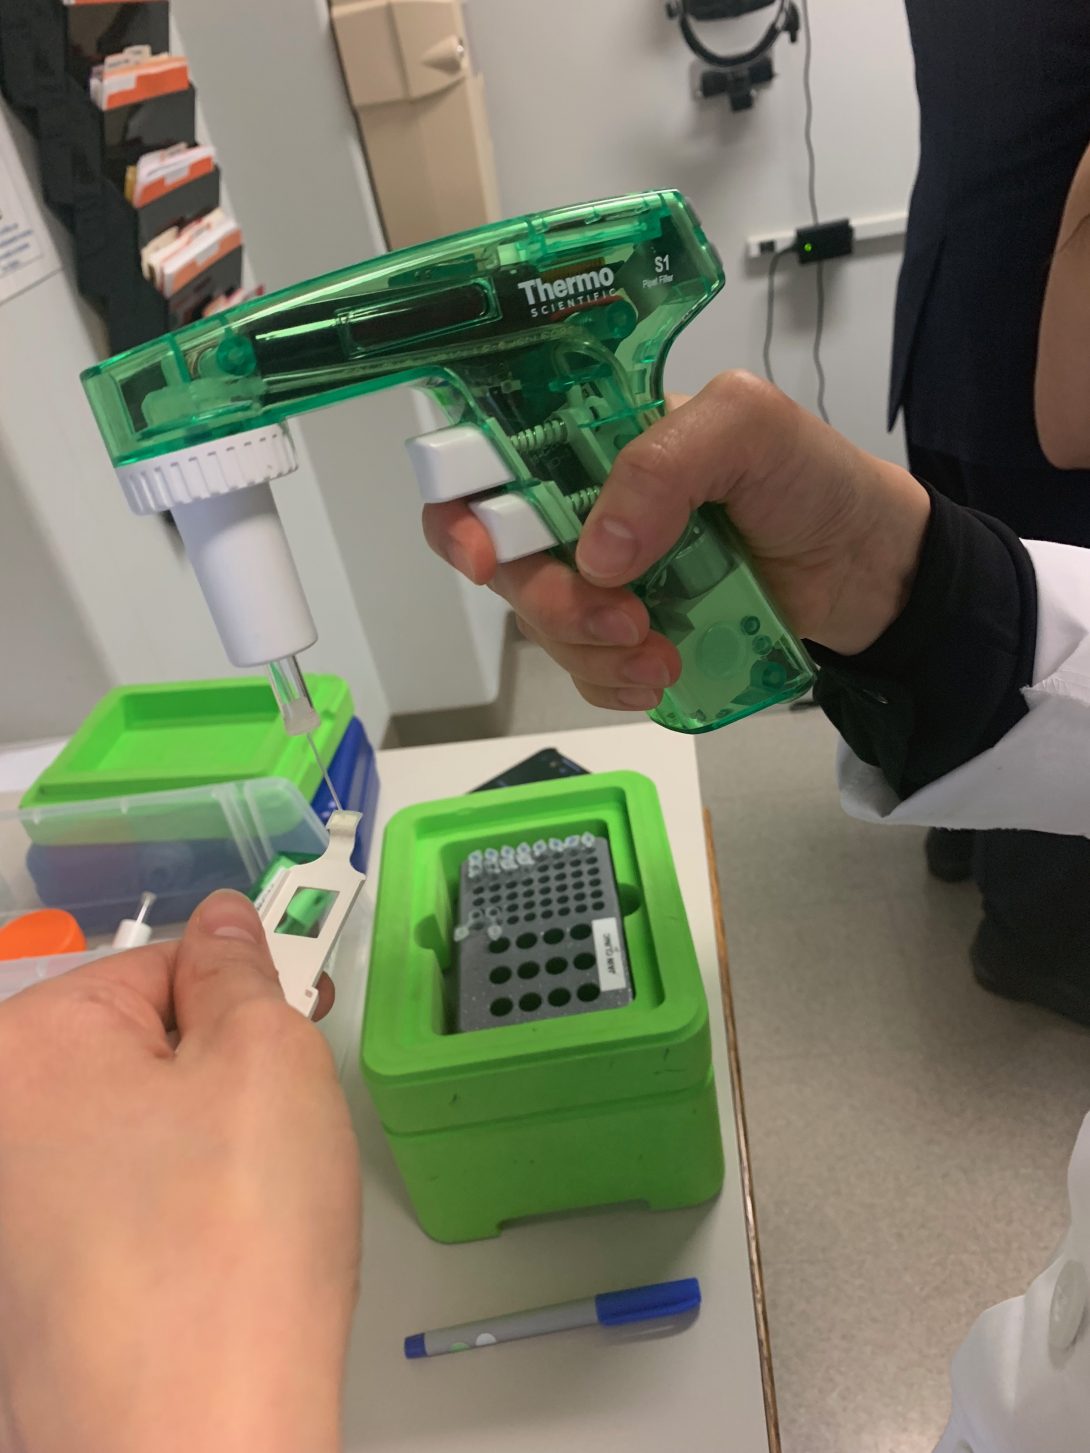
The last steps of the process solely involve the research assistants. They dispense the tears from the capillary tubes to Eppendorf tubes using a pipette controller. These are taken to the lab for further testing. The tears from one of the capillary tubes is dispensed into an MMP-9 test, which then indicates if the patient is positive or negative for inflammation.
June 28, 2019
During our first week in the clinic we shadowed Dr. Jain while he saw his dry eye patients in the Eye and Ear Infirmary.
June 28, 2019

The best design was seen in the rooms with the imaging equipment. Many of these machines are quite user-friendly. In regards to the patient, support is provided so they can remain still while being photographed. The imaging machines also provide simple instructions and feedback when the images can’t be analyzed and another picture needs to be taken, so the physician or lab assistant can use it with ease as well.
One machine in particular which shows good design is the LipiView® II Ocular Surface Interferometer with Dynamic Meibomian Imaging™ (DMI). For this, the users did not need to worry about alignment or blinking because it captures 20 seconds of video where the patient blinks normally. The video is then used to measure lipid layer thickness. It also provides information on partial blinks. Last, the research assistant would flip the eyelid to see if there’s any damage to the meibomian glands. This makes the LipiView the easiest and most useful machine, and, thus, the best-designed.
Due to the availability of the room shown above and the time it takes to run these tests, not all patients were seen here, and rarely by Dr. Jain. One test he conducted with every patient was vital staining. This is where Dr. Jain places dyes in the patient’s eye and qualitatively grades their irritation based on where and how much the dye collects. This is done to track the patient’s progress during treatment, but Dr. Jain mentioned that it gives very little information on the patient’s condition, providing no insight into the pathophysiology of their dry eye.
The process for grading the eye is long as well. Using a micropipette, Dr. Jain places 5 µL of 2% Fluorescein in the patient’s eyes, then waits 2 minutes. Using a slit-lamp, he examines corneal staining. After the 2 minutes, he adds another 5 µL of 1% lissamine green to each eye and grades the staining again. If time permits and the photography slit-lamp is available, he also takes photographs of the staining patterns. After this, one of Dr. Jain’s lab assistants removes the dye using saline drops and a napkin. As the drops are placed in the eye, the lab assistant places the napkin at the bottom of the patient’s face and continuously dabs. This takes another 2 minutes, making the process a total of 5-7 minutes.
Vital staining would be considered bad design because it is qualitative and grading can be inconsistent, especially between physicians. It would be more reliable if pictures can be quickly taken for each visit, but that is not possible due to time constraints and a lack of space and resources. Therefore, this test provides little information while taking most of the patient’s 15-minute appointment time and 2 people (Dr. Jain and a lab assistant) to complete.
Collin Dreilich
Collin Dreilich
Year: 4th year BIOE student
Area of Research: Pulmonary Critical Care Unit
Contact Information: collindreilich12@gmail.com
Collin Dreilich Blog
July 28th: Concept Cards
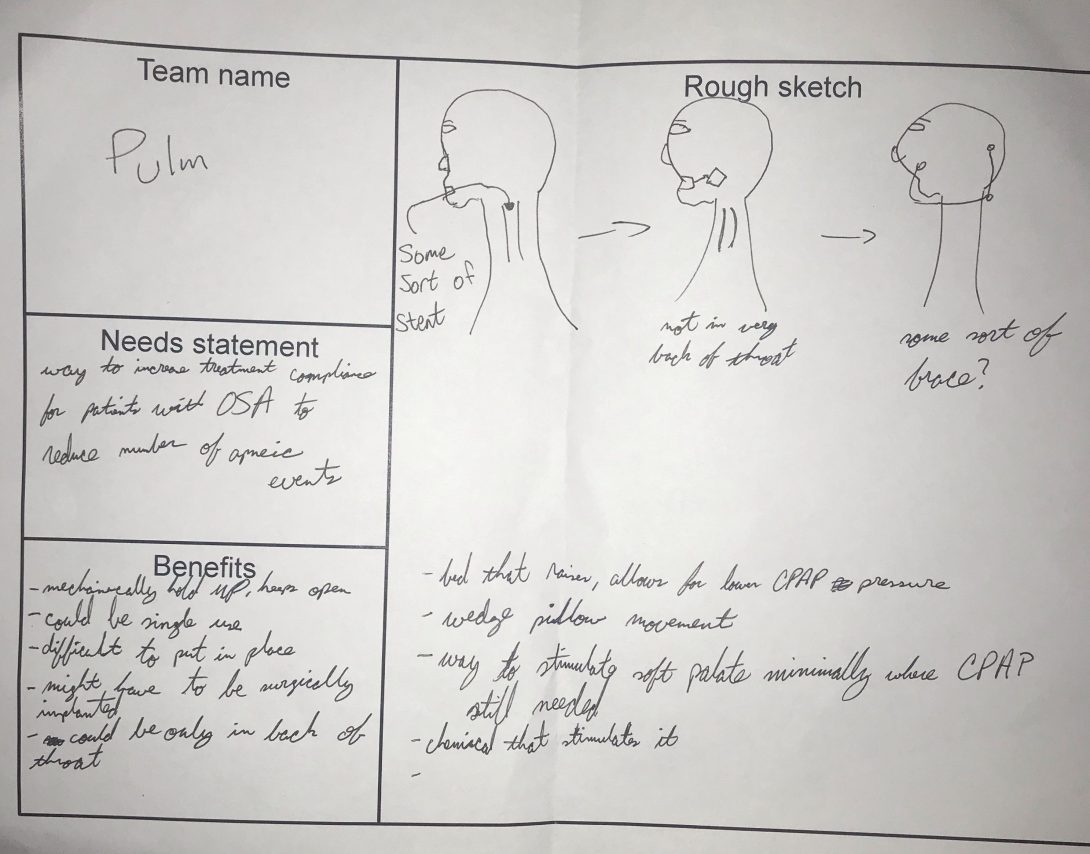
Content cards are a powerful tool to simply convey an idea to a group of people. Essentially, a rough sketch is presented of the idea, with the possible benefits and drawbacks listed underneath. These cards are very useful as they don’t focus on the non-important details of the sketch. As can be seen in the attached image, they aren’t meant to be the next Mona Lisa. Rather, they focus on just getting the idea across quickly without being caught up in unnecessary features.
For our group, it was very useful to help flush out what solution we wanted to move forward with. Each person in our group took one of our possible solutions we were considering and put them on content cards. Afterwards, we presented each one to each other. Even though we were all familiar with all the possible solutions, seeing them in this new medium forced me to look at them more intently. For instance, when I was creating the card for our mechanical stent shown in the image, I began thinking about lifetime of the stent, what material it would be made of, and cost viability. Before the cards all of our ideas were just kind of floating around in the air as vague, possible solutions. Talking about them in more detail with the cards was extremely beneficial to our selection process.
The great thing about these cards is they start up a conversation. Although the cards themselves don’t focus on specifics, a conversation about the specifics almost always follows. These cards could be remarkably useful when presenting ideas to people who aren’t very familiar with the solution or problem. By focusing on just the big ideas of the proposed solution, content cards make it possible for everyone in the room to make an informed decision. They’re a powerful tool to convey technical information succinctly and easily, sparking necessary conversation regarding the solution proposed.
July 21st: Brainstorming
After working in the clinics for 4 weeks, we’ve realized we want to work on increasing the patient’s compliance rates with their CPAP machines. Considering the compliance rate is ~50%, there has to be a better solution. Speaking to technicians and patients, it seems the reason the compliance rate is so low is the fact the masks/machines are so uncomfortable. Having positive air pressure forced into your lungs while trying to sleep is inherently uncomfortable, which becomes even more uncomfortable the higher the pressure goes.
To create an effective solution, there needs to be specific design and product requirements. Talking as a group, we considered patient comfort to be the most important aspect for our proposed solution. So the device needs to be more comfortable than current options. To achieve this, the device could be customizable for each patient to fit different face shapes or deformities. We could also create something allowing the patient to move more in their sleep. Some current models of CPAP masks look like the masks fighter pilot jets use to breathe. Considering the big tube forcing the air down somebody’s lungs would get tangled up while the patient sleeps, movement isn’t really an option.
As a group, we are still debating on what avenue we would like to go to solve this problem. We’ve had ideas about devices, which are instinctually where our minds go first. However, after brainstorming a bit more, we’ve thought about solutions with the actual machine. An interesting idea could be changing the software on the CPAP machine, allowing for a new setting which could be more comfortable for patients. Design criteria for a solution like this would be more along the lines of making it easy to understand. Giving someone a brand new setting to tinker with that affects their treatment would may require a certain level of intuitiveness to ensure it’s being used effectively.
Considering our many different directions we can go to solve this problem, our design criteria are all over the place. Once we hone in on one type of solution through brainstorming, the criteria will be more clear cut.
July 15th: Needs Statements
3 Iterations of the same needs statement
This week, we are focusing on crafting our needs statements. After shadowing many different departments in the pulmonary critical care unit, I’ve identified a need doctors face while doing bronchoscopies. It can be difficult getting passed the vocal cords when doing a bronchoscopy, especially if the doctor doesn’t have much practice. Many patients become very irritated during this part of the procedure as well, since they are only under local anesthesia and relaxing medications. I noticed often times another doctor will hold the patient’s chin up and apply a subtle amount of pressure, helping to open the airways.
My first needs statement for this problem was: “a method to get passed the vocal cords during a bronchoscopy to make the procedure easier for doctors.” This needs statement had a lot I needed to refine, but I liked the idea I was going for. The scope is fairly general, as “get passed the vocal cords” can mean a LOT of different things. The phrasing is also a little weird, I feel I could get the same idea across without making it seem so cluttered with words. I wanted to hone in on the outcome much more, as I felt the whole statement was too general and could go in far too many directions.
The second needs statement I came up with was: “an approach to mitigate vocal cord irritation in patients during bronchoscopies to make the entire procedure more comfortable.” Now this needs statement has a different outcome and population focus than the first one. I realized while crafting this needs statement, that patient comfort is the reason it can be so difficult to get through the cords. If patients are more comfortable, it’ll be easier for the doctor performing the procedure while not as taxing on the patient. I think this needs statement has a better scope and focuses on the “actual” problems there, rather than the low hanging fruit problems. The outcome can be refined though, as it feels sort of weak and rushed to me.
My final needs statement was as follows “an approach to mitigate patient vocal cord irritation during bronchoscopies to enhance procedure efficiency and increase patient comfort.” This needs statement feels like it has the best problem stated, population, and outcome of all three. After talking to the doctors doing the procedures and seeing them, efficiency seems to the best word choice. I noticed on multiple occasions where the doctor would attempt to enter the airways but the patient would be too agitated by the scope, so lidocaine (a local anesthetic) would be administered onto the vocal cords. The doctor would then need to wait about 1-2 minutes for the effects to kick in, so we would all just be standing around watching. Sometimes, this needed to be repeated 2 or 3 times. On procedures that can last up to an hour, saving those couple of minutes in the beginning eases the patient’s mind and mitigates time during an uncomfortable procedure. Patient’s really don’t seem to enjoy this procedure, so making them as comfortable as possible should help everyone in the procedure room. This needs statement focuses mainly on patient comfort, and has grown drastically from the first iteration drafted.
July 8th: Storyboarding
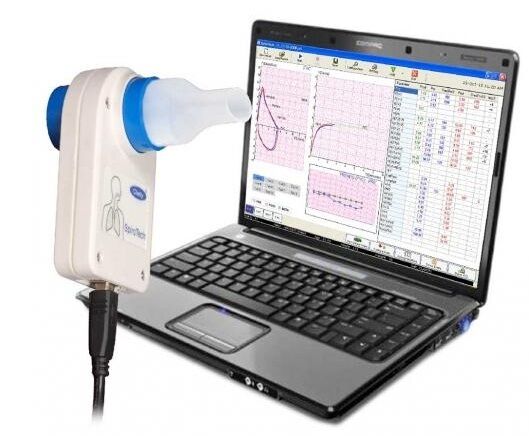
Step 1
The first step consists of the technician setting up the spirometer, entering specifics of the patient like their height, weight, race, and age. This tells the software what to base the results against.
Potential “pain points”: What if incorrect specifics are entered and the test is completed? Do specifics need to be entered every time for repeat patients?
July 8th: Storyboarding
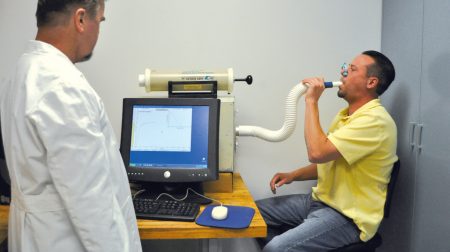
Step 2
The technician then explains the process of the procedure. This is typically accompanied with the tech demonstrating the breathing method required by the patient. All the instructions are given verbally.
Potential “pain points”: Since instructions are only verbal, what if the patient does not fully understand what is required by them? What if multiple different methods are needed which can confuse the patient?
July 8th: Storyboarding
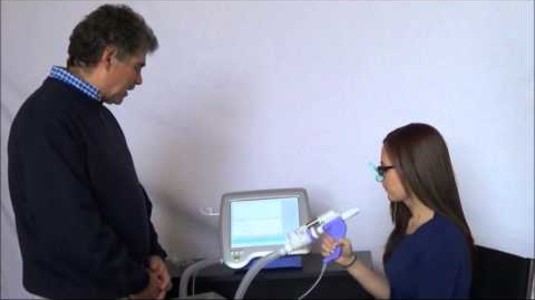
Step 3
The procedure is then done. The technician places a nose clamp on the nose to ensure all the air inspired/expired goes through the patient’s mouth and into the machine. The technician motivates the patient throughout each procedure, essentially coaching them throughout it. Multiple trials are conducted, while the technician looks for repeatability by the patient.
Potential “pain points”: What if the nose clamps don’t fully plug the patient’s nose during the procedure? How would a technician or patient realize if it isn’t fully plugged? What if the patient becomes exhausted during the procedure and can’t reproduce the same results multiple times? How long is the patient allowed to rest between trials? What if the patient mishears the technician when coaching?
July 8th: Storyboarding
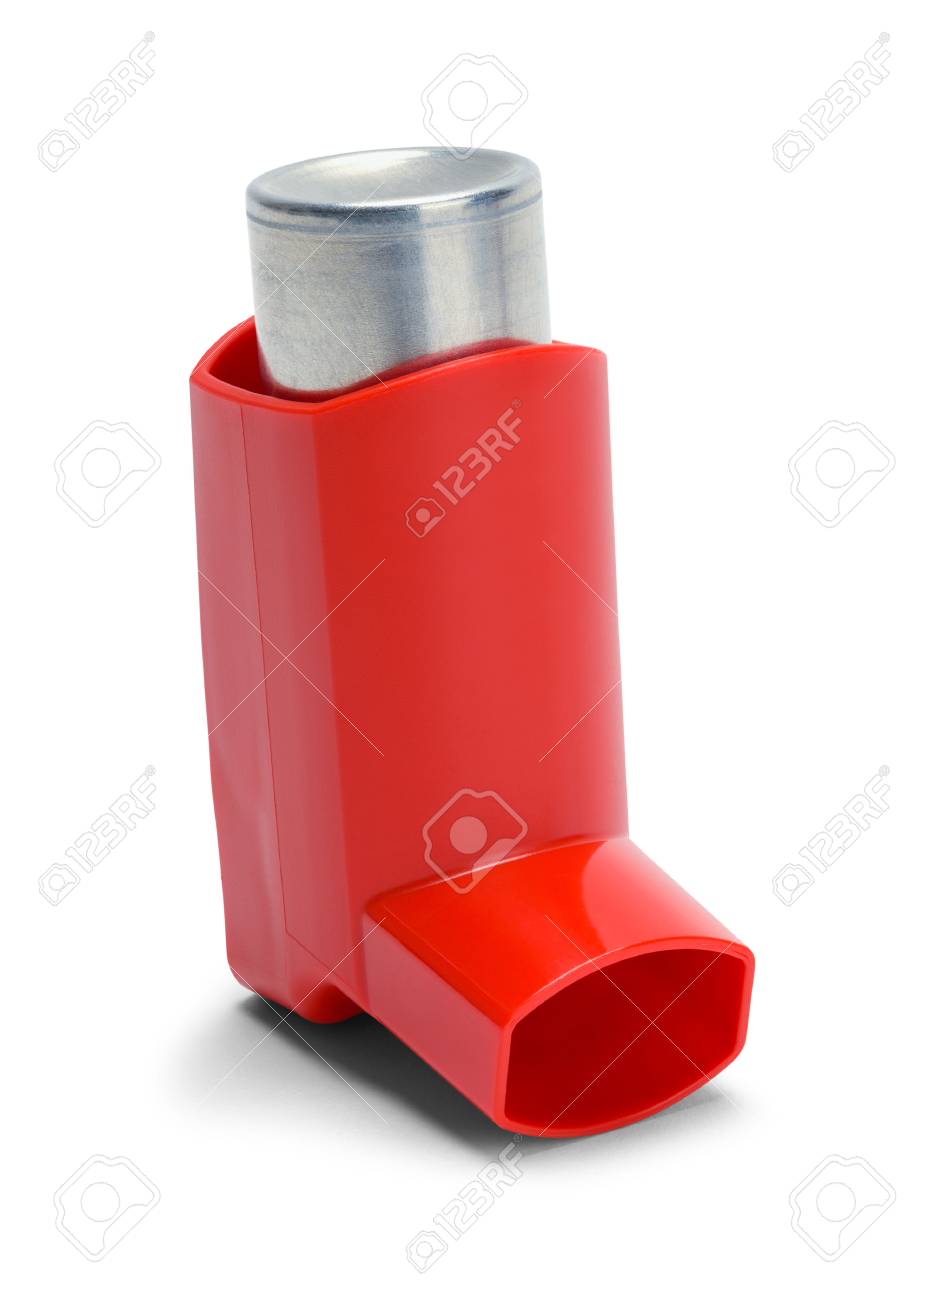
Step 4
The technician then administers an inspired bronchodilator, meant to open the airways and make breathing easier. Three separate breaths are taken by the patient, each held for 10 seconds then released. Once the medication is given, the patient needs to wait 10 minutes while it takes full effect. During this time, they are left alone in the room. If a patient does not know how to use an inhaler, the technician teaches them how to do it.
Potential “pain points”: What if the patient does not take the medicine correctly? Could the patient be bored waiting alone in an admittedly bland room? Does the technician need to set something else up during these 10 minutes of waiting?
July 8th: Storyboarding
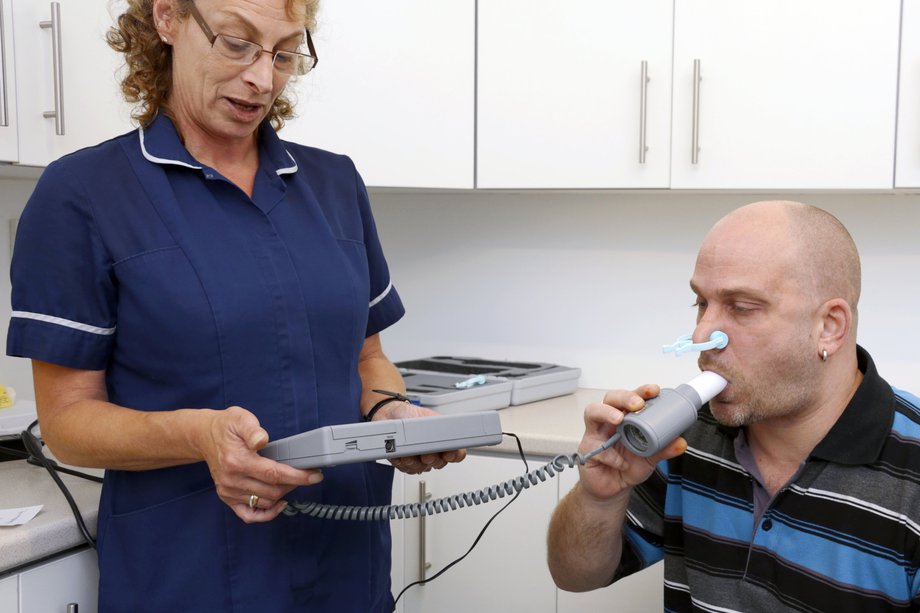
Step 5
The same procedures done in the step 3 are done, with the technician coaching the patient throughout it again.
Potential “pain points”: What if the clip does not fully plug the nose? What happens if a patient coughs while doing the procedure? What if the spirometer is at an uncomfortable angle for the patient?
July 8th: Storyboarding
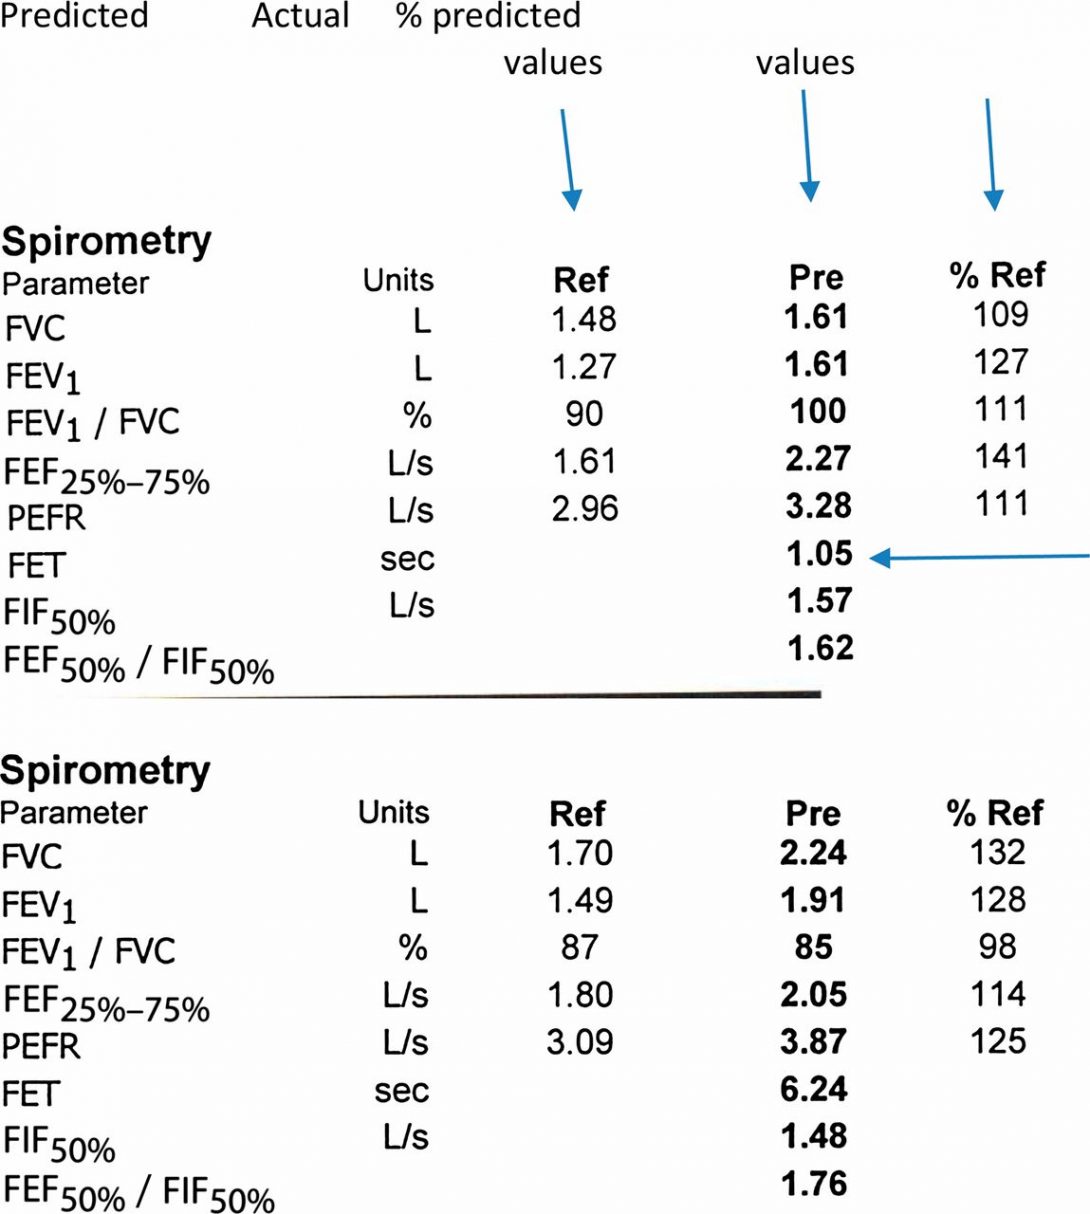
Step 6
The final results of the procedure are printed out for the technician and patient to see. The technician logs out of the computer and reviews the results with the patient. Both the patient and the technician keep a copy of the results. The machine may make an interpretation based on the data, subject to a physician’s review.
Potential “pain points”: Seeing the interpretation, patients may become scared from terms like “possible obstructive airways”. Although it isn’t a diagnosis, patients might not fully understand that. Having multiple trials on the same graph can be difficult to distinguish between each one. Logging out of the computer after every patient means they must be logged back in with their own unique login and password for the next patient.
July 1st: Good and Bad Design
After the first week of shadowing around the pulmonary department at the hospital, I noticed how many things got done. Specifically in the sleep apnea clinic, patients seemed confused when being taught how to use the monitor for the sleeping test. All instructions were verbal, and they lasted roughly 5-6 minutes in total. I think written instructions to send home with the patient would help them understand clearer. Patients also complained the CPAP machines could be very uncomfortable in the night. In the ICU, the hallways were very cramped during rounds and clinicians were straining to be fully involved with each patient. This inhibited learning, and seemed to slow down the overall flow of the rounds. Not everything seemed like it needed improvement, however. In the outpatient clinic, the doctors and pharmacists asked the same questions to the patient independently, often times receiving slightly different answers which helped paint a fuller picture of what the patient was actually doing. I also noticed a biometrics fingerprint scanner in the ICU to obtain medicine from the locker. It kept a record of who opened the locker and knew what medicine was taken out, which seems like smart security to me.