2019 Students Part 2
Raj Patel
Raj Patel
Basic Information about Student (Small Background introduction)
Year: Senior (BioE)
Area of Research: Gastroenterology
Contact Information: rpate293@uic.edu
Raj Patel Blog
May 15, 2019
First Day on the Job
Today was the first day on site. We tested…………
May 15, 2019
May 15, 2019
And the story continues as such…
Jun 29, 2019
First Week
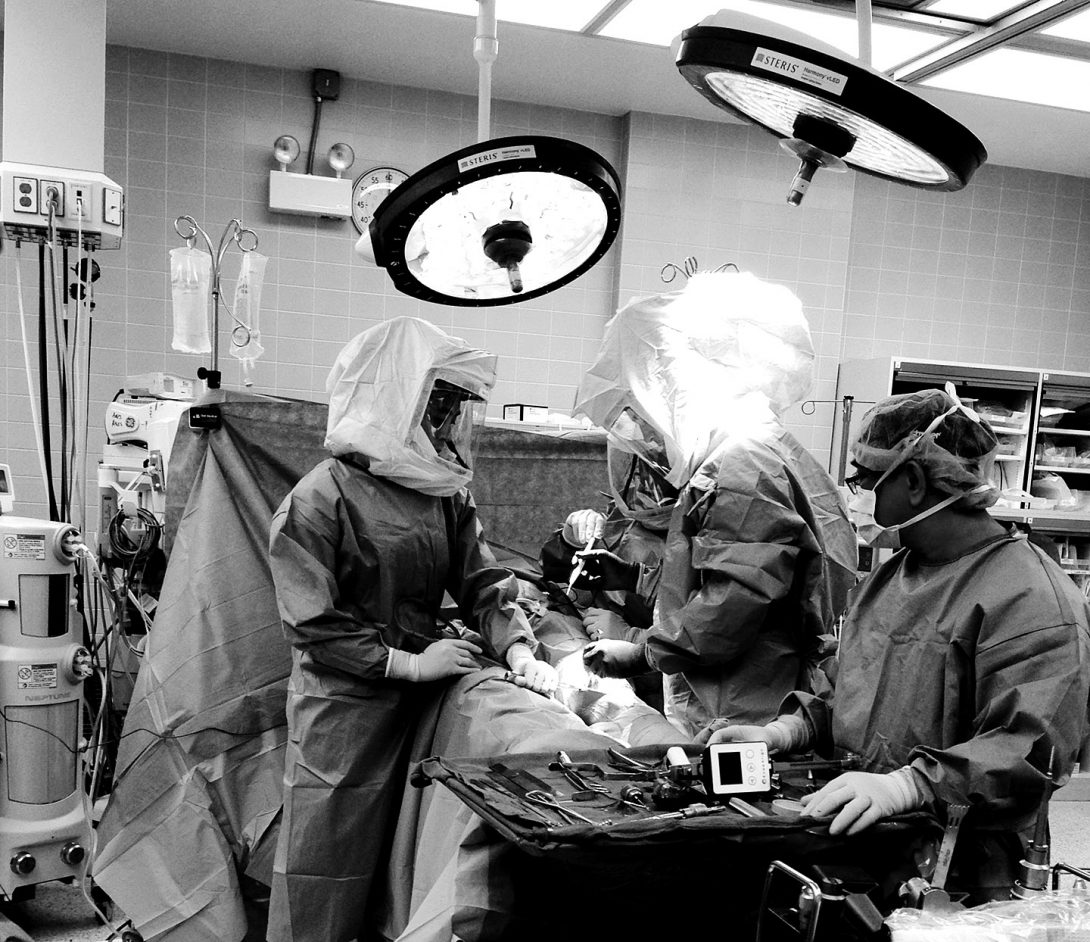
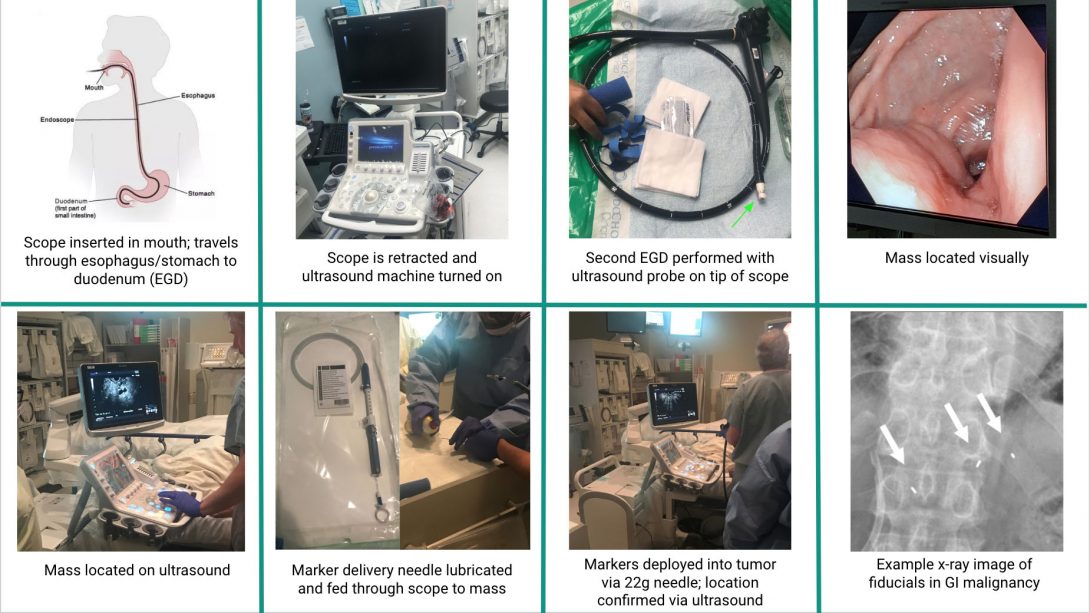
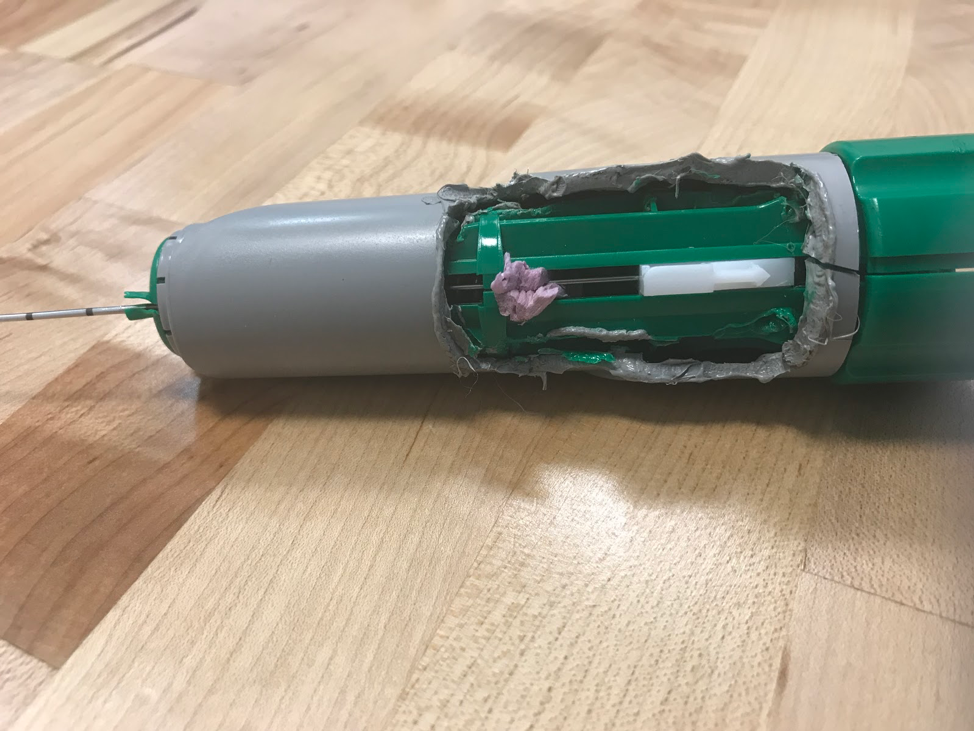
On our first week of observations in the GI clinic, we observed various procedures that were completed by many different physicians. Two of the main procedures were either a colonoscopy or a endoscopy using the device shown in the picture above. The procedure is used to take biopsies of various tissues/organs, remove polyps, or even apply heating treatment to lesions formed in the GI track that can cause bleeding.
One interesting procedure we saw was a polyp removal using an endoscope. The polyp was detached from the GI track using a heating treatment. After it was detached, a roth net was used to pull out the polyp, but since the polyp was as big as a human eye, the physical used a suction system to pull out the polyp.
As procedures happened, we started to wonder if the scopes were disposable or if they were being reused. We were told that each scope is worth about $65,000, so they had to be reused since physicians used about 30-50 scopes per day. Then we thought it would be really nasty to reuse a scope from a colonoscopy to an endoscopy, so we decided to head over to the sanitation room to see how the scopes were being cleaned. Upon watching the technician clean each scope, we were able to say they are clean after all. It takes about 60 minus to clean one scope, and these scopes cannot be cleaned all at once. The technician has to clean them individually, and in between the cleaning, he has to document every step he does such as completing the leak test, whether the scope is leaking or not, recording what scope he is cleaning and at what time… and other tests along with this.
July 7th
Storyboard
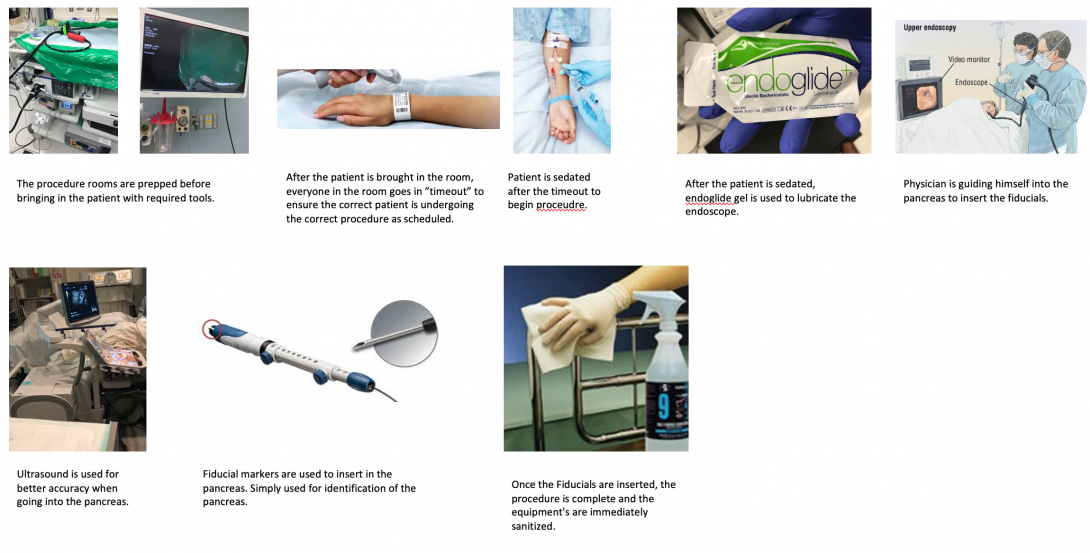
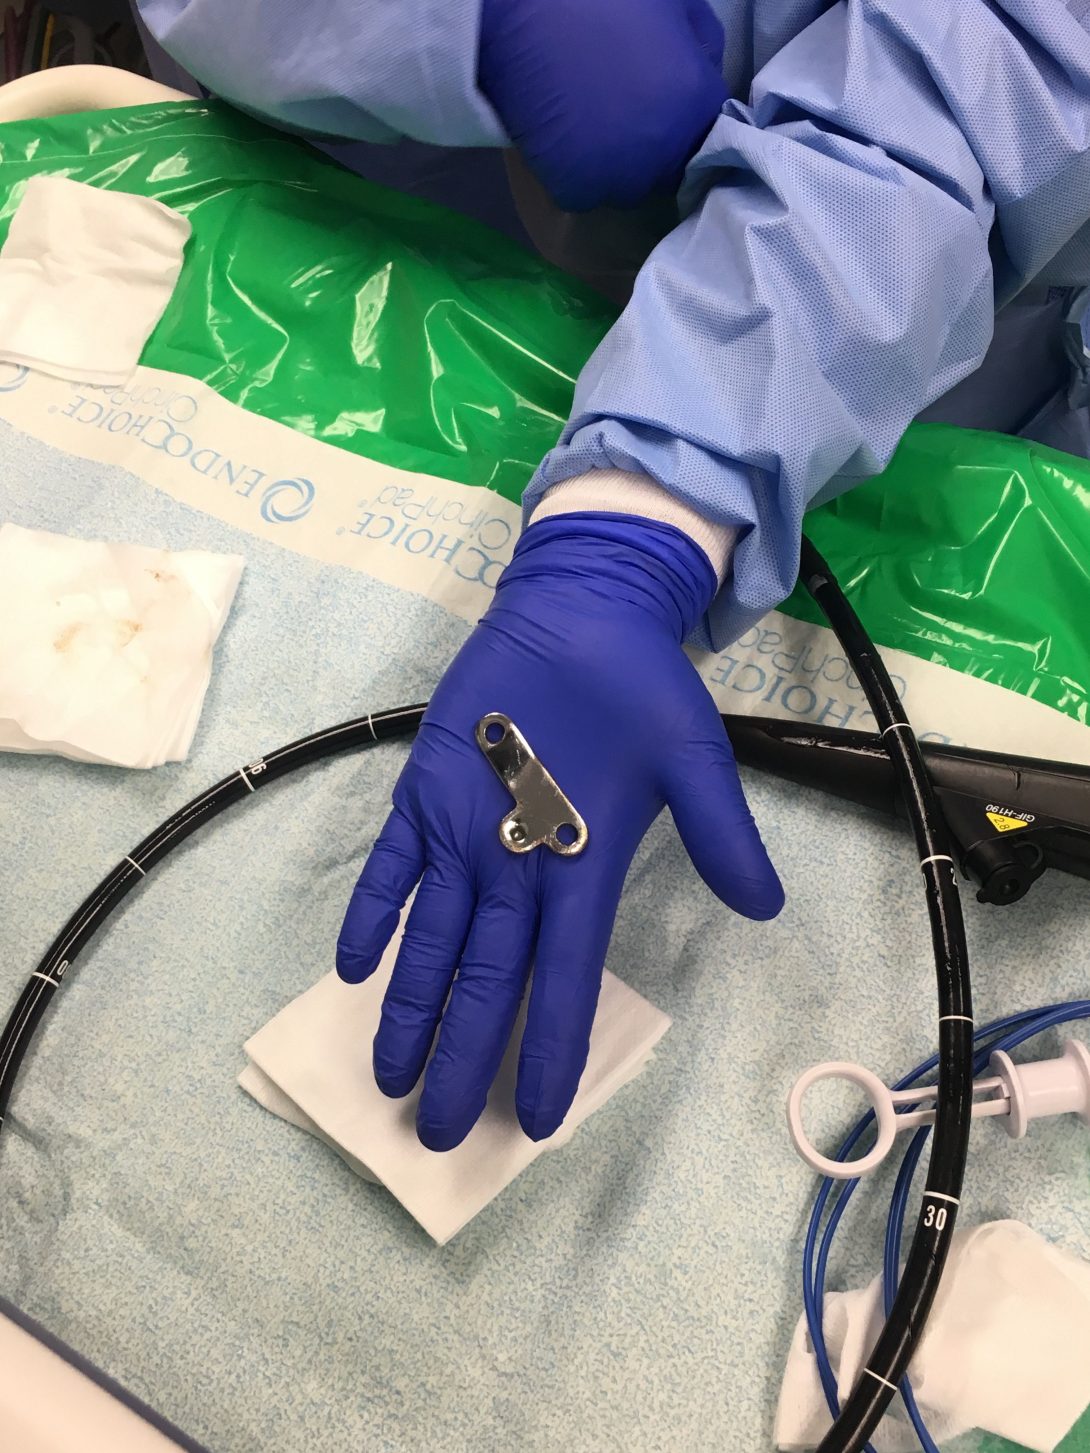
This week in lab we observed a fiducial implantation in the pancreas. This was done because the patient had pancreas cancer, and the radiologist wanted to apply radiation on the pancreas directly. With the imaging techniques, the radiologist cannot find the pancreas, so a specialist in the gastroenterology department has to insert these tiny markers in the pancreas called fiducial. These are inserted in the pancreas to make the life of a radiologist easier to kill cancer cells.
At first the patient is brought in the room, and correct patient identification techniques are used to ensure the doctor is treating the right patient for the right procedure. Afterwards, the patient was sedated with fentanyl, and versed. The physician then inserts the endoscope into the esophagus after lubricating the tip of the scope to avoid discomfort in the patient. Pancreas is located using the endoscope, and the ultrasound machine is introduced into the procedure now. The ultrasound device is used to determine where the fiducials should be positioned in the pancreas. Beforehand, the tip of the fiducial device is lubricated with PAM cooking spray for a smooth delivery into the pancreas. This procedure only required the insertion of 3 fiducials, so afterwards, the endoscope is drawn out carefully, and the procedure was over. The endoscope, and other equipments are then immediately sanitized, and a follow up with a radiologist is scheduled for the patient.
Possible problems within the procedure:
- Transferring the patient from an ICU bed to an inpatient bed causes discomfort in the patient with IV’s attached
- Sedating the patient with the right amount if difficult. Many patients wake up in the middle of the procedure if not medication is given which causes discomfort until more medication is given. So how can we give the right amount of sedatives to the right patient without the patient waking up?
- Why should we lubricate the tip of the fiducial device?
- Is the tip of the PAM spray bottle cleaned before spraying?
- Why doesn’t the fiducial device have enough lubrication from the beginning to avoid further problems?
Links to some of the images:
July 13th
Needs Statements
This week we learned about developing a need statements. A need statement consists of a population and an outcome. The needs statement starts off very simple, but through more research into the are, we can narrow down to a very detailed/specific needs statement.
This week in lab, we saw attending GI specialists use lubrications such as endoglide gel, or something as far as PAM cooking spray. We see that lubrication is needed for patient comfort, but the medical devices are not pre-lubricated. The three iteration of the needs statement is shown below:
A way to improve instrument lubrication for physicians performing a endoscopy or a colonoscopy.
- A way to improve instrument lubrication in medical devices for physicians.
- A way to improve instrument lubrication for physicians performing a endoscopy or a colonoscopy.
- A way to improve instrument lubrication for physicians performing fiducial placement that eliminates the need for outside materials.
July 21st
Criteria/Specifications
This week in our internship, we had to brainstorm ideas for our device and list criteria and specifications for them. Since we had two needs statement the previous week, we brainstormed ideas for both, and ranked each criteria and specification from a 1-5 scale with 5 being the best. After averaging both rankings, we realized we could prototype the jaw thrusting device since the benefits of that device outweighed the benefits of ERCP guide wires.
The device is used mainly on patients with obstructed air way disease. We decided to go on this route, since it causes a physical burden on CRNAs if they have to perform a jaw thrust maneuver in the middle of the procedure. So after accounting for all of the problems and brainstorming some ideas, we came up with some criteria and specifications for our device listed below.
Criteria:
- Device should be disposable
- Device should be portable
- Device should not cause harm or strain to patient
- Device should be ready to use immediately
- Device should be cost-effective
- Device should take no longer than 1 minute to set up
- Device should require minimal training
- Device should be operable by anyone in the procedure room
Specifications:
- Device should perform jaw thrust and maintain an open airway
- Device should maintain selected end-range positioning
- Device should be adjustable to accommodate various anatomical differences
- Device should not require any sort of power source
- Device should apply no more than 23N and 17N of force to the right and left jaw respectively
- Device should apply no more than 14N of force to lift up the chin
July 28th
This week we had to create concept cards on our models as we wrapped up brainstorming ideas on our jaw elevation device. The concept card consisted of 4 sections: Team name, needs statement, benefits, and a sketch.
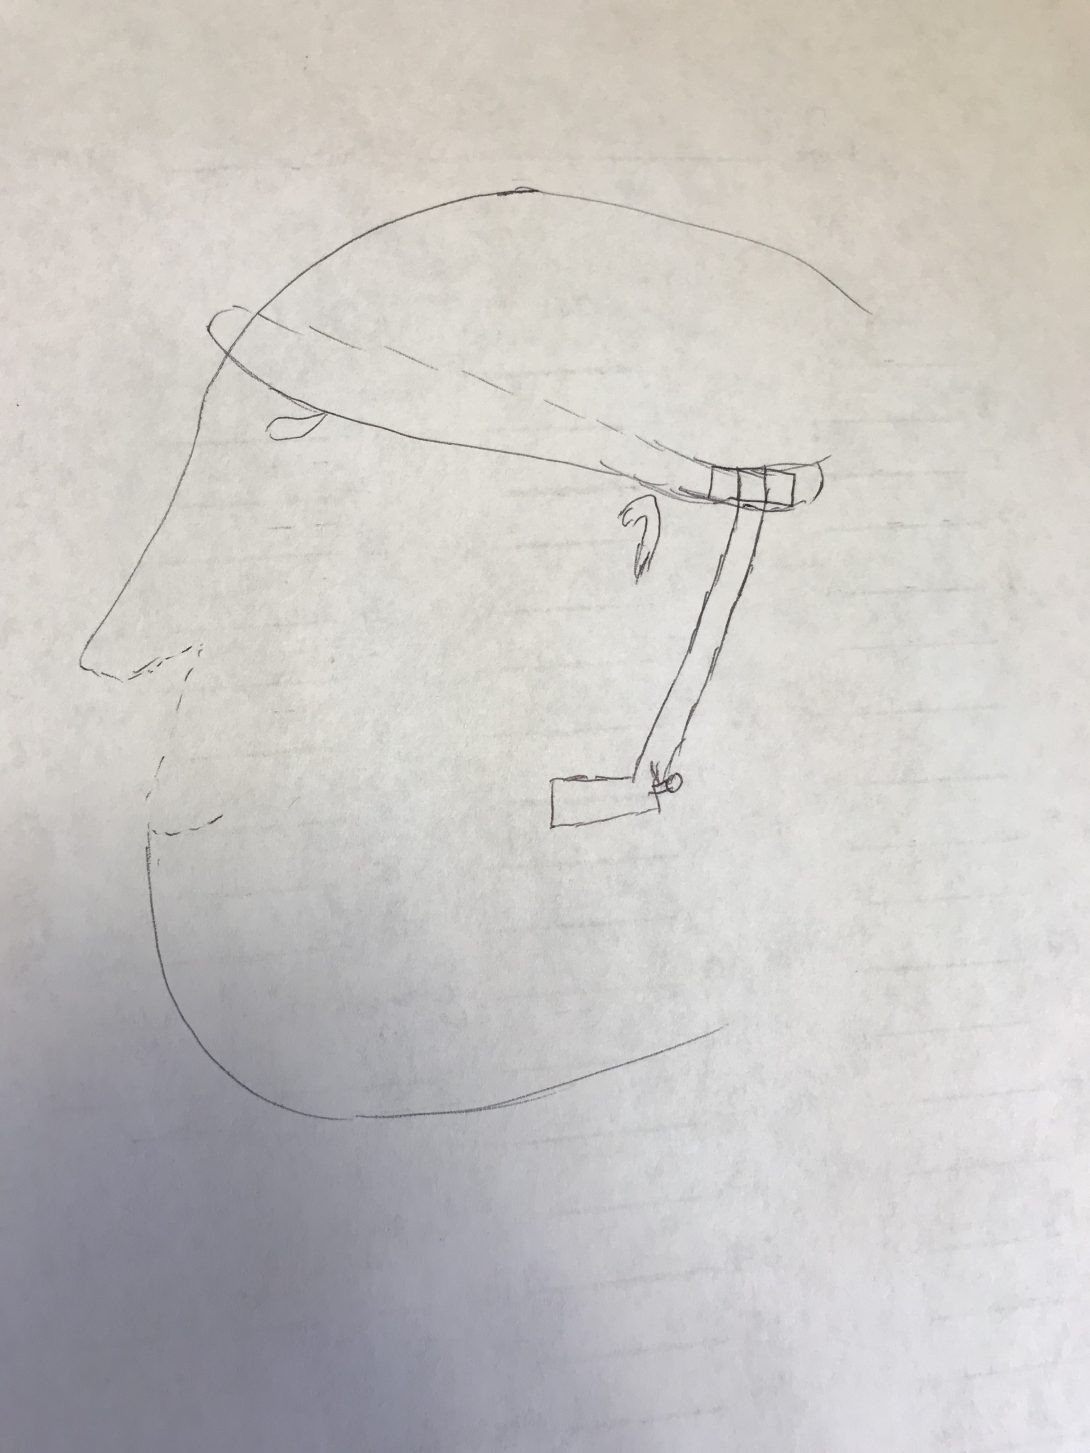
Needs statement: A way to decrease airway obstruction and incidence of subsequent intubation in patients with underlying obstructive airway conditions that decreases physical burden on staff.
Benefits: Creating a jaw elevation device that lets you perform the jaw thrust maneuver in any position allows a airways in the patient to be open. The direct impact is on the Nurses performing the maneuver for a long period of time (Over 15 mintes). Overtime, the maneuver does cause a physical burden on staff, so implementing this device into the procedure, we would be able to have one less nurse in the room which could potentially save labor as well as crowding in the rooms.
We decided to bring the force down from the forehead instead of the nasal region because there is a higher change to break cartilage in that region. The force is created from the tightness of the strap on the forehead, and that force is carried downwards to the joint, and into the jaw region to push forward. A rough sketch of of this device is shown below.
This device would cost less than $30 while the original jaw elevation device cost around $300 . Along with this, the new device would allow the physicians to perform endoscopic procedures on the patients side whereas if you use a JED the patient would have to be in the supine position.
Chloe Baratta
Chloe Baratta
Basic Information about Student (Small Background introduction)
Year: Senior (’20)
Department: Gastroenterology and Hepatology
Areas of Interest: Biomechanics, Rehabilitation, Powerlifting
Contact Information: cbarat2@uic.edu
Chloe Baratta Blog
Week 1: A Very Large Fly on the Wall

An Exploration in Intestines
The first week of anything new is bound to be a tad overwhelming.
No more than 3 minutes into shadowing my first clinical post-op appointment under the head of Hepatology, I realized that, despite taking several physiology classes, I somehow didn’t actually know which vertically oriented segment of the colon was ascending and which was descending. I decided to tackle this knowledge gap issue (and that of the countless acronyms of whose meaning I hadn’t the slightest – ERCP = Every Really Cool Procedure?) by using my favourite resource: Google. I really do think that I wouldn’t have survived in academia before contemporary internet resources simply due to the truly asinine questions I’ve googled on the fly.
This week was jam-packed full of chasing doctors around clinic while badgering them with questions in the hallway between patients, doing my best to imitate a pleasant and ignorable statue (see image) while not getting in the way in slightly cramped procedure rooms when yet again badgering staff with questions, and attempting to adequately document/categorize initial findings of potential areas for improvement.
Findings:
Clinic: Runs mostly like a well-oiled machine, some charting/bureaucratic issues that should be resolved through adoption of new cloud records software within the next year. Issues with patients are fairly common (diet adherence, medication side effects, wound infection, and follow-up attendance are the most frequent themes) along with small time slots for doctors leading to emphasis on most important summary points without explanation of certain items were the over-arching themes I noticed. It also seems odd that disposable stethoscope covers aren’t standard.
Endoscopy Lab: The rooms are cramped and have a lot of exposed wiring/cables/tubes; wiring will be fixed with the incoming lab renovation. Scoping is an actual ergonomic nightmare. The banding device for the scope could benefit from redesign and occludes vision when attached. Similarly, the wire used in ERCPs has no directional tip control or rate feed control and is fairly unwieldy. Inpatient preps for colonoscopies are notoriously poor, possible posited causes could be due to nurse inattentiveness, patient incompliance, or comorbid medical problems. Outpatient preps for colonoscopies are commonly non-ideal but adequate for scoping. The prep solution needs revision as it causes many to throw up and is then ineffective.
Week 2: Lots of Bile
A Holiday Week Shorter than the Existence of the USA
Running into a week bifurcated by the great American holiday, the 4th of July, our team knew we had to be fairly selective with our observations in order to not willy-nilly run off looking at new procedures instead of gathering continued data on procedures we chose to focus on. The beauty of being in Endo Lab is that scoping procedures are all fairly mechanically the same: scope goes in one orifice and stops about halfway through the GI tract. Biopsies, diagnoses, and therapeutic measures may/may not be deployed somewhere in between on withdrawal. The issue begins in finding whether problems are replicated between procedures. As we watched a huge variety of problems in the first week, we realized that some of our targeted “problems” were doctor-specific (operator error) or non-replicable, so we chose to attempt to limit our selection of procedures we watched this week. This led to our storyboard: EUS-guided fiducial placement. I’ll attach the presented storyboard I made below.
Problem identification: Going left-t0-right on each row, we’ll call images items 1-8.
Item 1: Standard EGD problems include varying levels of sedation often leading to patient discomfort, scope tip lubrication (thick lubricant needs to be applied), patient head positioning (bite block is sometimes ejected and airways can be obstructed, both requiring interventional manual manipulation), wire clutter in bed/room, and scope ergonomic design (the hill I will die on).
Item 2: The ultrasound machine isn’t exactly the newest – not that there’s anything wrong with it – but it’s more likely to hold germs/bacteria due to wear and tear on the plastic covering on the keyboard. Procedures aren’t sterile so it’s not really the end of the world, but if it malfunctioned the procedure would be fairly impossible so when machines are updated sanitation might not be a bad concern for redesign. You can do EUS-guided fiducial placement with fluoroscopy too, but it’s more of a complementary technique, not a replacement for US.
Item 3: Having to basically scope a patient twice is a recipe for twice as many potential complications. Here, main concerns are the same as Item 1 with the added potential need for more patient sedation, sanitation of US tip, and lubrication of US tip.
Item 4: As doctors have functioning eyes, visual inspection is considered reliable for locating masses, but it’s not exactly the most exact approach. As it’s unlikely that a patient would have two masses that look identical in the same place with one unnoticed, this method is fairly reliable but just seems funky.
Item 5: The US system is basically magic for a lot of applications but it is pretty terrible resolution and the readings tend to fluctuate a lot.
Item 6: The needle deployment system for fiducials is pretty much guaranteed to need PAM on it. It seems weird that this system would be so poorly designed.
Item 7: The markers don’t really have any control system other than the fact that they’re shot out of a small needle. Orientation doesn’t need to be any specific way so this is fairly irrelevant. Potential complications include migration in the tissue, bleeding, and/or infection.
Item 8: Same pain points as Item 7.
Week 3: Treasure Hunts in the GI Tract
A Tentative Demystification of the Colon
Week Three, or rather, the week the nurses vaguely accepted us as non-horrifying semi-permanent fixtures in the Endoscopy lab was simultaneously fruitful and frustrating. Befriending several of the medical assistants has possibly been the best thing I could’ve done in this program. They’re super happy to answer questions and they take time to volunteer tons of valuable insight during procedures. The same really goes for the nurses, and I may have been slightly too overcome with emotion for 8 am on a Wednesday when one of the charge nurses handed Aga and I print-outs of the biliary/pancreatic duct anatomy so that I didn’t have to covertly google structural minutiae of the liver-ish area while our favourite advanced GI doctor narrated at a mile a minute during ERCPs. I would like the reader to note that he, unlike his colleagues, believes that the bowel likes Def Leppard (not reggae).
Highlights, while not limited to playing Go Fish! (retrieval of a surprisingly phallic-shaped swallowed door hinge from a stomach – see image), were slightly constrained due to a necessary increase in our group meeting time while in clinic. Nevertheless, I was fortunate enough to observe several procedures that I missed in previous weeks (like an EUS) and actually felt like I somewhat knew what I was watching/talking about when asking questions.
While we had what was a bit of the best problem to have – too many identified needs – they desperately required some analysis in order to thin the herd. We initially had SIX needs statements written for the week-end presentation, and only even managed to narrow it down to two top contenders. I’ve thus chosen to discuss one of the black sheep of the needs; rejected for infeasibility/slight scope irrelevance.
Colonoscopies seem to be one of, if not the, most common procedure performed in the lab. Among a massive array of other benefits that well-done colonoscopies impart, a lot of colorectal cancer cases can basically be prevented by routine colonoscopies with polyp removal. Thus, routine high-quality colonoscopies are very important in order to catch these polyps so they aren’t allowed to progress to cancerous masses.
Unfortunately, colonoscopy preps are commonly very poor (particularly on inpatient patients, young people, and the elderly). This leads physicians to have to literally attempt to clean out the bowel with the water jet on the endoscope while performing colonoscopies. This adds a very large time window (often doubling procedure time) onto to usually quick colonoscopies; backing up all cases for the day and often frustrating the physician/staff. As polyps are commonly <1cm, the bowel needs a very high level of cleanliness in order to spot these and remove/biopsy them. The efficacy of the procedure as cancer prevention really plummets due to poor patient preparation. Obstruction of the bowel wall also interferes with pretty much every other efficiency/efficacy aspect of the colonoscopy, let alone the fact that it's a bit gross. I say just "a bit" because I've been strongly desensitized to everything GI/Liver even in the relatively short window of exposure we’ve had so far.
The general physician/staff consensus for the cause of poor preparation seems to be attributed to two main problems: a borderline intolerable prep formula and highly insufficient patient education. Patients tend to throw up or not finish prep solutions all the time (you must drink a gallon of thick, salty, sickly sweet flavoured polyethylene glycol), leading to “completed preps” that basically make it look like the only preparation taken prior to endoscopy was having a solid bowel movement and calling it a day.
When asked what information patients were provided with as to the necessity of properly completing preps (maybe a pamphlet with comparisons of good preps and bad preps and what information can be obtained with both), we were told that patients generally just received (poor) verbal instruction from their pharmacists. It is clear that both the prep formulation and patient education protocols require revision.
As is such:
Problem: poor procedure preparation
Population: patients receiving colonoscopies
Outcome: improved efficiency and efficacy of the procedure
Needs Statement Iteration 1: A way to address poor procedure preparation in patients receiving colonoscopies that improves procedure efficiency and efficacy
Needs Statement Iteration 2: A way to improve poor procedure preparation in patients receiving colonoscopies that increases procedure efficiency and efficacy
Needs Statement Iteration 3: A way to improve poor procedure preparation in patients receiving screening colonoscopies that increases procedure efficiency and efficacy
Revision notes: The edits were mainly petty etymological changes, but the scope was somewhat narrowed in iteration 3 to reflect the emphasis on the need for a good prep to facilitate effective polyp removal to try to prevent colorectal cancers. This is usually done in screening, rather than diagnostic, colonoscopies.
Week 4: "Remember Me?" -Engineering
Otherwise Titled: What the Heck Are We Gonna Prototype
This week (the fourth) we were tasked with further analyzing our data within the scope of our needs statement in order to develop criteria and specifications for our project. This process was slightly more frustrating than expected.
We finally narrowed down which problem statement we were going to proceed with! After being split between the ERCP guidewire tech or airway/jaw thrust device until even halfway through this week, talking to almost every single person in the endo lab, and discussing within a group on numerous occasions, we finally sat down and made one of those tables of attributes/ratings (like that seen in lecture) to best objectively select our project. We finally went with the airway device as it had overwhelmingly positive feedback from all levels of care providers (techs -> advanced GI docs) and had the best overall feasibility/desirability/viability/etc rating.
Refining criteria without having a concrete idea of your prototype was extremely foreign to me, so it was an interesting exercise to force myself to design differently. We eventually ended up slightly blending the two methods (design first, criteria after and criteria first, tangible design after) and worked on prototype ideas while brainstorming criteria and specs. We are currently working strongly off of the ideas of past patent applications – there is one product on the market meant to achieve the same goal but it’s overpriced, doesn’t work well, and doesn’t meet our specs/criteria – along with having creative basis, this makes it much easier to get FDA approval if similar to past devices.
This week also really emphasized the importance of being able to communicate scientific ideas to people with varying backgrounds. We split our research in various areas (research literature review, patent lit review, anatomical considerations, mechanical joint design, etc) and regrouped to recap our findings. I am very poor at communicating scientific findings without structured presentations and graphics and I really found myself struggling to informally communicate concepts orally so I’ll definitely be working on that.
Week 5: Deep Yoga Breaths
Otherwise Titled, “A Brief Tirade Regarding Concept Cards”
Much like Dr. Jung told a very moderately sedated patient who was having immense difficulty during an EGD, we all needed to do some deep yoga breathing this week.
Our penultimate week in CIP was spent solely in the innovation center. I would like to thank the gods above and below for Ground Up; as I have consumed an ungodly amount of coffee from them this week while fighting with Fusion360. I managed to learn a new CAD program on the fly this week (I’ve used it for CAM though, so I am vaguely familiar with…how to import files, as I have the most experience with both CAD and 3D printing in the group and thus took on the duties for both. I designed a series of jaw cups for our device (whew chile it has been a WHILE since I have designed anything that needs to fit the human body and that was apparent), and introduced my group members to the lovely internet resources of open source STL files. I also learned how to use two slicers for two different FDM printers (MakerBot and Prusa) and successfully printed parts/swapped filament (with a bit of help from the lovely innovation center staff) on both. Although I missed being in the hospital, I felt like this was a nice and hands on week in the program (and I didn’t have to wear a blazer)!
This week’s lecture included a fairly hefty amount of group work time, which can be both good and bad. We had a bit of frustration with communication again, same discrepancies with different levels of being “on the ball” with things as previously discussed. The concept card activity was particularly interesting to note variations in how we all pictured our prototypes – we’re basing our design off of some abandoned patents so we have a bit more of a tangible design basis than originally anticipated but somehow we all came up with fairly foreign sketches. I, personally, have a bit of a vendetta against 2D imagery as I am awful at visualizing and digesting it so the concept cards were a bit of a tiny hell to understand and it led to me awkwardly interrogating my group members as to what things meant. Me am dumb caveman. Like model that can hold. Give me modeling clay over pencil/paper any day.
Daniela Merlos
Daniela Merlos
Basic Information about Student (Small Background introduction)
Year: 4th, Senior
Area of Research:
Contact Information: dmerlo3@uic.edu
Daniela Merlos Blog
Week 1: OB/GYN
Merely Observing…
This first week under Dr. Ramanathan’s supervision, my team was able to observe several procedures in a variety of settings including the clinic, OR and procedure rooms. My team was heavily focused on observing and recording all items considered relevant to the AEIOU framework, while still seeking for good and bad designs.
On the second and third day of the Clinical Immersion, my team was alternating in pairs to sit in on clinical visits. Dr. Ramanathan was able to provide medical attention to her patients but also educate us on steps done in procedures like IUD insertions and pap smears
On the fourth day, my team was able to sit in on a total of three, OB/GYN-related, surgical procedures. That day provided insight into the workings of the OR and ICU, where most operations were observed from start to finish. The tools and interactions made by the surgical staff provided a better understanding of roles and responsibilities -lending to a better assessment for areas of improvement.
On the fifth day, Dr. Ramanathan had my team shadow her colleagues in their procedure rooms. The procedures done on this day helped to provide further observation of tools and equipment used for, do I dare to say, “less invasive” procedures.
The designs that my team evaluated ranged from room color scheme to surgical tool handling. Here is a list of just a few.
Good designs:
- Clinic: calm, light color schemes
- Clinic: Medical Assistant & Physician teamwork in procedures to maintain sterility
- Clinic: 7 rooms and 7 sonographers for ultrasound
- ICU: spacious and accessible layout
Bad Designs:
- OR: cable/outlets pose tripping hazard
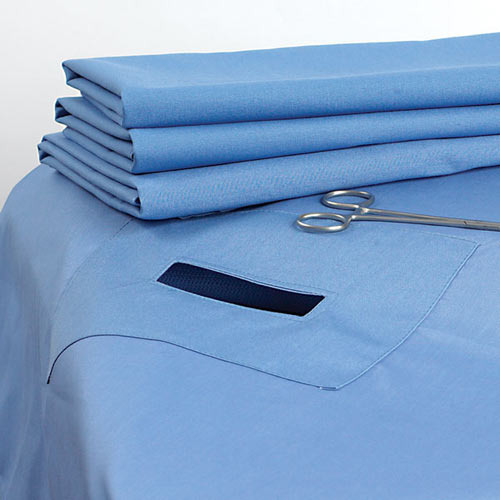
- OR: surgical drapes must be altered to fit incision
- Clinic: bed/chair no support for patients to lift themselves
- Clinic: cluttered consultation rooms
- Procedure Room: tools and devices uncomfortable for doctors’ use
- OR: collecting and assessing blood loss
Week 2: OB/GYN
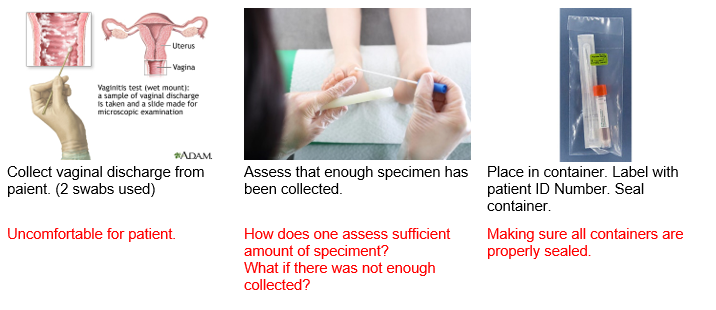
Storyboard: Vaginal Wet Mount
Steps 1-3
Week 2: OB/GYN
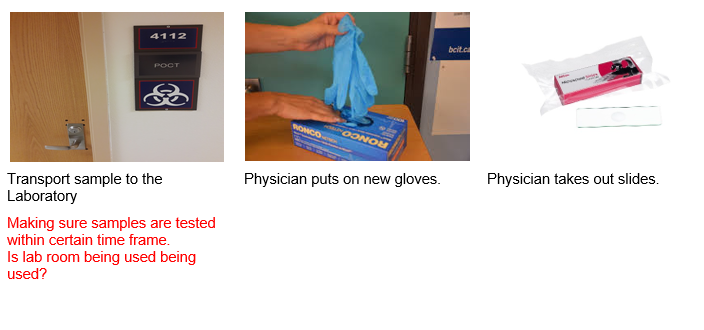
Row 2
Week 2: OB/GYN
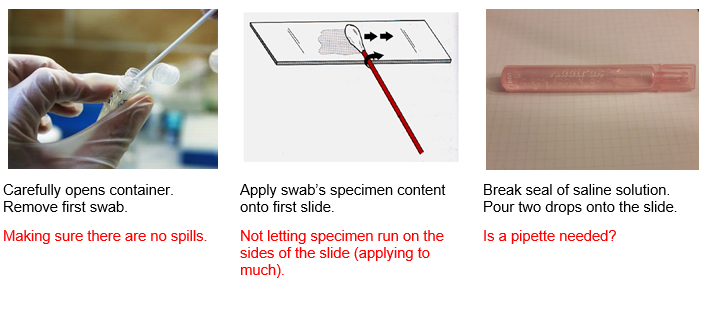
Steps 7-9
Week 2: OB/GYN
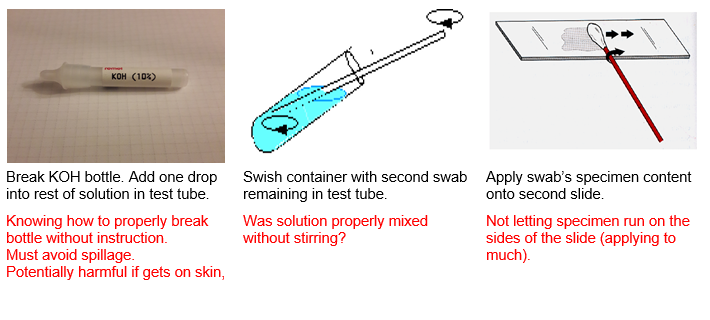
Steps 10-12
Week 2: OB/GYN
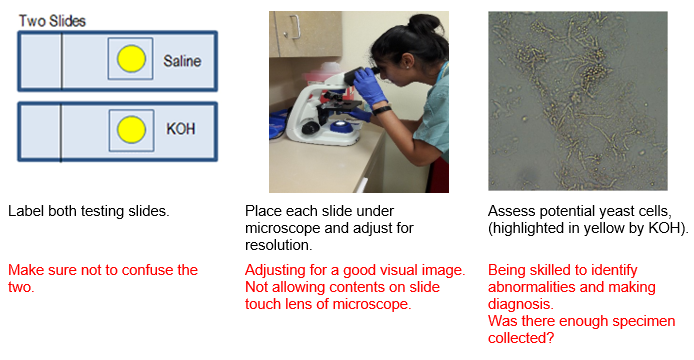
Steps 13-15
Week 3: OB/GYN
Creating the Needs Statement
After three weeks of intense observation and recording following the AEIOU Framework, our team was finally selecting an area of focus. This part was perhaps the most difficult part. However, we saw that in the surgical rooms there was a need for the sizing and application of the drapes. Please refer to the following needs statements:
Iteration 1:
A way to address draping in patients during surgery that provides ideal surgical area.
The problem with this need statement is that most key terms to describe population and problem are very broad. In fact, there is no clear outcome expressed in the statement as well. Population is merely defined as patients. The problem is merely defined as providing ideal surgery. What is d
Iteration 2:
A way to address the need to cut surgical drapes to better expose incision area for patients in surgery that does not minimize the adhesive property of the drape against the patient’s skin in cutting the drape.
The problem with this need statement is that the outcome is clearly stated and is very specific.
Iteration 3:
A way to minimize the loss of time and adhesive properties that result from the cutting of standard-sized surgical drapes to fit an incision area in patients of different stature during various gynecological surgical procedures.
Week 5: OB/GYN
Concept
Background: The idea originated in the OB/GYN Clinic where we saw the lack on interaction experienced by a deaf pregnant patient who came in for a regular clinical visit. She is unable to hear her baby’s heart tones, so the nonideal alternative would be to have her place her hand on the end of the Doppler Sonoline to feel the pulsing. However, she was unable to detect the pulsing emitted through the handle. We spoke with the patient and even allowed her to test out an app that simulated fetal heartbeat. The limitation on the interaction of this experience presented itself as an area of interest for my team. Afterwards, we continued research and interviews to facilitate the design criteria and specifications of the prototype.
Problem: method to improve interaction
Population: deaf pregnant mothers and their fetuses
Outcome: increasing of maternal involvement in prenatal care
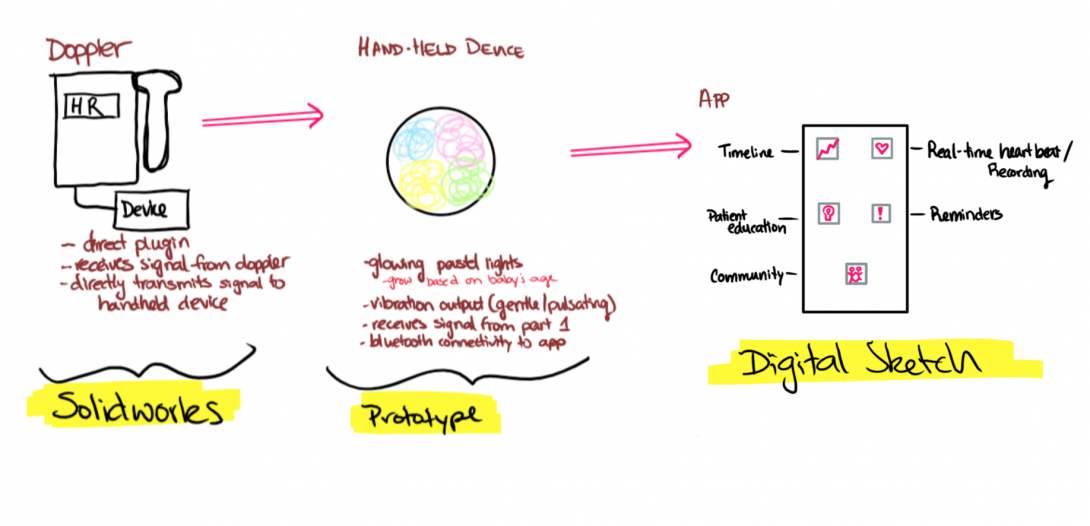
Key Components:
- Component 1: Attachment to doppler and transmits sound.
- Component 2: Device that has friendly appearance and has interactive output: vibrational motor and LEDs. It display fetal heartbeat in real-time
- Mobile App: a hub that has many neat features related to prenatal care.
Week 4: OB/GYN
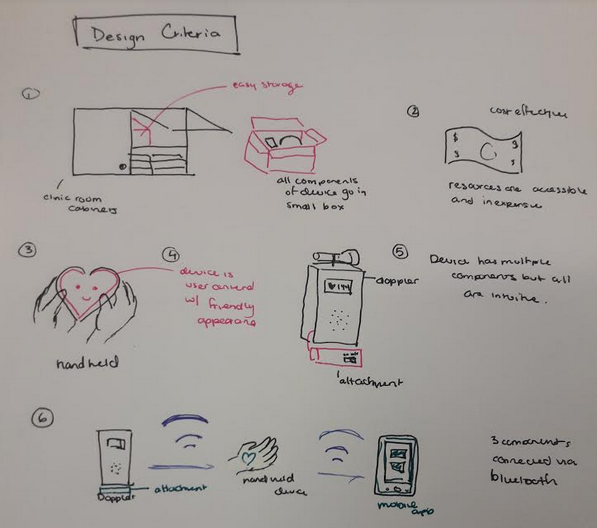
Design Criteria
It has been a truly incredible experience, thus far. We have learned so much under the supervision of Dr. Ramanathan and her colleagues. At this point, my team and I had finalized the need statement and began the initiation of designing potential solutions that would cover the need statement. After the idea to explore the enhancement of maternal experience in prenatal care for deaf pregnant women became our focus, we consolidated and refined the designs for our prototype. We came up with the following criteria as critical factors to remain in all revisions of any design.
Zafar Siddiqui
Zafar Siddiqui
Zafar Siddiqui Blog
What are some good needs?
Pulse Ox
This week was interesting because we delved deeper into some of the needs we’ve previously identified. It was also interesting to see that some of the needs we identified were only needs in hospitals like UIH, where sometimes funding was the issue. For example, we spent a lot of time identifying problems with the bronchoscopy suite, but when we did our own research, we found out that solutions to most of these problems exist. At UIC, the physicians were simply using older bronchoscopes, and we confirmed this with the physicians there.
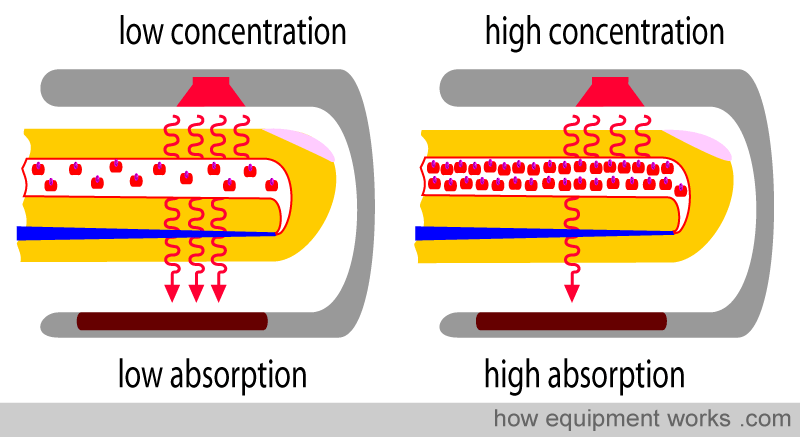
We also identified a new problem, however. A problem that is somewhere in between evolutionary and revolutionary. It would expand the scope of old technology but would have an extremely high impact. This need was a way to measure central oxygen saturation levels. This need was brought to light when we found out that it is hard to obtain a normal pulse ox reading, normally from the finger or another extremity, in sepsis patients. Septic patients experience vasoconstriction of their peripheral arterioles, and thus, it’s peripheral oxygen saturations are hard to obtain. At the same time, these patients are assumed to have low oxygen saturation but can still be undertreated for this, or sometimes can be overtreated as well. Overtreatment would also produce its own problem with oxygen associated tissue injury. The reason pulse ox work on extremities is because it depends on light transmission through the skin and tissues, as shown in the picture.
We’ve thus crafted this understanding into a few iterations of a needs statement.
- A way to obtain a central O2 saturation value in all patients in the hospitalThe rationale behind this needs statement is to not limit ourselves to only dealing with one subset of population, and to focus on a specific problem that if solved, may be widely applicable to many patients.
- A way to obtain a central O2 saturation value in septic patients in the hospital.This needs statement is the most specific and has the narrowest scope of all three. The rationale here is to focus on a specific problem as seen in a specific subset of patients in the hospital.
- A way to obtain an accurate O2 saturation value in sepsis patients in the hospital.The rationale behind this needs statement is to make the problem a little broader than the last one. Perhaps a central O2 saturation value isn’t the solution to accurately measuring O2 sats in a septic patient. On the other hand, this needs statements focuses on septic patients in the hospital.
Storyboard
Thoracentesis
This week was all about storyboarding. We broke down several processes into individual steps and focused on possible pain points in the process. This exercise was very enlightening. Below is my storyboard for an aborted thoracentesis procedure.
2: 44 PM: The patient is brought down into the pulmonary procedure suite.
Possible Problems:
- If the patient is in the ICU, the protocol doesn’t allow them to leave so the procedure must be done in an ICU room that’s not specialized for this kind of procedure.
2:51 PM: The team of an attending, a couple of fellows and residents, as well as a technician, prepare the patient for the procedure by rolling the patient over.
Possible Problems:
- It takes a while for the patient to be put into position and I wonder if, during the procedure, he may change his position on accident.
2:53: The attending uses an ultrasound probe to find the pleural effusion so that he can drain it.
Possible Problem:
- Most of the fellows/residents arent’ very comfortable reading lung ultrasounds and don’t know what to look for.
2:53 PM: “The fluid doesn’t account for the X-ray findings,” he says. He then asks the team what could possibly have lead to the X-ray and US being so different. The pulmonary technician answers.
Possible Problem:
- Much time was “wasted” prepping the patient and the team for a procedure that didn’t happen. (Couldn’t they have done the ultrasound earlier??)
2:55 PM: The procedure is aborted and bronchoscopy is scheduled for Friday.
Possible Problem:
- The patient barely has a left lung because of this condition. While he’s not acutely short of breath, the patient has to wait for two days for a procedure that takes 10-15 minutes
- The patient had been given food/juice before the procedure so a bronchoscopy couldn’t be done at the same time.
The Good and the....Not So Good
First Week in CIP
It has been quite an interesting week, and I can’t believe we’ve seen so much in a week’s time! We’ve rotated in the ICU, pulmonary outpatient clinic, pulmonary hypertension clinic, sleep clinic, and the pulmonary function test lab. Each environment was so unique, and each was replete with opportunities for improvement. On our first day, we met our mentor Dr. Dudek, and given how busy he must be, I was pleasantly surprised by how personable and invested he was in our success in this program. He made it clear that he’d be willing to help us along the way and provided us with a detailed introduction to the field of pulmonary/critical care. We then went to the ICU and familiarized ourselves with the environment before heading to lunch. In the evening, we were in the outpatient clinic. Unfortunately, there were only a few patients that day. However, there was still plenty to soak in, from the workflow to the environment. On Wednesday, we walked to the sleep clinic. This was possibly our best experience of the week. The staff was so helpful and we got to meet with every single kind of employee in the clinic, including the clinical coordinator, the attending, the fellows, the respiratory therapist, and several more people! Each person allowed us to shadow them and fielded any questions we had. The PFT lab was our destination for the evening and it was a large room filled with cool technologies that allowed patients to be screened for respiratory problems. On Thursday, we got to see the pulmonary hypertension clinic, where Dr. Fraidenburg and the nurse were both very helpful in showing us all of the sophisticated technologies their patients use to take their medication. Finally, on Friday we got to spend significant time at the ICU. We shadowed the ICU rounds which was a scene unlike any I’ve seen before. It was fascinating as both a medical student and an engineer. I think we’ve come up with almost 100 problems so far in one week, and I look forward to spending more time finding more creative ones in the weeks to come.
So we saw a lot. Good examples of technology and processes, and not so good ones. Some examples of good execution were the ultrasonic nebulizer technology which was very user-centric, the nature of the interactions in the ICU, the efficiency of the sleep clinic, and the PFT lab. The ultrasonic nebulizer came with several ways to charge the device, the battery lasted the whole day, and it was very portable. Additionally, the company sent each customer two units. In the ICU, so many different people interacted seamlessly in very large teams to take care of very sick and complicated patients. The sleep clinic was relatively small for how many patients they had, but each bit of space was being used and the staff there also worked great as a team. The PFT lab had a lot of cool tech, and the staff was very helpful in instructing the patients on how to complete their tests accurately.
Then, there was the not so good. Like a lot of it. Some that stand out was the fact that the CPAP/BIPAP masks weren’t customizable. People with angioedema, facial deformities, or with any other reason their face isn’t like the average person’s had trouble using the mask. This means their sleep apnea can’t be treated optimally. Additionally, the positive air pressure was very uncomfortable and there was no way to only turn this on once the patient fell asleep. The technology for the stress testing in the PFT lab seemed old and boring, so people may have a little bit less motivation to push themselves to the limit. The WOW’s (workstations on wheels) in the ICU were very cumbersome and crowded the already small hallways even more. Also, everyone on rounds had stacks of papers, and sometimes when a medical question was asked, there was uncertainty because it took some time to look at patient’s charts to find small, but relevant details.
Specs and Brainstorms

I think we’re a little crazy
This week began with the task of picking a needs statement to focus on for the next three weeks. This was a painstakingly frustrating process as we kept bouncing around the 3 needs statements that made our final list. We interviewed several physicians and other healthcare experts. Finally, we stumbled onto Dr. Haas who saved the day. As an interventional pulmonologist, two out of our three needs statements were in his exact area of expertise. He explained to us that one needs statement may be very complicated and slightly out of scope in terms of the timeframe for the program and the knowledge required to understand the technology. The other need had actually just recently been solved. We sketched out a few of our brainstormed ideas to him and he was very impressed because our sketches were very similar to two patents that have been filed to address this exact need. It turned out were a couple of years too late. While this would be disappointing news to some, it was fulfilling to hear him tell this to us because it could be an indication that we’ve learned a little bit about the innovative process these past few weeks.
So then we were left with one needs statement, and we modified it to make the possible scopes larger. We then identified design criteria that we would want our innovation to have, as well as product specifications. We spent some time searching the literature to come up with product specifications that could measure our innovation’s level of success.
We then brainstormed different avenues to solve the problem and then spent many hours thinking of possible solutions within each avenue. We came up with some crazy stuff, no doubt, but the exercise was the most fun I’ve had so far in the program. One of the ideas we liked the most as a group was an idea of a sleep tent that would not only remove the nuisance of wearing a mask but could possibly help insomnia symptoms as well if the tent was made to be conducive to sleep. This concept of possibly treating insomnia and sleep apnea together was fascinating, especially since 50% of sleep apnea patients also have insomnia. The sleep tent idea we came up with would be able to make an airtight seal through which positive pressure would be applied and the entire tent would become a high-pressure atmosphere to sleep in. Companies such as Hypoxico already market tents to do the opposite, that is, lower the pressure and simulate high altitudes and low levels of oxygen. These tents are marketed towards professional athletes. Repurposing this kind of design for sleep tents to treat sleep apnea was one of the many interesting ideas we came up with.
Concept Cards
It’s starting to get real….not really
This week was all about picking a solution and ironing it out. We started the week with four possible solutions. As a group, we decided to ideate the most exciting one first, although we were all quite cynical of the tech being able to actually work. Our problem was CPAP compliance, and we thought that creating pressurized sleep tents would be comfortable and treat these patients’ conditions. But we were wrong, and we realized after many hours that it just wouldn’t work because of the laws of physics and physiology.
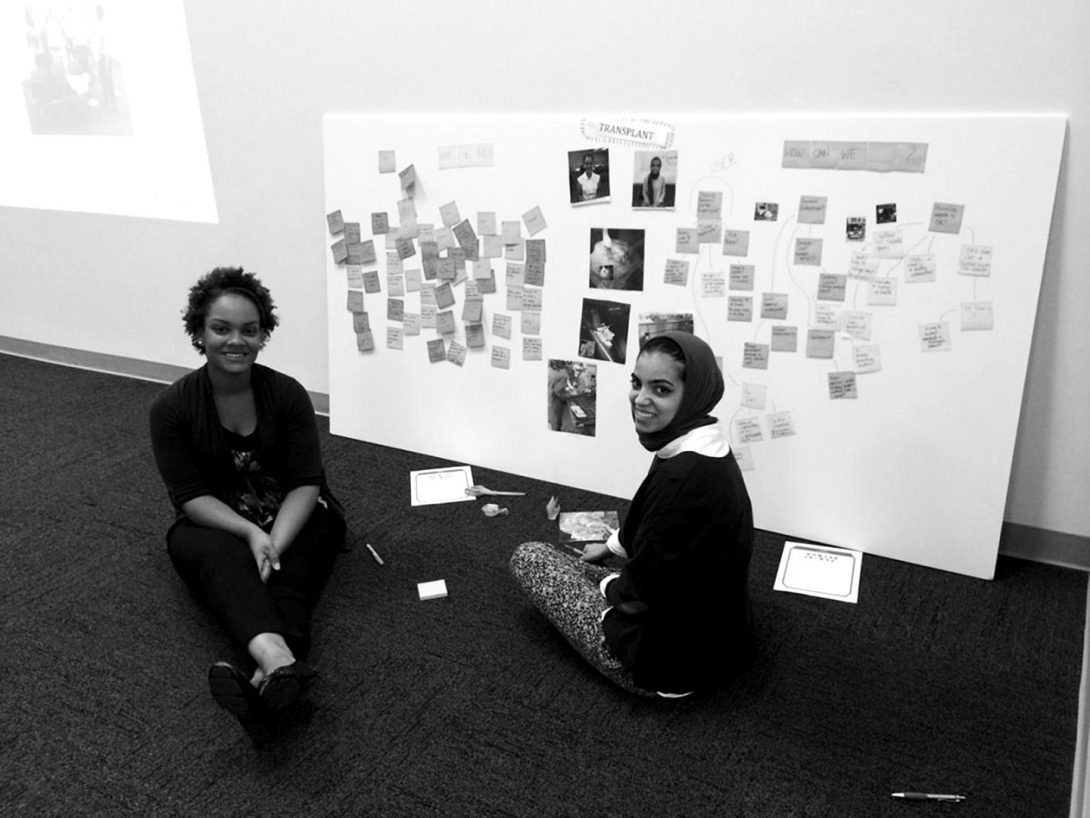
So we moved on, and we decided on focusing on creating a system that builds on existing tech. In order to firstly ensure that we knew the details and benefits of our concept, but also to be able to show others, we began to create concept cards. Concept cards are really useful to give a general but powerful overview of the idea that you are proposing. It allows stakeholders to envision the impact it would have while also explicitly pointing out the benefits to them. We also used it to ensure that we were not only thinking through our ideas but also to make sure that we were keeping the stakeholders and users in mind while we were doing it.
Zachary Taub
Zachary Taub
UIC College of Medicine | IMED Program
Year: M2 | Class of 2022
Area of Focus: Urology
Contact Information: ztaub2@uic.edu
Zachary Taub Blog
Week 1 - Good & Bad Engineering
My team and I started our Clinical Immersion experience in the Urology department. We spent each day rotating between clinic and the OR, watching how clinical procedures may escalate to surgery, and how various diagnoses may be uncovered, from nephrolithiasis to incontinence. The mode of visualization and screening primarily used both in OR and clinic was a cystoscope. The camera was used to visualize components of the urethra, the neck of the bladder near which the prostate sat (in men), and the bladder itself.
Based on the procedures and patients I saw, I noted that a form of good engineering used by the urology department involved the use of the use of the cystoscope to inject liquid into the bladder to test for additional incontinence and determine where the source of the leak occurs. The cystoscope has a small stream of water from the tip that allows it to be smoothly guided into the urethra, to swell the bladder to be able to fully examine the site, and to test for the primary source of dysfunction that induces leakage. For instance, whether incontinence can be prevented by striated muscle or if “holding your bladder” does not suffice.
A component of bad engineering I observed was the limitation of the cystoscope; that is, I only observed it being placed into the bladder and unable to pass into the ureters. If the ureters needed to be visualized, a massive CT was brought into the procedure room or OR and placed precisely to examine the proper field. This required an additional technician, ample space and time, and radiation to the patient. Furthermore, the use of CT without being able to visualize fully the ureter placement in a Hilium laser lithotripsy procedure may have been what caused the guide-wires to perforate the weakened ureter wall and cause a failure in surgery; a time-, money-, and energy-consuming process that will now have to be corrected with a percutaneous removal of the stone.
Week 2 - Storyboarding
This week as we learned about storyboarding, I applied the step-by-step conceptualization to arguably the most intriguing surgery I have ever witnessed: a robotic-assisted laparoscopic prostatectomy (RALP) using a single-port Da Vinci. As the patient was being prepped in pre-op, the robot was being readied, including the five arms it would eventually use and the two monitors for the other surgeon and others in the room. Once the patient was brought in and anesthetized, the patient was placed in Trendelenburg position to use gravity to move the intestines proximally to expose the prostate. A small, 2cm incision was made just above the umbilicus and the base of the machine ports was placed in the abdomen. A camera, bipolar cautery, scissors, and forceps were the arms attached to the Da Vinci, while a tiny incision was made on the lateral portion of the abdomen to provide the surgeon not operating the robot a port to provide suction, sutures, and other aid to the robot arms.
A minimally invasive procedure such as this has surely evolved from having many pain points to having relatively few, though this operation was not without its flaws. For instance, while the surgeon was removing fascia and fatty tissue from his way to access the prostate, the camera that he used to see the surgical field had to be removed multiple times for manual cleaning. This process required all arms of the robot to be lifted out of the operating area so the camera could be detached, cleaned by hand with a towel, and then reinstalled. Not only did this consume time at multiple points during surgery, but the surgeon had to re-visualize where he was cutting and cauterizing rather than pick up exactly where he had left off. Another shortcoming of the surgery involved the number of times the surgeons had to re-scrub because the robot is not sterile, while the actual surgical field is. For the surgeon and the resident to switch places, whoever was leaving the robot had to re-scrub, making the process of teaching and providing guidance particularly difficult without risking having no surgeons scrubbed in to assist in case of emergency.
The ventral component of the prostate was first isolated, then the dorsal part of the prostate was cut to retract the prostate from the body. A catheter was required as the wall of the prostate is attached to the bladder neck, and during the closing of the bladder wall, the sutures became stuck on the catheter itself, due in no small part to the narrow field of vision and use of robotic arms that do not come with an extended sense of touch for the surgeon. Higher order concepts of laparoscopic surgery with robotic-assistance surely minimizes the risk of complications, small nuisances such as the one that required additional visualization of the catheter to untangle the sutures need to be considered so future surgeries can avoid any additional risk of harm for the patients. While everything was corrected (with some delay) without any harm whatsoever to the patient, a better method of suturing and visualization may have prevented this issue.
Ultimately, the arms of the robot were removed, along with the prostate, and one of the major benefits of a RALP was realized when closing the surgical field took mere minutes. The only two areas that needed closing totaled fewer than 3cm. The patient no longer had a prostate, and the suture area was no larger than if he had gotten a mole removed on his abdomen.
Week 3 - Need Statement Iterations
This week, we collected our observations from the past few weeks and reflected upon what might be a tangible solution to the various problems we saw. I decided to focus on how disorganized the surgical field appeared during the adult male circumcision I observed. In order to properly resect the foreskin, numerous clamps were used to keep the area taut and the skin was resected by hand while the other physician either held the resected skin or held the phallus to keep the skin taut. Regardless, the entire procedure seemed somewhat imprecise, particularly when considering the sensitive skin that was being uncovered. That had me thinking that there might be a better way to improve the entire procedure, from organization to precision. In the form of a needs statement, I addressed it as such:
- Reduce surgical field clutter and improve precision, and reduce duration of operation for adult circumcision.
I amended the statement for its second iteration by changing the “negative” inflected words to positive (i.e. reduce) so that the statement’s improvements all point to the same direction:
- Improve organization of tools, and overall precision efficiency of an adult circumcision.
Following this iteration, I realized that the statement doesn’t adequately reflect on the intended audience. While any and all reduction of complication risk will ultimately be bestowed on the patients, This improvement would be designed to improve physician experience. Thus, the statement was amended:
- Improve tool organization, overall efficiency, and precision for physicians performing adult circumcisions.
Week 4 - Brainstorming Criteria and Constraints
This week, we began conceptualization of the need we identified: a redesigned method for taking a prostate biopsy. We focused specifically on the shortcomings of the current method, which includes an ultrasound-guided transrectal prostate biopsy gun that requires two people to operate, only allows for one biopsy to be taken before having to remove the device and reload it, and produces a loud, startling sound upon use. We are trying to develop a solution that will reduce the time, improve the experience for both physician and patient, and not need two people to operate.
While brainstorming this idea, we have started to develop a concept of a design that could be feasible, and we have included the following product requirement definitions (PRDs):
- The device shall be used for prostate biopsy.
- The device shall be used in clinic for patients who have a measured PSA greater than 4.
- The device shall collect one biopsy core at a time.
- For each of the six collection regions (two biopsies per region), collection should take no more than one minute.
- The device shall be fully operable by one physician.
- The device shall fit within a 5000 cc volume.
- The device shall be spring-loaded but may contain an electrical power source in the form of a battery.
- If applicable, the electrical source shall last for at least 2 hours.
- The body of the device shall be made from plastic and any needles shall be metal.
- The device shall be no louder than 50 dB.
- The device shall allow for concurrent use of a transrectal ultrasound
Week 5 - Prototyping & Concept Cards
This week, we sought to develop our ideas to improve the method for obtaining a prostate biopsy. We thought of three “big picture” items that would enable us to redesign the device that collects biopsies that would improve patient satisfaction/experience, usability for the physician, and time of the procedure. We discussed making the current biopsy gun quieter, adding a pull lever to ready the device as opposed to the current twisting method, and a multi-vial containment unit within the device for immediate sample placement and quick removal. The latter two methods, unfortunately, are out of scope for our current program. We decided to test the sound the device makes when firing and conceive of ideas to make it softer. Ultimately, we determined that the plastic-on-plastic contact generated by the spring mechanism was producing the sound, and a foam pad reduces the sound by 10x. We also considered submerging the device in water, which produces a similar effect, though we are still discussing ways to incorporate this into the device.
To communicate this, we utilized simple concept cards to illustrate our ultimate goals. Our idea in conveying the sound reduction of the biopsy gun, in particular, is important because we believe that the current method may not have had the concern of the patient in mind when designing the product. Our design would help reduce the anxiety and discomfort surrounding the procedure, which would help with overall patient satisfaction and possibly even improve compliance with procedure. We also proved using a very inexpensive foam that this sound reduction can be achieved with negligible increases in price of production.
Ravi Tyagi
Ravi Tyagi
Ravi was raised in Naperville, IL and graduated from Saint Louis University in 2018 with a B.S. in Biomedical Engineering. His research dealt primarily with tissue engineering, regenerative medicine, and wound healing. His specific interests included the use of electrospinning for burn wound and pressure ulcer applications, and fabrication of 3D printed cryogel scaffolds for treatment of volumetric muscle loss. His hobbies include swimming, badminton, and hiking. He hopes to use his background in engineering and experience with IMED and CIP to make healthcare more efficient, affordable, and accessible.
Year: M2
Area of Research: Urology
Ravi Tyagi Blog
Week 1
“Good” and “Bad” Engineering
This week we had the opportunity to observe in both the clinic and in the OR. One of my favorite cases we observed this week was the varicocelectomy. There were a number of interesting technologies utilized including an ultrasound transducer used to identify the location of blood vessels. The transducer was an essential part of the procedure because without it identifying the vessels from the fascia and other tissue of the inguinal canal would prove challenging. The transducer allowed the surgeons to identify and ligate the veins in the region while also allowing them to preserve the testicular artery.
The device uses the doppler effect to identify blood flow to a region. What makes this device unique is that instead of providing another visual stimulus for the surgeons to interpret, it provides an auditory stimulus. The surgeons already have so much to focus on during the procedure, so using the transducer provided a novel stimulus to avoid sensory overload.
I was initially skeptical as to how beneficial clinic would be towards finding needs, but I was surprised by how quickly I identified areas to improve flow in the clinic. One device that could be improved is the probe for the urogram. For one, the probe placement is pretty invasive and uncomfortable for the patient. Moreover, even slight misplacement of the probe could render the 30 minute ordeal of setting up the device meaningless and make the patient’s discomfort go in vain.
Week 2
Storyboard
One of the most common procedures performed in urology is cystoscopy. Cystoscopy is performed to visualize the bladder and urethra using a camera. While other imaging modalities like X-ray, CT, ultrasound, and MRI have the advantage of being non-invasive, cystoscopy can sometimes be the most definitive way to understand the pathology.
The procedure can be performed in the clinic or in the OR, but the steps are similar. First the patient is consented to the procedure, then they are brought into the procedure room. The area around the urethra is sanitized with iodine and local anesthetic is injected into the area. A catheter is inserted into the urethra to expand the urinary tract with water. The cystoscope is inserted and used to view urinary tract. The physician will examine the video footage of the tract to identify pathology or to orient themselves in order to perform a procedure. Finally, the water is drained from the tract and the scope is removed.
One of the pain points that we recognized through this procedure was the difficulty in coordinating all the moving parts. For example, the physician would often struggle to position the scope, the phallus, and a probe without another person being there to assist with the procedure.
Week 3
Needs Finding
This week our objective was to begin thinking about framing some of the observations that we made into need statements. For the past couple weeks, I’ve noticed that surgeons are consistently limited in their dexterity during cystoscopy. The procedure requires the use of three hands at times: one to position the camera, one to position the anatomy, and one to navigate other tools into the urethra. After talking to the surgeons, it seems like this problem is most troubling at the beginning of any procedure requiring cystoscopy: especially those performed on males since it requires positioning of the phallus. That being said, here is the need statement we came up for this week.
Need Statement: A way to position the cystoscope to increase physician dexterity during procedures requiring cystoscopy.
Week 4
Constraints and Specifications
This week our goal was to narrow down the list of potential improvements we would like to make and choose one to focus on for the remainder of the program. After interviewing nurses, residents, and attendings, one idea that stands out is a redesign of the prostate biopsy gun. The current gun collects one sample at a time and requires the physician to reinsert the ultrasound probe into the rectum 12 times to obtain the specimen. Additionally, the gun makes a startling noise every time the sample is acquired which invariably startles the patient. Our goal is to redesign the gun to make it more convenient for the physician and comfortable for the patient
Some initial constraints we developed include:
- The device shall be used for prostate biopsy.
- The device should be used in clinic/in the OR for patients with a PSA more than 4.o
- The device shall collect one biopsy core at a time.
- Each collection should take no more than a minute.
- The device should be operable by one physician.
- The device shall fit within a 5000 cc volume.
- The device shall be spring-loaded but may contain an electrical power source in the form of a battery
- The electrical source should last for at least 2 hours
- The device shall be plastic and needles will be metal.
- The device will be no louder than 50 dB.
Week 5
Concept Cards
One of the objects of this week was to narrow down on the idea for our project and start conceptualizing potential solutions. We quickly discovered that it was far too easy to get lost in the weeds and lose sight of the bigger pictures. For the remainder of the class, we chose to focus on the prostate biopsy gun. Specifically, we wanted to find ways to make the biopsy experience more comfortable for the patient and more intuitive for the physician.
We had a number of “solutions” in mind prior to coming into this week. Perhaps we could create a “semi-automatic biopsy gun” to speed up the process? Perhaps we could incorporate some sort of “silencer” to lessen the patient’s fears? We quickly realized that before we pursued any of these ideas, it would be important to consult our stakeholders.
Fortunately for us, we were able to present our ideas directly to our stakeholders. The three components we wanted to focus on for the project were to:
- Design a quieter firing mechanism.
- Design a more efficient cocking mechanism.
- Design a faster way to load samples into the collection vial.
We already had ideas for each of these three needs, but after talking to our stakeholder, we realized that we might have bit off more than we could chew. Using the concept cards, he suggested that we focus on one of the three needs we identified: the sound. So for the rest of the week we experimented with ways we could reduce the sound of the biopsy gun.
Alex Wind
Alex Wind
Alex Wind is a native of Evanston, Illinois, a place he still considers to be the best city on earth. He attended the University of Illinois at Urbana-Champaign where he majored in physics and minored in computer science. While at the university, his academic interests were far-reaching and he took courses in math, chemistry, sociology, and music. In parallel with his academic interests, his research was highly varied as well. Throughout his undergradatuate years Alex conducted research at NorthShore University Health System, where he designed and prototyped a vasectomy simulation module and contributed to the development of a device used to measure blood-oxygen levels of muscle and deep tissue in real-time, The University of Chicago where he helped develop algorithms to predict population-based long-term incidences of type-II diabetes complications, and his home institution of the University of Illinois where he conducted joint research in the departments of Sociology and the College of Law, investigating the causes and effects of unequal access to justice in the United States. Following college, Alex returned to Evanston where he received a Master of Science degree in Biomedical Engineering from Northwestern University. His thesis measured the ability of able-bodied patients to modulate their ankle joint stiffness, a component of impedance, voluntarily in real-time. Now a medical student entering his second year at UIC, Alex is always looking for ways to innovate and improve the medical student experience through his work on the Student Curricular Board and as President of the Class of 2022 Board. Alex loves to read, write, play pinball, and watch old horror movies.
Year: M2
Area of Research: Pulmonary Critical Care
Contact Information: wind2@uic.edu
Alex Wind Blog
July 1, 2019
First Week
This week was the first week of the program. I was excited to get started, meet my team, and see exactly what we’d be doing for the next six weeks. For me personally, the objectives of the summer reminded me of y very first medical experience, the thing that got me interested in medical school in the first place.
In the summer of 2013, I spent several weeks shadowing in the urology department at NorthShore University Health System Evanston Hospital. Our objective was simple — observe and innovate. Sounds easy right? For a physics major who had just completed his first year with no medical background, it was actually pretty tough. I really enjoyed myself shadowing in the OR — enjoyed enough that I went on to pursue a career in medicine — but with very little engineering or medical knowledge I didn’t feel that there was much I could contribute. This time, I knew it would be different.
Armed with a Master’s degree and a full year of medical school under my belt, I entered the hospital and the clinic with my team excited to see how I could apply my knowledge. One reason I wanted to be involved with Pulmonary Critical Care this summer is because of the numerous settings we’d get to shadow in. We spent the first week moving around from the ICU, the pulmonary clinic, the pulmonary hypertension-specific clinic, the sleep clinic, and the pulmonary function test lab. In these different places, we saw examples of both good and bad design.
Good design: In many ways, the ICU runs like a well-oiled machine. The stakes are incredibly high and every member of the care team from doctors and nurses to respiratory therapists and pharmacists, have to be operating at 100% efficiency. Watching the way the different teams weaved in and around each other in the ICU was mesmerizing, one team rounding on patients while a critical care nurse tended to a patient all while a group of pharmacy students starts rounding in the opposite direction. While not a device or technical innovation, the way all these teams work together is, in my opinion, an example of good design. It’s no accident that literally dozens of people, each with a different role, are able to flow around each other in the relatively cramped space of the UI Health ICU, all accomplishing their respective tasks without getting in the way of anyone else. This type of efficiency requires careful precise design to be effective.
Bad Design: The ICU is impressive, but it is not without flaws. One example of bad design that I saw is the way that the medical team rounds. The medical team consists of about 10 people with roles ranging from medical student to senior attending physician. This large group walks around the ward from patient to patient, stopping outside each room to discuss each patient in detail. At these stops, each patient is presented to the attending physician by either a medical student, a resident, or a fellow. The physician takes time during these presentations to ask questions to the group, quizzing them on relevant details and keeping everyone sharp. The bad design here comes simply from the size of the group, which is so large that it takes up a lot of space, and also is very hard to hear. Additionally, the group pushes around two large computer workstations, dubbed “WOWs” or “Workstations on Wheels” which allow the team to view the chart and any relevant imaging studies right outside the room. In addition to the WOWs, each member of the team carries around a thick leaflet of paper containing general information, medication lists, and lab values for each patient. The system works, but I can see a lot of areas for optimization and improvement.
July 8, 2019
Second Week
This week, we focused on storyboarding our experiences in clinic. The idea behind a storyboarding is to break a task down into its most fundamental components, isolating each action into a separate step. By considering a task from this perspective, it’s easiest to see possible hang-ups or redundancies.
For my storyboard this week, I decided to examine the workflow of seeing a patient in pulmonary fellow outpatient clinic from the perspective of the attending physician. Fellows clinic serves a dual purpose — it’s primary function is to make clinic hours available to patients but it’s secondary function is to allow the pulmonary fellows to see patients in clinic under the supervision and instruction of an attending physician, The attending’s time in clinic is limited and valuable and structuring the workflow such that the maximum value is extracted from this time would be beneficial to both the physicians and the patient’s trying to get an appointment in clinic.
- The patient is checked in at the front desk
- The patient is brought to a room by a medical assistant
- The patient has vitals checked and recorded by a medical assistant
- One of the pulmonary fellows goes in to see the patient. This is the first real time the attending is made aware that the patient is being seen. Before this step, the attending just sees that the patient is on the schedule and whether or not they have arrived
- The attending has time while the fellow is in with the patient to review the patient’s chart or imaging. Often, if a different fellow has just finished seeing a different patient this time is used to discuss that patient (see step 6)
- The fellow, who has now seen the patient, comes back to discuss the history, physical, assessment, and plan with the attending in the back office. This is the major teaching-time for the fellow, with the attending simply confirming or expanding the fellow’s action and plan.
- This step is variable. Often, the patients need to be educated about a new medication they’re taking both in terms of what the medication is and how to actually take the medication. There are many different kinds of inhalers, all with different mechanisms, and all containing different combinations of drugs. At some point during the patient visit, one of the PharmD or PharmD students goes in with the patient to discuss what their prescribed medication(s) is(are) and how to use it(them). This may happen while the fellow and attending are meeting, and may happen afterward.
- Finally, the attending goes in to see the patient. This final step is interesting, and seems mostly designed for patient comfort more than serving any real purpose. The attending may ask a few additional questions, do a cursory physical exam, and answer any questions the patient may have, but at this point the patient has already been seen by the fellow and a plan has been made.
- The attending returns to the back office to await another patient
This workflow is functional, but there are a few places where it could be optimized. While the attending’s presence is required to teach and train the fellows, a lot of his or her time is spent doing nothing in the back office. I’m interested to see how steps could be combined or rearranged to make the attending’s use of time more efficient.
July 15, 2019
Third Week
This week, our objective was to begin crafting “needs statements”. Needs statements are an important part of the development process for any innovation. It basically serves as the bridge between a problem and its potential solutions. In this way, a well-thought-out needs statement serves a dual purpose: it both succinctly and specifically summarizes a problem, and provides the context for beginning to think of ways to solve that problem.
A good needs statement has three components:
- Problem
- Population
- Outcome
In crafting my needs statements this week, I tried to iterate so that my statements contained all three components. This wasn’t always easy — pulmonary critical care isn’t a procedure-heavy specialty, and most of the needs that my team identified were either structural or administrative. That is to say, they didn’t immediately should “engineering solution” at us. Regardless, I did my best to craft needs statements that both addressed a real problem and lent themselves to achievable solutions. While we worked on many needs and many needs statements this week, I’ll include one below as an example, showing each iteration to illustrate the process of crafting one of these statements.
- A method to improve ICU communication
- This statement starts to scratch the surface of the problem we identified (i.e. ICU rounds serves a dual purpose as both a chance for physicians to consult each other regarding the care of a patient, and as a roaming classroom giving younger doctors and doctors-in-training a chance to learn from more senior physicians. The ICU is loud, however, and this “roaming classroom” can often feel more like sitting in the back of a lecture hall listening to a professor speak without a microphone. While this statement identifies the problem, it’s much too vague and doesn’t suggest a solution
- A method to improve ICU communication during crowded ICU rounds
- Again, this more specifically describes the problem, but it doesn’t contain any info about who this problem affects, or what direction possible solutions could take
- A method to improve the presently insufficient team communication between team members for health professionals during crowded ICU rounds
- This is the final needs statement I landed on this week — it contains a problem, a population, and an outcome. Notably, a needs solution is never necessarily done and I plan on improving and iterating this further (if it’s the need we choose to work on) over the next several weeks.
July 22, 2019
Fourth Week
This week, our objective was to settle on a specific need, and begin the brainstorming process for developing a solution. When I heard we were supposed to spend this entire week brainstorming, I was initially very skeptical. Brainstorming seemed like a very intuitive process, something that I felt we’d sort of been doing in the background the entire time. I soon learned that despite my training as an engineer, I’d never had any experience doing the sort of structured, regimented brainstorming that we learned about this week.
During class on Monday, we learned several techniques to stimulate creativity and draw out our best ideas for solutions. My friend and teammate Zafar said several times throughout the week, “the first few ideas we think of are probably going to be the least creative — that’s why they’re coming out first. We have to draw deeper and think harder to get at the truly unique solutions.” After spending a week trying to think of every possible solution we could think of to our problem — namely, that CPAP has extremely low patient compliance — I came to agree with Zafar’s analysis.
The low CPAP patient compliance rate problem is so interesting because there are so many different avenues a possible solution could take. Could we make the mask more comfortable? Sure. Forget the mask, can we provide positive pressure some other way? Why not. As a matter of fact, forget positive pressure, can we keep patient’s airways patent without using positive pressure at all? We sure can if we think hard enough about it. This week was challenging, but in many ways it was the most fun week of the program so far for me. Flexing your creative muscles to see how far you can push yourself towards a creative solution can be an incredibly rewarding experience. Here are some of my ideas from this week:
- Electrical muscle stimulation to keep airway from collapsing
- Reclining bed that raises during sleep to keep airway open
- Warm air mask that lets you breathe warmed air which stimulates the airways to stay open
- Pressurized “tent” that coverers your entire head and neck which works like a CPAP
Obviously, these solutions are all over the place in terms of concept. We did want any solution we came up with this week to meet certain design criteria though. Our only rules for solutions were that they meet these criteria — past that anything, no matter how crazy, is far game. Here were our design criteria for the week:
- The solution needs to be comfortable and should not contribute to patient irritability
- The solution needs to work throughout the entire sleep cycle→ no systematic errors or temporary shutdowns, needs to administer continuous treatment
- The solution needs to improve sleep quality→ ensuring full progression of 90-minute sleep cycles without disruptions
- The solution needs to be customizable for each patient→ compatible with facial/bodily proportions
- The solution needs to function at the patient’s home→ or where the patient currently resides
- The solution needs to be safe to use
July 29, 2019
Fifth Week
For our final week, we narrowed our options for a final project to focus on down to our final choice. After much deliberation, weighing potential benefits versus feasibility, and at least one physics argument, we finally settled on developing a system to improve the dismal CPAP compliance rates for patients with sleep apnea. Our system consisted of two parts:
- A system which uses metrics measured from a wearable device to determine how asleep a patient is
- A CPAP machine and special pillow which read the information from a wearable and use that to both ramp up the pressure and change the elevation of the patient’s head based on how asleep they are
The goal of this system is not exactly to treat sleep apnea, but increase compliance with a treatment that’s already proven to work namely CPAP.
Once some time is taken to explain it, most people understand the motivation and mechanics of our system. It was great to have a simple method for conveying the exact information we need in order to explain the device without overloading someone with miscellaneous info. One way to do this is through the help of a concept card.
A concept card is a tool for explaining a device or innovation to an investor or anyone that’s looking to understand your idea. It includes several key pieces of information like the needs statement and some quick specs, and then a drawing of the device or solution that’s being proposed. It’s perfect for when you need to convey the most important aspects of your idea to someone (e.g. to a busy physician so that he or she can tell you if your idea makes sense or not). We utilized these kinds of quick drawings and explanations to get feedback on our final system, and we actually used that feedback to make some changes to our design.
Abdul Zakkar
Abdul Zakkar
Abdul Zakkar Blog
Week of June 24, 2019
First exposure to Dry Eye Disease
This week, we first visited the ophthalmology clinic as well as the clinical trial center for Dry Eye Disease (DED). We observed many patients with DED, and learned that these patients often have a history of bone marrow transplant, and the DED is one of the manifestations of their graft-vs-host disease that results from the bone marrow transplant. Other causes of DED include aging as well as autoimmune disorders; commonly Sjogren’s and rheumatoid arthritis.
For most patients, Dr. Jain follows a similar procedure. He first collects a short relevant history from the patient, then observes their eye using a slit lamp to look closely. Next, he begins a tear collection process. He first adds artificial tears to the patient’s eye, then collects those tears using micro-capillary tubes. Next, he adds a special dye to the patient’s eye to observe damage done by DED and grade it. Then, they dye is washed out, and Dr. Jain discusses his findings with the patient, and their treatment plan moving forward. This process may seem short, but we found many instances of both good and bad design within it
Good and Bad Design
I will focus on the process of adding dye to the patient’s eye (staining) to illustrate both good and bad design. The procedure that Dr. Jain and his team follow when staining the patient’s eye is very efficient and smooth. First, one of Dr. Jain’s assistants prepares a pipette with the exact amount of dye needed for staining, and presents it to Dr. Jain the moment he needs it. After Dr. Jain has observed the stained eye, the assistant begins washing the eye out while Dr. Jain records his findings to begin discussion with the patient.
- A – Dr. Jain and assistants are adding dye to the patient’s eye, Dr. Jain observing, assistants washing.
- E – The clinic/clinical trial center.
- I – Dr. Jain is engaged with the patient and the assistants.
- O – The pipette, the dye, the patient’s chair.
- U – Dr. Jain, the assistants, and the patient.
In terms of bad design, I learned about the way Dr. Jain records his findings after staining. The lissamine green stain that Dr. Jain uses stains the parts of the eye with epithelial damage caused by DED. This appears as small specks of staining scattered across the surface of the eye. Dr. Jain then decides based on the number of specks, and their size, what the clinical grade should be. I feel this is bad design because of the scale’s subjectivity. Other ophthalmologists may come to different a grading when looking at the same eye.
- A – doctor is grading the severity of eye disease
- E – in the clinic
- I – after looking at the eye on the slit lamp, the doctor is writing the numbers to grade the dots on the paper
- O – slit lamp, paper on which the eye is graded
- U – patient, doctor/healthcare provider
Week of July 1, 2019
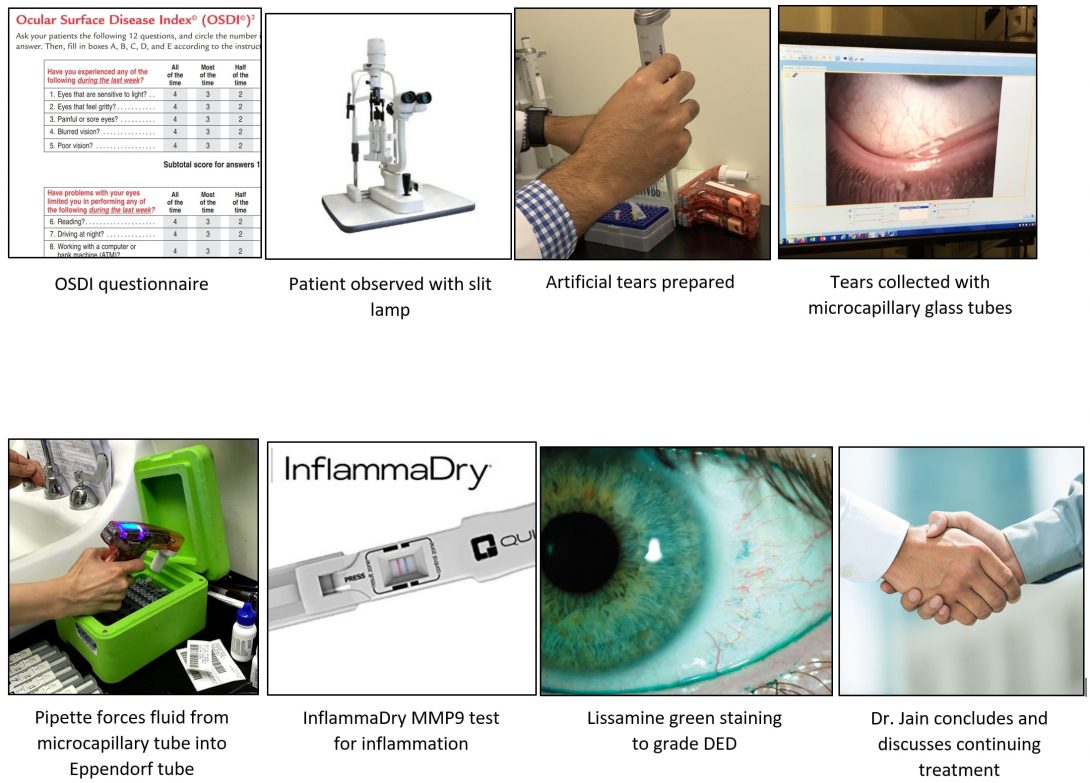
This week, we got the chance to talk to some patients, as well as some research assistants about how they feel about the current process that every DED patient undergoes. We mostly focused on the tear collection process, since that seems to be a pain point for the assistants and the physician. However, we found that patients did not seem to mind the tear collection very much and some found it to be efficient and well-performed and thought out. Only first-time patients reported being apprehensive at first, but trusted Dr. Jain once the tear collection began. Nevertheless, the tear collection process seems to be the largest concern for Dr. Jain and his lab, since it can require up to two assistants to perform effectively. I asked the assistants about their use of time and how much the tear collection can take away from that and found that there is plenty more they can be spending their time on to push the agenda of the lab forward.
I will story board the entire general process that a returning DED patient undergoes when they see Dr. Jain, starting with the history and ending with a prescription or other recommendations.
Storyboard
First, Dr. Jain asks the patient how they have been doing in general, then asks focused questions based on the Ocular Surface Disease Index (OSDI) to record responses consistently over time.
Next, Dr. Jain examines the patient’s eye using the slit lamp, looking for signs of worsening or improving DED.
Then, Dr. Jain initiates the tear collection process. The first assistant hands Dr. Jain a loaded pipette with artificial tears for Dr. Jain to drop into the patient’s eye. A timer is started. He asks the patient to look in various directions to distribute the artificial tears evenly.
After 40 seconds, Dr. Jain is handed the first microcapillary glass tube and draws some of the fluid from the patient’s eye, with the help of the slit lamp. He then returns the microcapillary to the assistant, who hands it over to the next assistant who forces the tube fluid out into an Eppendorf tube using another pipette. This process repeats until all the fluid has been removed from the patient’s eye.
The last portion of the patient’s tears is used to conduct an MMP9 test, which involves dropping some of the tear fluid onto a small device that will detect the presence of MMP9, which is a general sign of active inflammation.
Next, the patient is handed a tissue to dry their eye with, in preparation for the staining.
The assistant hands Dr. Jain a pipette loaded with lissamine green dye, which Dr. Jain then drops into the patient’s eye. He asks the patient to look in various directions to distribute the dye evenly.
Dr. Jain then uses the slit lamp to observe the staining of the eye, recording his findings using the NEI metric for DED. He may take photographs if the option is available (i.e. in the clinical trial center).
Finally, the assistant cleans the dye out of the patient’s eye with saline while Dr. Jain records his findings.
Dr. Jain gives his conclusions on the visit and makes recommendations about continued treatment for the patient’s DED. The patient may head to the waiting room to make the next appointment.
Week of July 8, 2019
week of 7/8
This week, my team and I had the chance to conduct an interview with the researcher in Dr. Jain’s lab who conducts tests to analyze tears after Dr. Jain collects them. We learned that tears are assessed for various bio-markers such as extracellular DNA, cytokines, immunoglobulins, ACPA antibodies, and others in order to identify the causative agent of a patient’s dry eye disease. The researcher discussed the process of tear collection in detail and noted that the process is not sterile. The researchers do not use gloves, which are generally not used with ophthalmology clinic patients because they make the patients “skeptical.” Dr. Jain will still sanitize his hands though, and the team still takes appropriate measures for sanitation. However, it is nearly impossible to keep the tear sample completely untouched throughout the process.
For this week, we were tasked with creating a needs statement that describes a problem that Dr. Jain and his team face. The following are a few iterations of this needs statement.
Week of July 8, 2019

Needs statement 1
Make tear collection accessible for more healthcare workers and safe for patients.
The main point that we would like to get across is that tear collection is currently restricted to highly trained ophthalmologists who have access to a slit lamp and other devices in order to perform the collection safely. We would like to remove this restriction and make tear collection feasible for most healthcare workers in any setting.
Week of July 8, 2019

Needs statement 2
Modify the tear collection process to make it user friendly for more healthcare workers to use safely on patients.
Here we are specifying what we mean by accessible in particular. We went from broad accessibility which includes cost as well as training, and the more specific user-friendly, which indicates ease of use as our primary goal.
Needs statement 3
To create a more user-friendly tear collection process that allows any healthcare professional with minimal training to collect patients’ tears safely
Here were are specifying the user to a more defined set of people. We are targetting healthcare workers who have not been trained like the ophthalmologist Dr. Jain, and we would like them to still be able to use our process/device easily.
Week of July 15, 2019
week of 7/15
This week, my team and I came up with design criteria that we would like to implement in improving the current tear collection process carried out by Dr. Jain and his assistants. We also tried to come up with solutions and ideas to get ourselves started. Some of these ideas involved modifying the current glass capillary tube that Dr. Jain uses to something that can hold a larger volume, and be less abrasive to the patient’s eye. Some ideas involved suction in addition to the tried and true capillary action. This suction may be motorized or mechanized. Some ideas involved a pen-like device, while others involved a device that rests on a table in between the patient and the healthcare provider. All these designs were thought of in order to meet at least one of our design criteria, which are listed below.
Week of July 15, 2019

Comfort criteria
The device or part of the device that comes near the eye should remain there for no more than 10 seconds.
Week of July 15, 2019
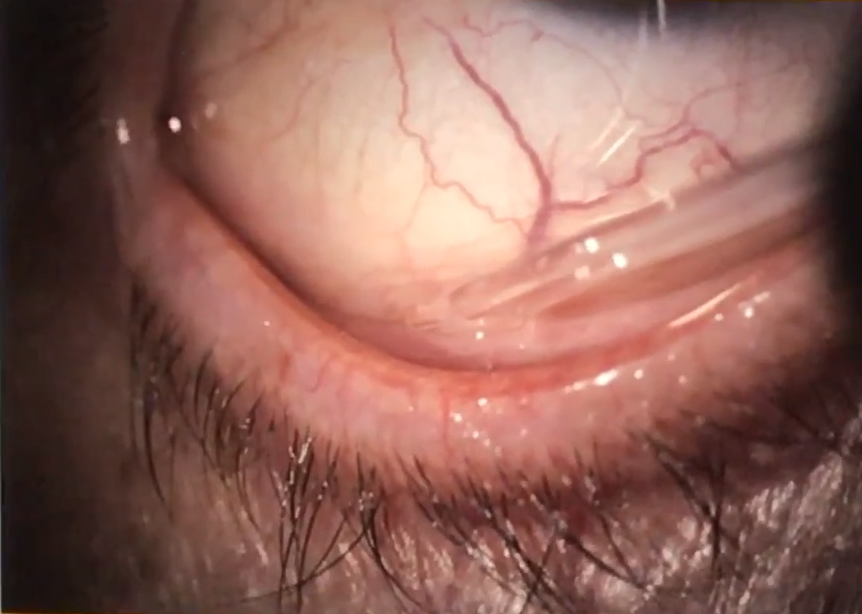
Efficiency Criteria
Week of July 15, 2019
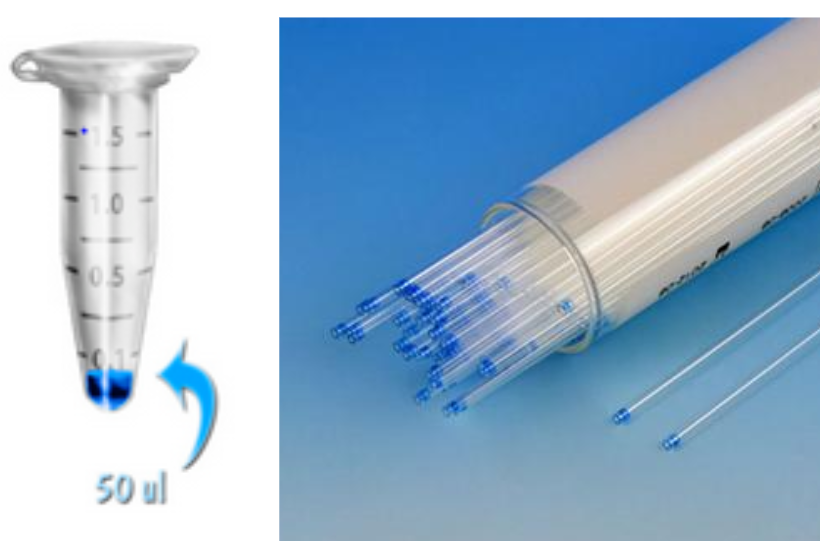
The entire process of tear collection, from start to finish, should take place in one minute or less.
The minimum amount of tear collection in a healthy individual with no DED should be at least 50 microliters, or the amount of artificial tears that was added to the eye.
Week of July 15, 2019
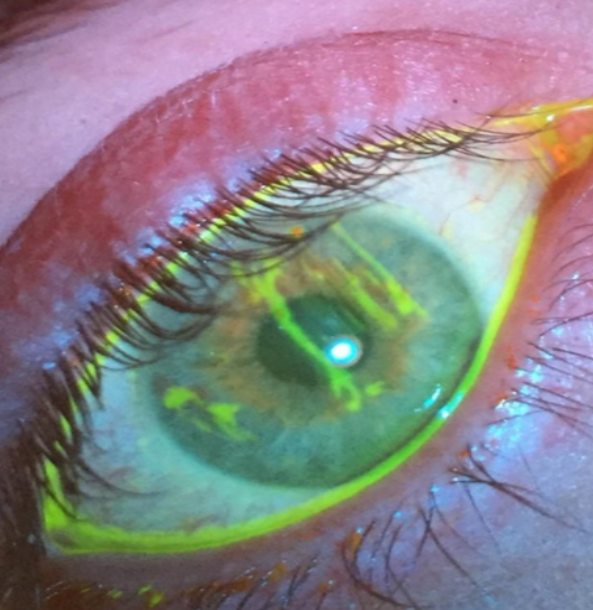
Safety Criteria
The deivce or process should cause no injury to the eye during any portion of the process.
Materials that touch the eye should be sanitary.
Materials that come in contact with the tears collected should be disposable.
Week of July 15, 2019
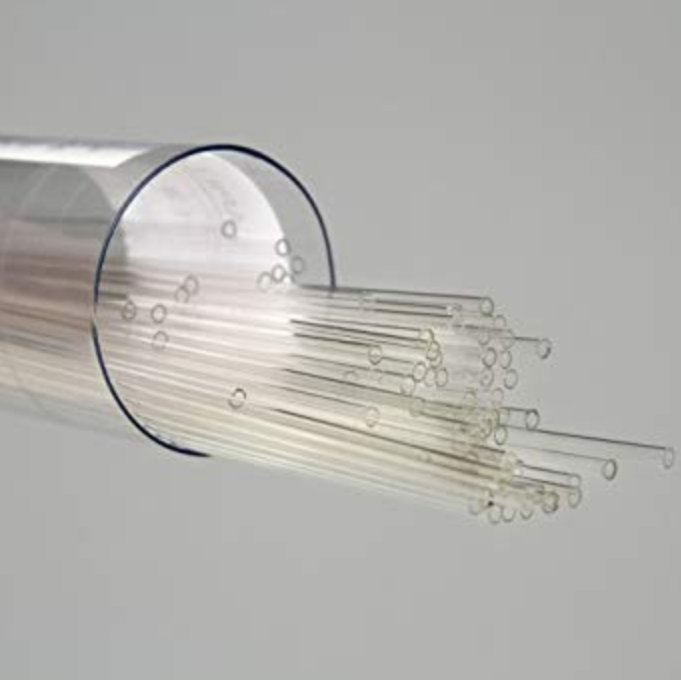
Week of July 15, 2019
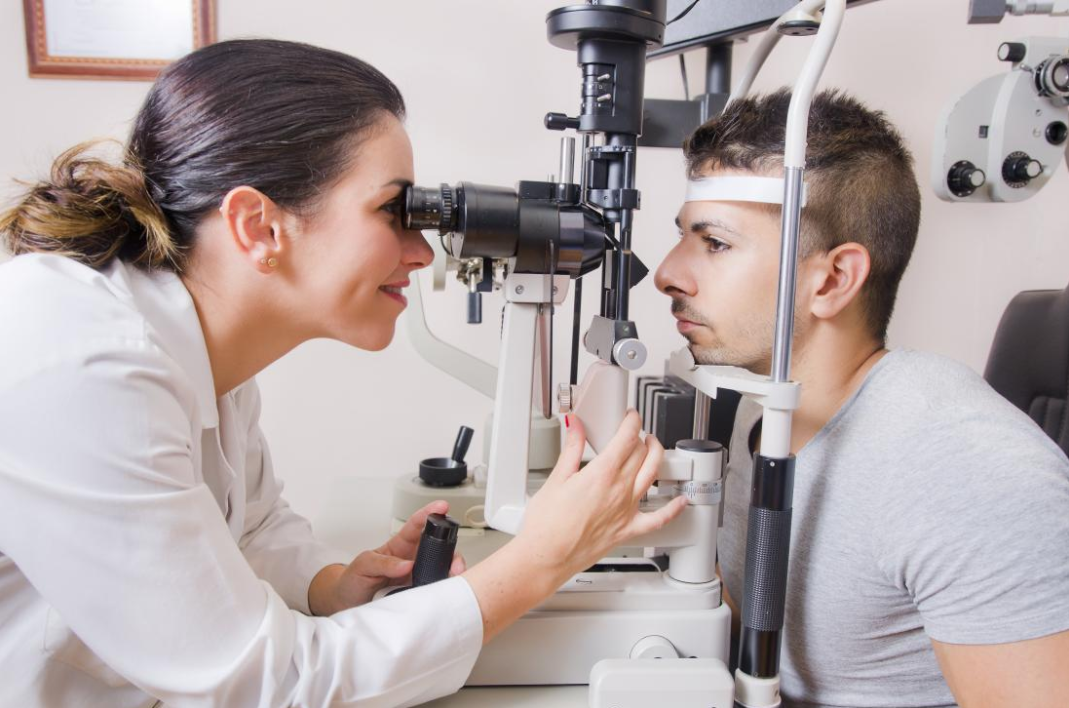
Accessibility Criteria
Healthcare providers should be able to use the device or process after one demonstration.
The device can be used/the process can be carried out by a single person without the assistance of a slit lamp, or any additional materials.
Week of July 22, 2019
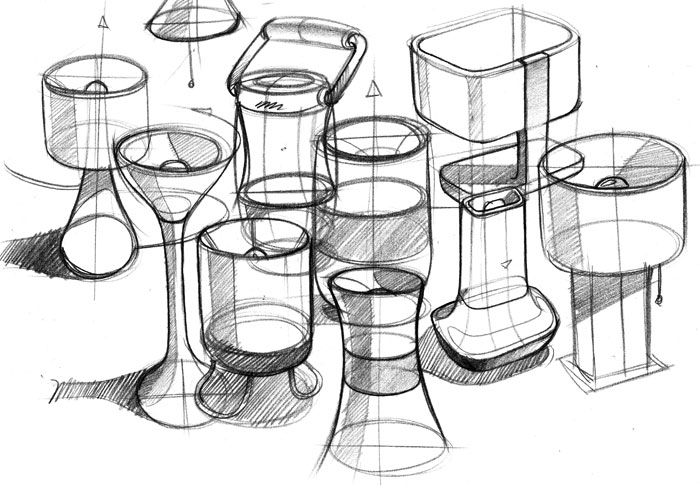
Conceptualization
By this week, my team and I had plenty of ideas on how to make the tear collection process more efficient and accessible. We did our best to consider all of our requirements in each of our ideas; however, it was difficult to include them all. After attempting several sketches and constructing several ideas, we had a set of core features we wanted to discuss with Dr. Jain. As per Dr. Felder’s advice, splitting our ideas into core concepts when presenting to Dr. Jain reduces the risk of an entire idea being shot down as a whole even when some of its parts are viable working concepts.
So we went about creating our core features, and I felt worried that we had no clear way of developing these features into physical prototypes. We had not considered how we may take a sketch into reality. Are there parts that we can order? Do we have to 3D print custom parts? Maybe some combination of the two? I felt that going from these sketches that only convey a concept to a working prototype would not be easy. Thankfully, we had plenty of resources on our hands as UIC students to learn from others and come up with realistic ways to bring our ideas to life. This includes Innovation Center and UIC faculty in general, as well as mHUB, which is also an innovation center for product development and manufacturing. After discussing our problems with several people, including Dr. Jain, we were able to come up with a list of parts to construct our first prototype.
Week of July 22, 2019

Discussing with Stakeholders
Lander McGinn
Lander McGinn
Year: Medical school 2nd year
Area of Research: Gastrointestinal department. Previous research done in immune system development. Current research in ophthalmic biomaterials, and student satisfaction regarding medical school curriculum.
Contact Information: lmcgin4@uic.edu
Lander McGinn Blog
July 1, 2019
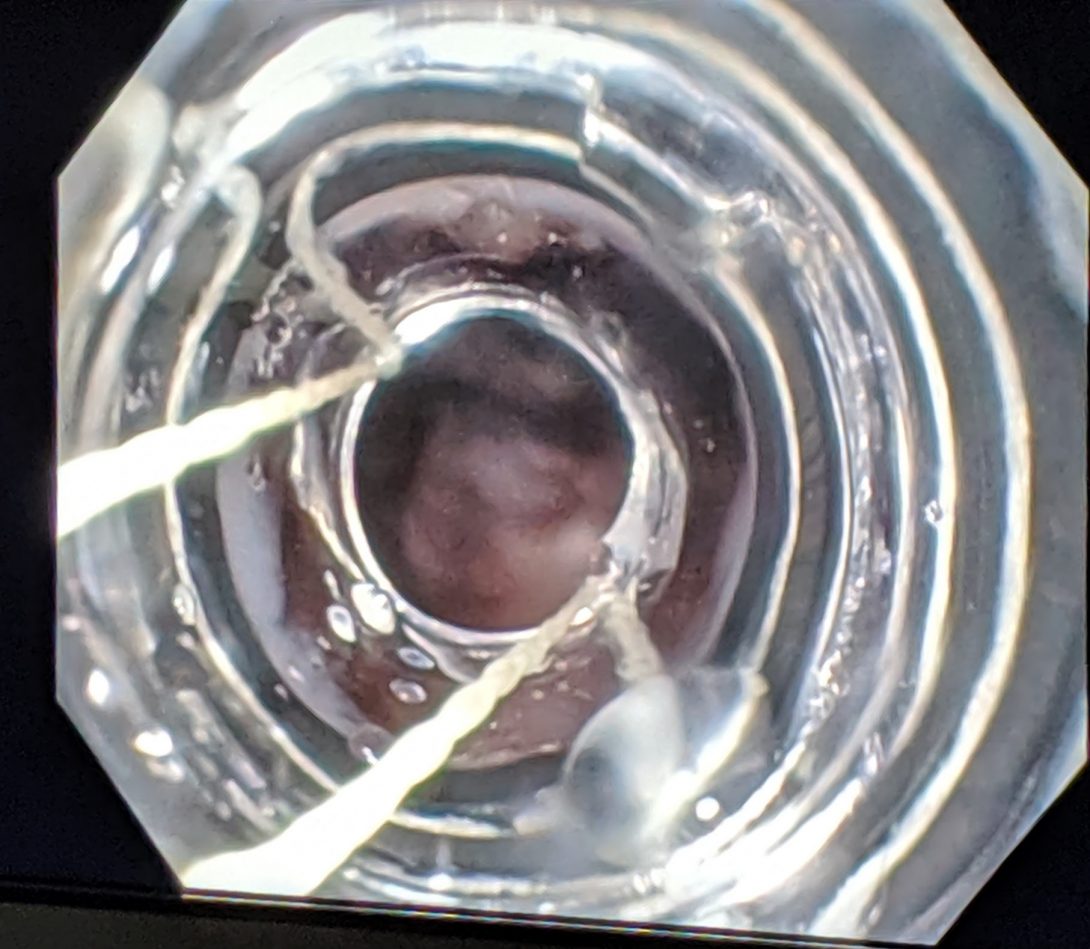
First Week on the Job
In our first week working in the gastroenterology department, we observed procedures that dealt with the gastrointestinal tract and the liver. During this time, our conversations with physicians and other members of the healthcare team revealed numerous opportunities for improved design. One among these that stood out is the current method of managing esophageal varices using ligating bands. Varices arise most frequently from cirrhosis which results in portal hypertension. Long story short, this results in blood backing up into the veins of the esophagus and can get so engorged that they may even rupture. This rupture has the potential for massive hemorrhage and death.
The ligating bands used for varices are launched from an accessory affixed to the end of the endoscope. The design of this accessory fails many aspects of the AEIOU framework. Simply attaching the accessory seemed cumbersome because the user (the doctor) often cannot see if it is secure. In this way, it causes uncertainty and confusion for the user, which places the patient at risk. The environment is inherently compromising for the patient since the bands are being launched at vulnerable tissue. If the procedure goes poorly, and the user damages the tissue, they can inadvertently cause the worst-case scenario that they are trying to avoid. The object, the accessory, itself, seems it could be improved. Before the procedure even begins, the field of vision is severely limited, and it only gets worse throughout the procedure as debris and secretions occlude the entire apparatus.
While the aforementioned device seems like a promising area of improvement, it is important to note also the instances of highly successful design. The process of disinfection and management of the scopes has been well thought out. There is a dedicated space for the cleaning with ample room, wherein the worker follows a specific set of guidelines. Thus, it is relatively comfortable and not confusing. The worker is able to manage their space at a pace that suits them and scopes are taken in and out as needed. The process has a multitude of checkpoints to ensure safety and that procedures are followed accurately. As well, there is a yearly evaluation of competency for the worker. While endoscopy sanitation associated infections have been an issue at other hospitals, it has never been an issue at UIH.
July 8, 2019
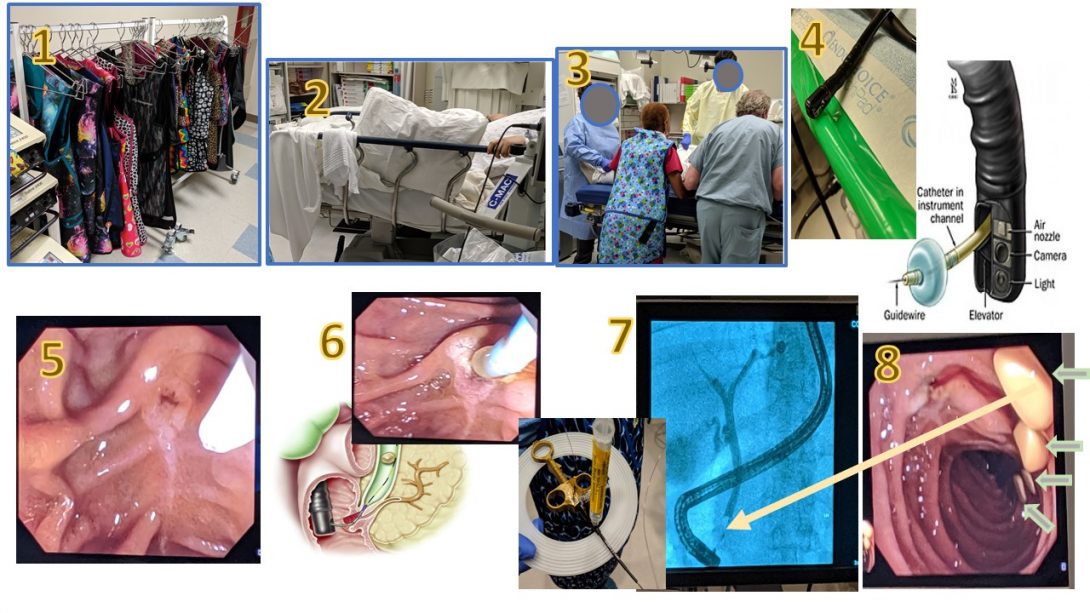
Storyboard for ERCP-guided removal of four gallstones
During this second week, we had the opportunity to observe an ERCP-guided removal of four gallstones. A 26-year old patient came in with suspected acute pancreatitis and a history of gallstones, which had been confirmed with previous imaging studies. At this point, Dr. Boulay decided it would be best for the patient to have the stones removed. This storyboard aims to explain this process visually.
All these images have been obtained in the University of Illinois at Chicago Endoscopy Lab with permission of Dr. Brian Boulay with respect to HIPAA guidelines and patient privacy.
Source of sphincterotomy diagram
July 8, 2019
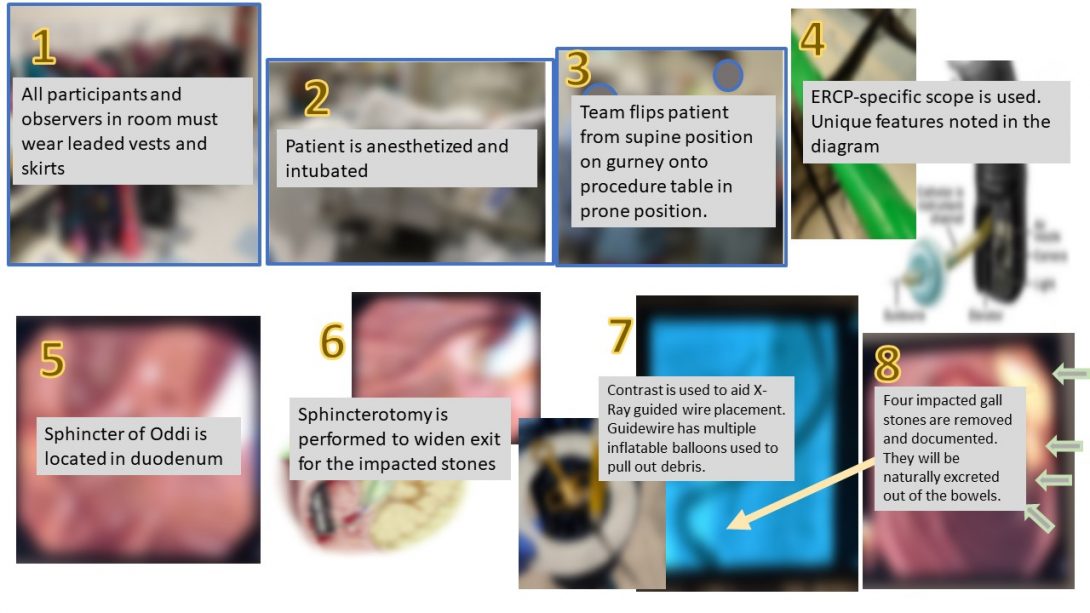
Explanation of steps
In this next image, the images have a brief explanation in a text overlay.
July 8, 2019
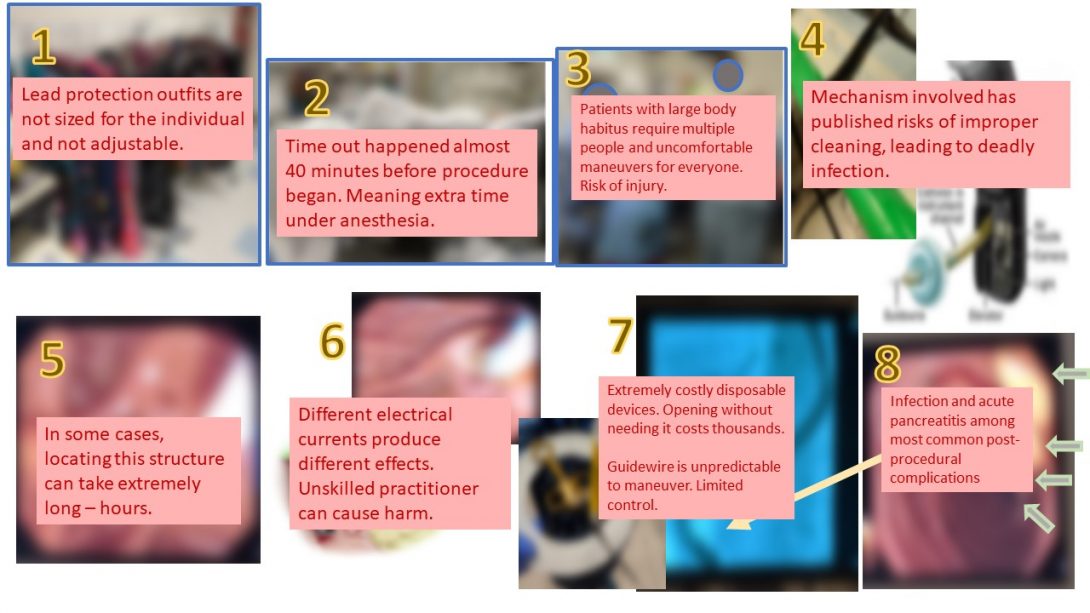
Pain points
One of the functions of this storyboard is to also identify pain points inherent to the procedure. I have interpreted these pain points to be possible health complications unique to the procedure as well as difficulties in performing the procedure.
July 15, 2019
Crafting a needs statement
The focus of this week is to begin crafting a needs statement. The following needs statement is an example of the thought process involved in creation of such a statement. It is unlikely that this will actually be the focus of our project in the end. A needs statement involves 3 components: a problem, a population, and an outcome.
Iteration 1: A way to dilate the esophagus quicker in patients with esophageal strictures so that time between treatments is reduced.
- One problem we identified is the time between dilation treatments. The current practice is to dilate by about 2 millimeters every few weeks. This measurement does not seem to have a well-researched basis, and is founded on what seems to have been safe for patients and worked in the past. So, a timeline that is shorter and perhaps dilates more each session, if the esophagus allows it, would be better.
Iteration 2: A way to manipulate the physical properties of the esophagus in patients with esophageal strictures so that the time between balloon dilation treatments is reduced.
- This next iteration broadens the scope of the problem to allow us to think of other means of approaching the problem. Changing the problem to instead “manipulating the physical properties” means that we can consider the physical limitations of the tissue as our focus, instead of focusing on the procedure.
Iteration 3: A way to manipulate the physical properties of the esophagus in patients with esophageal strictures so that the time between dilation treatments is reduced.
- In this iteration, I have eliminated “balloon” before dilation treatments. My logic is that there are different methods of achieving dilation, which are illustrated in the images below. Balloon dilation, ergo, may not be the best option for all patients.
July 15, 2019

Common balloon dilation for esophageal stricture
Below is the more common method of esophageal dilation using a balloon to dilate.
July 22, 2019
Conceptualization
This week, we had to pare down all of our ideas about what we could potentially improve in the GI department. We had ideas ranging from esophageal varices ligation mechanisms to improvements on patient education for colonoscopy prep. After running through several brainstorming exercises as a team, however, we decided upon a device that could be used to minimize the risk of complications during an endoscopy.
Normally, an endoscopy is a fairly straightforward procedure. The patient is sedated to a point that they are responsive to binary questions and they are breathing autonomously, but they are extremely relaxed and able to endure the scope passing down their esophagus. However, if a patient has underlying obstructive breathing disorders like COPD or asthma, they can start to cough and gag and “desat,” meaning the oxygen in their blood is decreasing — they are essentially suffocating. The nurse who is administering the sedatives and ideally monitoring vitals must then step in and perform a chin-tilt-jaw-thrust maneuver to try to open up the patient’s airway. This involves a nurse standing at the patient’s head and manually pushing their jaw up and out to widen the space air can pass. Unfortunately, this means the nurse must maintain this position for quite a while — in one instance up to about 20 minutes. If the patient’s oxygen level does not increase, they must be advanced to anesthesia and intubated.
There are several issues present here: the nurse performing the maneuver is now locked into that position and unable to assist in any other way — more staff must be brought in. As well, if the patient does need to be advanced to anesthesia, then that introduces other health risks. Finally, the physical demands on the nurse performing the maneuver as well as the burden of having so many people being brought into the equation lead our team to believe that this would be a valuable area to improve.
With this all in mind, we seek to develop an airway protection device that could be placed on a patient suspected to be at risk, and then if a complication should arrive, the device would be simply clicked into place and would essentially perform the jaw thrust maneuver in stead of a nurse. This minimizes the need for additional personnel, and would hopefully help avoid having to advance a patient into anesthesia.
In terms of qualifications for our device, it must have the following qualitative criteria:
- Device should be disposable
- Device should be portable
- Device should not cause prolonged harm or strain to patient
- Device should be low cost
- Device should take no longer than 1 minute to set up
- Device should be intuitive to use by anyone in the procedure room
In terms of quantitative and measurable criteria, our device must meet the following:
- Device should maintain selected end-range positioning
- Device should be rapidly adjustable for anatomical variation
- Device should not require power
- Device should not apply more than 17N of force to either jaw
- Device should not apply more than 14N of force to mental protuberance
July 29, 2019
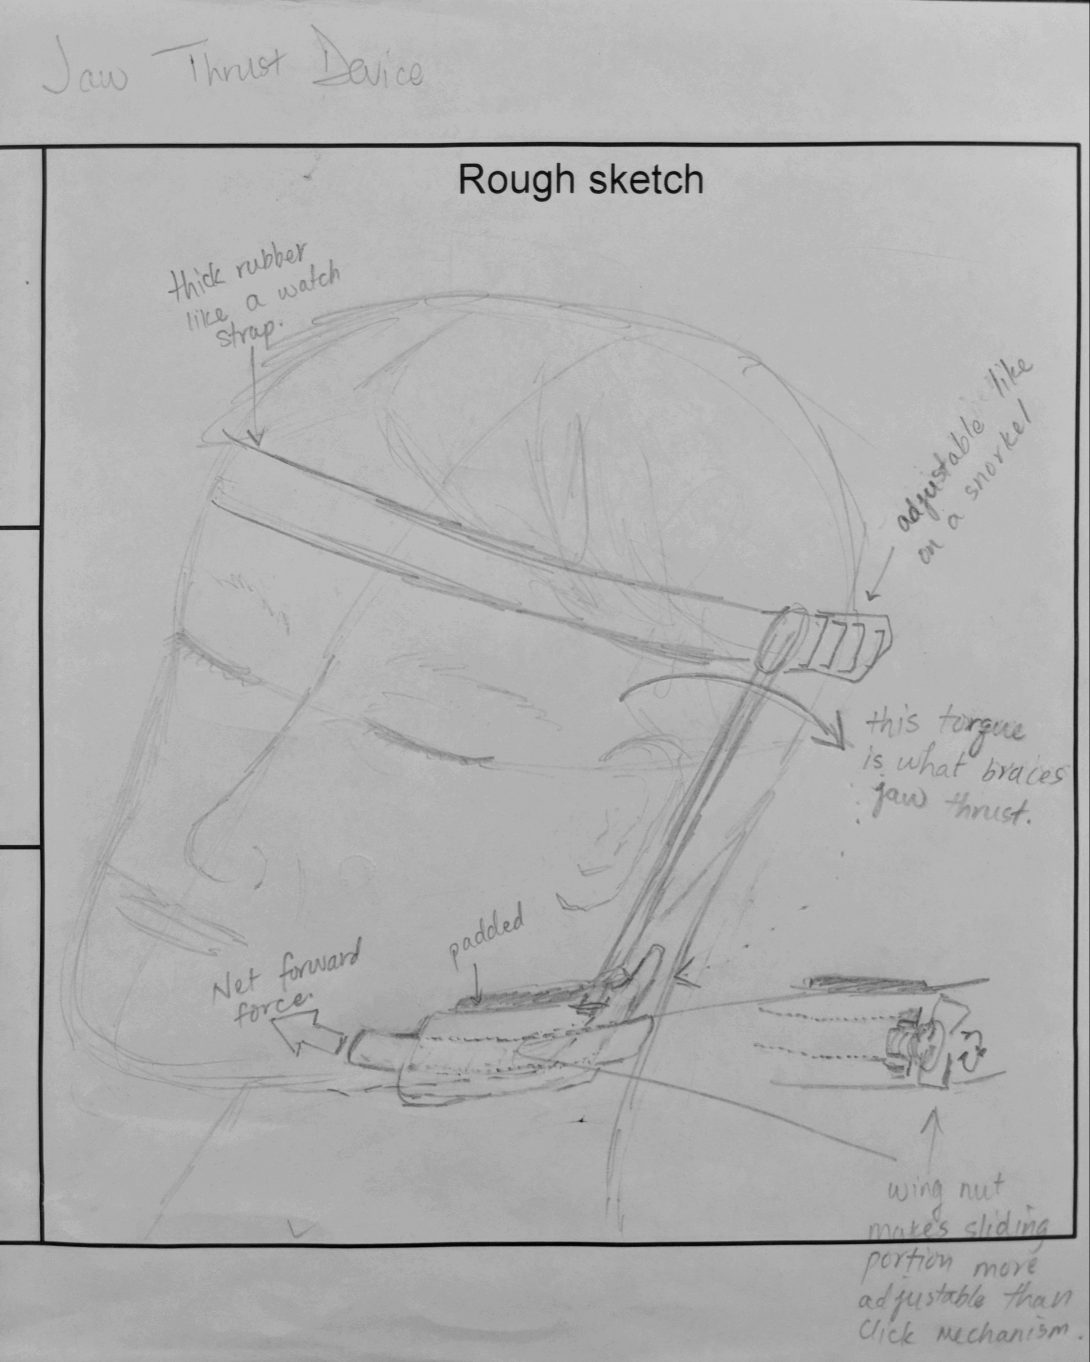
Concept Cards
In this week, we were charged with creating concept cards as a means of focusing our thoughts in order to better present to our mentors. In this exercise, we had to sketch our device to give some sort of visual which we would show. In our version, we tried to create a device which might mimic the action of a jaw-thrust maneuver. Previous blog posts have discussed the need for such a device, but in short, we wanted something that would minimize the physical burden on staff who would otherwise have to stand at a patient’s head and hold that position for upwards of 15 minutes. This position means that a nurse cannot perform any other duties for the time they are holding the position, and it can leave them feeling exhausted.
Our device would hopefully maintain a patent airway especially for a patient with underlying obstructive airway disease or sleep apnea without the need for staff to physically hold open the jaw. Such a device minimizes the need for additional personnel and aims to increase patient safety, while avoiding the necessity of advancing a patient from moderate sedation to anesthesia in the case of an intubation.
Filling out this concept card allowed me to get the highlights of our device clear in my head. It gave me sort of an “elevator pitch” that I could quickly present to someone. Below is the beginning of what would be a more refined concept card.
Zobia Chunara

Zobia Chunara
Year: M2 Student at University of Illinois College of Medicine
Contact Information: zchuna2@uic.edu
Zobia Chunara Blog
Clinical Immersion Program: Innovation in Medicine
Blog 1: Good and Bad Design
Our first week in the ophthalmology clinic allowed for observation of many examples of good and bad design.
One example of good design in the clinic was the standard chin and forehead stabilizing bar attached to each slit lamp as the bar allowed patients to intuitively position themselves properly for examination with little guidance. Another example of good design was the Schirmer paper strip which the physician places in the patient’s eye to stimulate tear production to test for dry eye disease. This test is simple, yet effective, and requires little effort on behalf of the physician or the patient.
An example of bad design was the tear collection process. The physician administers artificial tears to the patient’s eye, allows the tears to incubate in the eye, and then collects the tears by holding tiny glass capillary tubes next to the ocular surface. As the risk of scratching the surface exists, this process is unsafe. A second example of bad design was the subjective eye grading process. After assessing the patient’s eye using a slit lamp, the ophthalmologist writes numbers on an outline of the eye to grade the severity of dry eye disease. Because this process is not automated and there are no controls/standards used to compare with each examined eye, this seems to be quite a subjective process.
Clinical Immersion Program: Innovation in Medicine
Blog 2: Story Board
Tear collection is quite a precarious process. There exists no effective standard for tear sampling. Thus, Dr. Jain invented his own method to collect tears, which requires an ophthalmologist trained in using a slit lamp, 2 assistants, a slit lamp, 8 capillary tubes, a fluid dispenser, Eppendorf tubes, and a box of ice. Here, I explain the current work flow to collect tears:
The first assistant passes a micropipette filled with saline to the ophthalmologist who looks into the slit lamp while holding the pipette to eject the fluid into the right lower eye lid. The ophthalmologist asks the patient to look left, right, up, and down while he moves the lower lid of the eye around to allow the drops to mix with the ocular surface for about 30 seconds. The second assistant holds up 4 small glass capillary tubes. The ophthalmologist takes a small glass capillary tube from the second assistant, pulls the patient’s bottom eyelid down, and holds the tube at the base of the eye to collect the pooling tear fluid. He hands the tube back to the second assistant, who passes it to the first assistant, who dispenses the tear volume in the tube into Eppendorf tubes sitting on ice. The physician repeats this process again with 3 more capillary tubes.
The above tear collection process is then repeated for the left eye.
Clinical Immersion Program: Innovation in Medicine
Blog 3: Needs Statement
Our time shadowing Dr. Jain led us to create a needs statement focused on creating a user-friendly tear collection process that allows any healthcare professional with minimal training to collect patients’ tears safely. We came upon this needs statement through interviewing patients and research assistants involved in the tear collection process. We also thought about the populations we would want to serve. In order to bring the tear collection process to low-resource settings where slit-lamps are unavailable, we would need to create a process/device that would allow for tear collection without the use of a slit-lamp.
Clinical Immersion Program: Innovation in Medicine
Blog 4: Criteria & Specifications
After much brainstorming on the process of tear collection, my team came up with a few salient criteria such as safety, comfort, efficiency, and accessibility. We will look towards creating a solution that prevents the direct use of glass capillary tubes, requires only 1 person to collect tears, is intuitive in terms of use, and does not alarm patients.
Clinical Immersion Program: Innovation in Medicine
Blog 5: Concept cards
We created concept cards this past week. On my concept card, I drew two ideas that my group had been discussing. The first idea was a mechanical apparatus that would allow the user to collect tears. The second idea is a motorized version of the same idea. Drawing out our ideas on concept cards allowed us to verbalize/demonstrate what we each were envisioning to our teammates. We showed our concept cards to our mentor who gave us feedback on what features he preferred, additional ideas, and future plans.