
Nikith Erukulla
2023 students
IMED, M2
Department of Anesthesiology
Pronouns: He/Him/His
Email:
Week 1: Learning to Identify Clinical Needs Heading link
During the first week of the IMED Clinical Immersion Program (CIP), I had the chance to shadow different physicians in the anesthesiology department at UI Health with my fellow teammates. It consisted of seeing various different surgeries in the main OR floor of UI Health as well as one day of shadowing on the OB/GYN floor to see expecting mothers receive epidurals. I had shadowed anesthesiology in the past, so I was somewhat familiar with the OR and the rules and expectations around it. With that being said, it was a different shadowing experience this time. In my past shadowing experiences, I was more focused on learning about the different indications for medications that the doctors use and why they were doing certain things. This time, I was trying to shift my focus more to the various devices and processes that were utilized by the physicians in hopes of identifying things that were working “well” and things that were not working so “well.” The following are my findings from my first week:
Good Design: Patient Vital Information Monitor Utilized During Surgery
I thought that the large monitor which shows the different vitals and measurements of a patient during surgery is designed well. It shows all the relevant information in an organized and concise manner. This is important because an anesthesiologist may have to quickly be able to interpret and make decisions based off of the data shown.
Activities: The main purpose of the monitor is to show all of the patient’s relevant vital information in one spot that a physician can easily read from. It shows information such as heart rate, respiratory rate, blood pressure, minimum alveolar concentration (MAC), BIS score, and many other measurements. It can also be used to adjust anesthesia levels during surgery, keep a record of the patient’s vitals throughout the procedure, and also visible and audibly alert the OR team to changes in the patient’s vitals.
Environment: This device is generally used in an operating room where there are surgeons, nurses, anesthesiologists, and other staff present. It also a sterile area.
Interactions: The main interaction that takes place with this device is when the anesthesiologist uses it for continuous vital monitoring. Besides that, it is also interacted with when dosages of medications are altered. Further, it can alert the entire OR staff to an issue with the patient’s vitals which is another interaction. The information it provides can also cause different healthcare providers to interact with each other. For example, the anesthesiologist may communicate with the surgeon because of a change in vitals.
Objects: The monitor mostly just consists of the screen which displays all the relevant information. Besides that, it is connected to a temperature, BP, heart rate, respiratory rate, and other monitoring systems. It can also consist of IV lines and medications that it may regulate.
Users: The main users of this device are as follows: anesthesiologist, surgeon, nurses/other support members of the team. The device provides information that the anesthesiologist will need to use to make decisions about medications. The surgeons needs to use the device to monitor the patient during surgery. The support staff also would be using this device to monitor the patient and properly perform in their roles.
Bad Design: Removal of Fetal Heart Monitor During C-Section Delivery of Baby
While this may not seem directly related to anesthesiology, it is. One of the main ways to tell how a fetus is doing is through the fetal heart monitor. The fetal heart monitor must be removed during a C-Section delivery because it would otherwise be contaminating the surgical field. The issue is that when mothers receive an epidural to relieve their pain, they often develop something called a sympathectomy which may cause them to become hypotensive. This, in turn, could cause issues for the baby. Normally, the anesthesiologist is able to monitor the baby’s status with the fetal heart monitor, but once it is taken off before the surgery begins, the anesthesiologist essentially has to make their best guess on how the mother’s vitals are affecting the baby and what medications should be given.
Activities: The fetal heart monitor is kept on the mother for the entire time that she is at the hospital until she gives birth. It is placed on the belly of the mother and is adjusted around as necessary. The heart monitor is removed when the mother’s belly is being prepared for the C-Section surgery so that it does not contaminate the surgical field. The fetal heart monitor is what allows healthcare providers to gauge how the baby is doing inside of the mother.
Environment: The fetal heart monitor is used when the mother is in her hospital room and up until its removal inside of the OR just prior to the C-Section surgery beginning. It is essential in monitoring the overall status of the baby, so it makes sense that it would be placed onto the mother for as much time as possible whenever she is inside of the hospital.
Interactions: The main interaction between the healthcare team and the fetal heart monitor consists of them moving it around as necessary on the mother. There is not much else they need to do besides monitor its output constantly. There is a TV screen on the OB floor which shows the output from every patient’s fetal heart monitor on the floor so that the nurses and doctors can keep an eye on the babies. The other interaction with the fetal heart monitor is when it is removed from the mother inside of the OR.
Objects: The fetal heart monitor essentially consists of a Doppler ultrasound “puck” that is attached to two bands which stretch around the mother and attach to each other to adhere the ultrasound portion of the device to the mother’s belly. The Doppler ultrasound then sends the fetal heart beat information to a monitor and a speaker which can be used to continuously monitor its output.
Users: The main users of this device are the healthcare team and the patient. The healthcare team uses it to monitor the baby’s health continuously. The patient can also generally see and hear the output of the fetal heart monitor, so they are also monitoring the output in a way.
Overall, I think that a device which can effectively provide fetal heart tone monitoring during the gap in a C-Section surgery could be very useful. It would give the anesthesiologist better information to work off of during the procedure and would likely improve outcomes.
Week 2: Creating a Storyboard Heading link
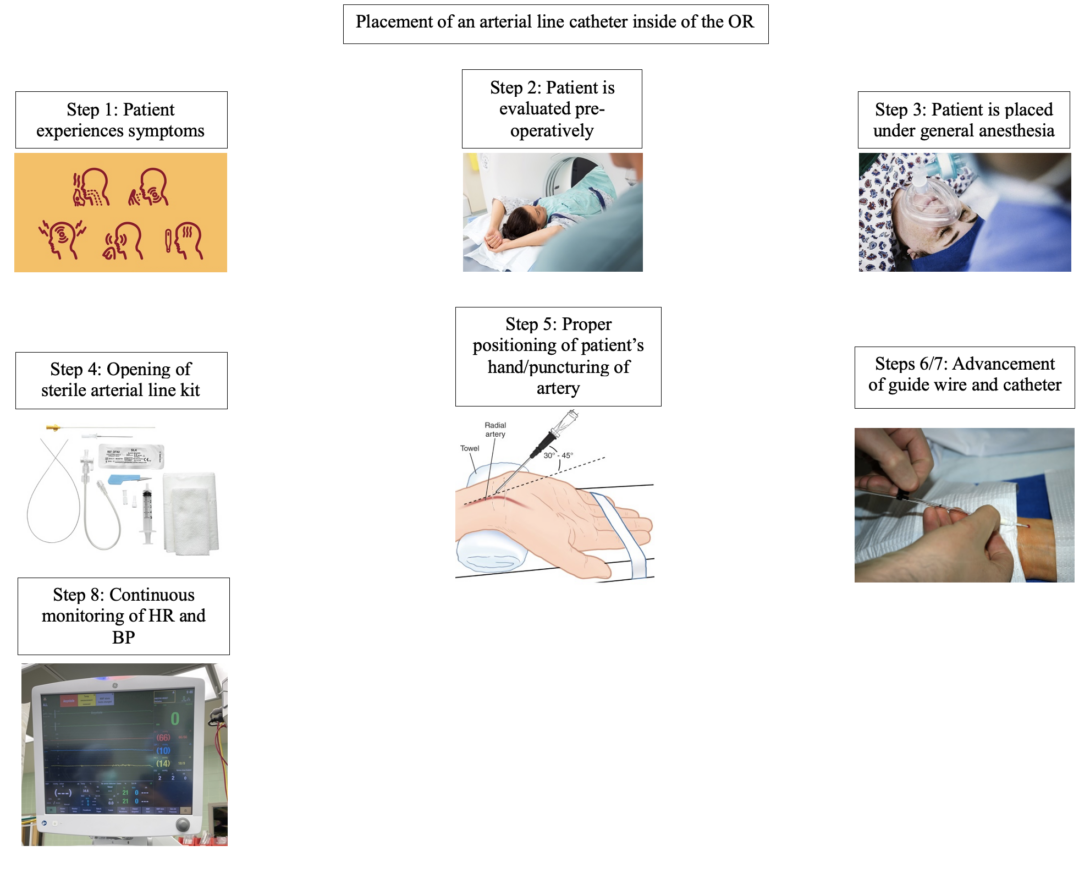
One of the most interesting cases I saw this week was an abdominal aortic aneurysm repair in an elderly female patient. Although the surgery itself was interesting, I found the various challenges that the anesthesiology team faced to be even more interesting. Although it may seem as if placing an arterial catheter is relatively simple based on the storyboard seen above, there are many different way it can go wrong or fail. In order to learn more about why these arterial catheters may fail, I conducted a literature search and came upon an article by Imbriaco et al. which discussed in depth the different reasons for why an arterial line catheter can fail. I will discuss these reasons in greater depth later in this blog post.
Step 1: Patient experiences symptoms
This step is relatively self explanatory, as it demonstrates a patient showing symptoms for whatever condition they may have.
Step 2: Patient is evaluated pre-operatively
After the patient has presented with symptoms and has been deemed as a candidate for surgery, they are evaluated pre-operatively for the specific surgery they may be getting.
Step 3: Patient is placed under general anesthesia
Before the surgery begins, the patient is placed under general anesthesia and “put to sleep” so they will not feel or remember anything from the surgery. The placement of the arterial catheter can also differ here because this procedure may also be done in the setting of an emergency department or elsewhere where the patient would still be awake. In this case, the patient would normally receive a local anesthetic injection, such as lidocaine, in the area where the arterial catheter is going to be placed so they would not feel any pain or discomfort.
Step 4: Opening of sterile arterial line kit
After the patient has been properly anesthetized, the healthcare provider dons their sterile gloves and opens the sterile arterial line kit. They need to make sure they have everything that is needed for a proper arterial line placement and they need to maintain sterility.
Step 5: Proper positioning of patient’s hand/puncturing of artery
The patient’s wrist should be extended so the healthcare provider can properly identify the radial artery and the correct site of insertion. After the radial artery is found and palpated, the area around it is sterilized and draped. Further, sometimes it may be necessary to check proper collateral flow through the ulnar artery prior to inserting a catheter into the radial artery. This can be done by applying pressure to both the radial and ulnar arteries until the hand loses color. Then, pressure on the ulnar artery is relieved and if the hand regains color within 15 seconds its collateral flow is sufficient.
It is also important to note that ultrasound is commonly used to identify the radial artery prior to insertion.
Since the insertion site has been identified, the healthcare provider can now proceed to puncture the skin and advance the cannula provided in the kit into the radial artery at a 30-45 degree angle. Once a flash back of blood is seen, they know that they are in the correct location.
Steps 6/7: Advancement of guide wire and catheter
After the cannula has been placed into the artery and it is confirmed to be in the correct location from the presence of flash back, the healthcare provider can continue the procedure and advance the guide wire. By using a lever on the tubing, the guide wire can slowly be threaded into the artery. It is important to note that if any resistance is felt the guide wire should not be forced.
After the guide wire is placed into the radial artery, the catheter can then be advanced into the artery over the guide wire. After the catheter has been successfully placed into the artery, the cannula and guide wire can be removed leaving just the catheter. A stopcock is also placed at the end of the catheter to stop the blood flow. Finally, the catheter is generally secured to the skin in some form (usually with something like Tegaderm).
Step 8: Continuous monitoring of BP and HR
After the arterial line catheter has been placed it is used to provide continuous beat by beat hemodynamic monitoring. This is especially useful in cases where having an instant BP readout is important, such as in cardiac surgeries.
During the abdominal aortic aneurysm repair I saw this week, the arterial line catheter was having issues. At one point during the surgery it began showing obviously incorrect BP readings, so the anesthesiology team tried to troubleshoot it. They discovered that although it was properly placed into the radial artery, it had somehow slipped out and was floating outside of the artery. Since the case was an inherently vascular/cardiac case, it was extremely important for them to have continuous BP measurements available. This began the process of the team attempting to reinsert a new arterial line catheter with ultrasound guidance. At first, it was troublesome because they did not have the same level of access to the patient’s arms during the middle of the surgery as they had before it began, so they were working in a tight space. Additionally, the patient was elderly and had comorbidities which made it difficult to properly gain access to her artery. Eventually the team was able to reinsert a new arterial line catheter, but I was still left thinking about why the original one failed. According to Imbriaco et al., there are many various factors that may affect the survival of an arterial line catheter besides the device itself failing. These are: use of ultrasound guidance, angle of insertion, location of cannulation site, catheter length, proper securement of the catheter, and the ratio of the arterial diameter to the catheter diameter. They determined that using ultrasound guidance leads to better outcomes overall. Further, they concluded that the angle of insertion can also affect failure rates. More specifically, they showed that a longer catheter needs to be utilized if the angle of insertion is less then 45 degrees. The authors also suggested that a cannulation site that is at least 4 cm above the wrist is better for overall outcomes because it reduces the amount of mechanical stress the catheter endures. Additionally, they found that arterial line catheter failure may also be attributed to improper securement of the catheter which may cause it to become dislodged. Finally, Imbriaco et al. also discussed how a proper catheter to vessel diameter ratio needs to be chosen based on the information gained from ultrasound.
Reference:
Imbrìaco G, Monesi A, Spencer TR. Preventing radial arterial catheter failure in critical care — Factoring updated clinical strategies and techniques. Anaesthesia critical care & pain medicine. 2022;41(4):101096-101096. doi:10.1016/j.accpm.2022.101096
Week 3: Needs Statement Iterations Heading link
During my third week of the CIP program I got to view more surgeries and gain some more insight into the daily schedule of an anesthesiologist. Of my various observations throughout my weeks in the program, the ones that stood out to me the most were about the BP cuff. During multiple surgeries which I shadowed I noticed that the BP cuff was either giving out very obviously incorrect readings or just not working properly and giving out no reading at all. What was more interesting was that the vitals monitor did not give a warning that the BP cuff was not providing a reading. The BP cuff was actually not giving out a reading for ~15 minutes in one surgery I was shadowing before the anesthesiologist noticed (this is because they were occupied by setting up various different lines and other tasks so they were relying on the automated monitor to provide them with alerts if necessary) that there were no numbers showing up on the screen. In another surgery, the BP cuff was giving wildly inaccurate readings before the physician realized that one of the surgeons was leaning ever so slightly against the BP cuff. As one may realize, this is obviously a glaring issue because monitoring BP and keeping it stable is extremely important during a surgery. For this reason, I generated the following needs statement:
First iteration of the needs statement:
Anesthesiologists need a better way to ensure that the BP cuff is properly functioning.
- Population: Anesthesiologists
- Opportunity: Ensuring that the BP cuff is properly functioning
- Outcome: More comprehensive hemodynamic monitoring during a surgery that may lead to better patient safety, overall care, and outcomes
My main objective in formulating this needs statement was to just become more familiar with the P.O.O structure and to create a basis to work off of for future iterations of the needs statement. As it stands, the statement is too broad. The opportunity and population could be more specific and improved upon. This leads me to my next iteration of the needs statement:
Second iteration of the needs statement:
Anesthesiologists providing care in the operating room need a more automated and more technologically advanced method to monitor BP cuff readings that they can consistently rely on throughout a surgical procedure.
- Population: Anesthesiologists in the operating room
- Opportunity: Use of a more automated and more technologically advanced method to monitor BP cuff readings
- Outcome: Increased accuracy of BP cuff readings, increased anesthesiologist confidence in their equipment, overall more comprehensive and continuous hemodynamic monitoring for a patient, improved safety and patient outcomes
The second iteration of my needs statement is definitely an improvement over the first one. It further refines the population to be anesthesiologists in the operating room. I think this could still be improved upon because there are other providers that are in the OR who also assist with anesthesia besides just anesthesiologists. The opportunity is also greatly improved upon because it became much more specific and it focuses more upon what is specifically needed by the anesthesiologists in the operating room. The outcome is also slightly more specific, but the overarching goal of increased patient safety and better patient outcomes is still the same.
Third iteration of the needs statement:
Anesthesia providers in the operating room need an advanced and reliable BP cuff monitoring solution that effectively addresses common issues such as external obstructions or malfunctions, ensuring continuous and accurate blood pressure readings throughout surgical procedures.
- Population: Anesthesia providers in the operating room
- Opportunity: Development of an advanced and reliable BP cuff monitoring system that addresses common issues such as external obstructions or malfunctions
- Outcome: Improved and more continuous hemodynamic monitoring during surgery, improved patient safety, improved patient outcomes, increased confidence of anesthesia providers in their equipment
The third iteration of my needs statement further improves upon the second iteration in multiple aspects. Firstly, it becomes more general with the population. There are also CRNAs and other healthcare providers in the OR who provide anesthesia, so this was a necessary change. The opportunity also changed to remove the words more technologically advanced and automated in order to be less specific. A good needs statement should not limit the scope of solutions, so this was also a needed change. Furthermore, it gives a couple examples of common causes of issues that I discussed earlier. It provides some issues that the solution should be able to address. Essentially, the third revision of my needs statement becomes a little more open-ended which allows for the user/team to be able to have more liberty when generating possible solutions.
Week 4 - Introduction to Patents Heading link
Similar to my experiences during week 3 of the CIP program, week 4 consisted of shadowing Dr. Nishioka and various different residents and anesthesiologists inside and outside of the OR setting. For example, I got to see Dr. Nishioka be the board runner for the day which showcased more of the administrative aspect of his position. I also got to see some procedures done in the pain clinic as well as some nerve blocks. Of my experiences during week 4, one thing that stood out to me again was the issues that the blood pressure cuff was having. As detailed in my week 3 blog, I noticed that the blood pressure cuff that is commonly used inside of the OR has malfunctions or issues that occur which can seriously compromise patient care. Based on what I saw last week, I developed the following need statement:
Anesthesia providers in the operating room need an advanced and reliable BP cuff monitoring solution that effectively addresses common issues such as external obstructions or malfunctions, ensuring continuous and accurate blood pressure readings throughout surgical procedures.
After some discussion with Dr. Browne and Dr. Felder, I realized that the statement could be further improved upon as it focuses in too much on a solution and can be made a bit more concise. I changed the statement to become the following:
Anesthesia providers in the operating room need a hemodynamic monitoring system that effectively addresses common issues such as external obstructions or malfunctions, ensuring reliable and accurate hemodynamic readings throughout surgical procedures.
Based on the need statement I generated, I wanted to see if there were any other existing solutions that would satisfy what I outlined. This led me to do a patent search for existing hemodynamic monitoring solutions that can be used inside of the OR. I found the following:
Patent no. WO2019027904A1
This patent details the information and claims for something that makes up the basis of the Clearsight BP monitoring system which is owned and developed by Edwards Lifesciences Corporation. Essentially, the claims detail a device that is described as a “finger cuff attachable to a patient’s finger to be used in measuring the patient’s blood pressure by a blood pressure measurement system…” This statement represents the most salient portion of claim 1 listed on the patent. In this regard, it still agrees with the generated need statement. It does not conflict with any of the needs set forth. Since it is a finger cuff, it would likely reduce external obstructions such as a surgeon leaning on the system which may cause it to give incorrect results.
There are 27 claims in total which describe a device with the following overall specifications:
- A two sided cuff which is removably attached to the other side in order to wrap around the patient’s finger
- A signal source and signal detector which work in tandem for the hemodynamic monitoring
- A bladder mounted inside of the cuff which has two openings (presumably for a patient’s finger to go through) and surrounds the signal source and signal detector
- A cable which gives pneumatic pressure to inflate/deflate the bladder and receive electrical signals from the signal source and signal detector
The claims describe a device that could potentially be used a solution to the need statement that I described above. It provides hemodynamic monitoring, can be used inside of the OR, and should solve a common issue of external obstructions since it is placed on the finger which generally secured in a place free from accidental pressure. As for the accurate and reliable portion of the need statement, there is not a way to tell just based off of the patent. I have seen this device used within the OR at UI Health and based on what I hear some of the anesthesiologists say, it is not accurate and not reliable, but a scientific study would need to be done to truly prove or disprove these claims.
Week 5 - Estimating the Total Addressable Market Heading link
The fifth week of the CIP program consisted mostly of shadowing various anesthesiologists in different areas of the hospital again. This week, I got to visit the pain clinic where I saw epidurals and trigger point injections being performed under fluoroscopy. I also got to see some more of the administrative side of the profession. Furthermore, I was able to gain access to a report which gave me information on the usage and price of blood pressure cuffs by UI Health in the last year. I will use this data to calculate the total addressable market for a potential solution to the need statement from the blog posts in previous weeks.
According to the data I received, UI Health as a whole purchased 140,497 blood pressure cuffs in the last one year for a total of $244,860.81. This shows an average cost of $1.74 per blood pressure cuff. Looking further into the data I saw that 27,528 of those cuffs were purchased for surgical use for a total of $44,250.32. This yields an average cost of $1.61 per blood pressure cuff. Considering that the need statement focuses on blood pressure cuffs specifically in the operating room, I will first focus on the total addressable market for just BP cuffs used in that environment. First, I will divide the number of surgical BP cuffs used by 28 since UI Health and the SCB have 28 operating rooms combined. This gives a value of 983.14 BP cuffs per OR per year. This can then be generalized to the entire nation by multiplying it by the total number of ORs present. According to Definitive Healthcare, which is a healthcare market data analysis company, as of April 2023, there are a total of 35,870 operating rooms present within the US1. If we multiply this value by the average number of surgical BP cuffs used per OR per year at UI Health, then we get a value of 35,265,334.30 surgical BP cuffs used per year in the US. If we then multiply this value by the average cost per surgical BP cuff seen at UI Health of $1.61, we get a total addressable market value of $56,777,188.20 per year.
I believe it is also relevant to calculate the total addressable market for all BP cuffs in general. Even though the need statement focuses specifically on the operating room, a potential solution may be utilized in the entire clinical setting outside of the OR. In this case, the total number of BP cuffs of 140,497 will need to be divided by the number of beds that UI Health has and extrapolated to the US. According to the American Hospital Directory, UI Health has 484 staffed beds2. This leads to a total of 290.28 BP cuffs used per hospital bed per year at UI Health. Per the American Hospital Association, there are a total of 919,649 total staffed beds in the US3. This leads us to see that there are a total of 266,958,524 blood pressure cuffs used per year in the US. If we then multiply this by the average cost of $1.61 per BP cuff that was obtained from the UI Health data, we see a total addressable market of $429,803,223. Overall, a solution that satisfies the need statement I have proposed seems to have a decently sized addressable market.
1https://www.definitivehc.com/resources/healthcare-insights/number-of-us-operating-rooms
2https://www.ahd.com/free_profile/140150/University_of_Illinois_Medical_Center/Chicago/Illinois/
3https://www.aha.org/statistics/fast-facts-us-hospitals