
Andrew Gould
2023 Students
Email:
Week 1 - Testing the AEIOU Framework Heading link
Good Design: Sterile Surgical Tool Pouch
Activity
These pouches were used throughout the entire surgery and some googling shows that they’re used to hold various surgical instruments. In this week’s cases, I noticed they were used mostly to hold electrosurgical instruments, so I’ll focus on their usage in this context. Briefly, electrosurgery describes the usage of controlled and localized electrical currents to simultaneously fulgurate and coagulate soft tissues. Electrosurgical instruments I saw commonly used in the OR for were bipolar diathermy, liquid suction tools to remove bodily fluids and debris, and an aerosol vacuum to remove unwanted smoke and noxious fumes.
Timeframes for the use of electrosurgery vary greatly according to the application. For spinal reduction and fixation, I noticed that electrosurgery was used to cut through different layers of tissue and to clear excess tissue from the bony structures of the spine. This process took anywhere from 1-2 hours following the first incision.
Environment
The pouches adhere to the sterile drapes that cover the patient during the surgery and are usually kept at the level of the hip to the mid-thigh of the surgeons. It’s important to note that the instruments themselves consist of a handheld device connected via power cords or tubing to power sources or vacuum pumps that are within several feet of sterile field.
While the handhelds are sterile, the tubing evidently isn’t, as it is usually draped on the floor and underneath the operating table. This creates an interesting dilemma because the surgeons need to maintain a pristine surgical field, but they also have tens of feet of non-sterile tubing within arm’s reach throughout the surgery. The tubing must be tens of feet long (couldn’t get an exact measurement) to give the users some freedom of movement, and when not in use, the instruments are normally “holstered” in the pouches.
Interaction
The surgeons use their electrosurgical instruments differently than other stainless steel surgical tools, in that they are usually holstered in their sterile pouches. This is different from most other surgical instruments (calipers, hemostats, screws, and rods), which are normally kept on the scrub tech’s table and are handed to the surgeon at their request before being returned to the tech’s table when they’re done with them. It’s worth remembering that the electrosurgical instruments are unique in that they’re connected via tens of feet of tubing or cords, to a non-sterile device. Handing them off to the surgical techs would involve moving these connectors around and over the sterile field, which would be both cumbersome and pose considerable risk for contamination.
Objects
As mentioned, the pouches primarily interact with the electrosurgical instruments, but googling these pouches shows that pretty much any surgical instrument that’s sterile and that can be fit in them might be kept in there. Ultimately, the choice to use these pouches may depend upon the surgeon’s frequency of usage for a given instrument, the space in the OR, and the space of the scrub tech’s table.
It also probably goes without saying, but the pouches are typically adhered to the sterile drapes that are placed on top of the patient. After closing the incision, the techs begin to “deconstruct” these drapes by tearing them off the patient. So far I’ve seen this happen where several layers of these drapes are pulled off in one swift movement, almost like a sleeping bag, and the pouches on the outside are pulled off with them. Evidently, the pouches are disposable just like the drapes. This makes sense since they’re initially sterile yet get covered in bodily fluids throughout the surgery.
Users
Obviously, the most frequent users of these pouches are the surgeons as they’re the ones who keep their instruments inside of them. They have an interest in keeping valuable instruments within arm’s reach, without contaminating their patient or creating a tripping hazard. You could also argue that the surgical staff and techs use these pouches when they initially adhere them to the patient, since they might risk breaking sterility if they had to replace them. Thus, they have an interest in ability of the pouches ability to bear the weight of whatever they’re carrying. You could also argue that the techs value the convenience of a disposable pouch that’s easy to get rid of along with the other drapes, allowing for quick and efficient room turnover.
Bad Design: Clinical Computer – Sharing MRI to Patients
Activity
In neurosurgical clinic, it’s pretty typical for physicians to share radiographic imaging with patients that demonstrate anatomical features that may or may not warrant surgical intervention. To do this, surgeons will usually pull up a scan on Epic and turn their computer screen over to the patient, who’s sitting about 2-3 feet to the physician’s side. The physician then uses their mouse cursor to highlight features worthy of attention. This is a very common practice (I’ve seen this is pretty much all of the patients we have observed in clinic, and I’ve seen this happen in clinics for other specialties I’ve shadowed outside of CIP). However, in certain specialties like neurosurgery, you also tend to encounter patients who have limited range of spinal movement, use wheelchairs, are visually impaired, or some combination of all three. In these cases, the patient may have issues getting close enough to the computer screen to properly see their own imaging studies.
Environment
Clinical rooms are usually set up with a physician’s computer in one corner by the door, chairs for the patient and maybe a companion within a couple of feet, an examination chair in the opposite corner, and a table for gloves and/or instruments directly across from it. There’s enough of space in the room for 5-6 people to crowd in there, but it’s not necessarily that maneuverable for someone who may use a wheelchair, or for them to approach the table if they need to get closer to see their scans.
Interaction
Relevant interactions are between the physician and patient with the computer. Physicians are the ones who pull up the scans, turn the screen around to face that patient, and highlight relevant features with their mouse cursor. The patients also watch the screen and follow the cursor as the physician points out key features.
Objects
Pertinent objects in these interactions obviously include the chairs that people sit on, the tables, and the computer.
Users
Obviously, the physician is the primary user of the computer, as they’re the one who logs on to epic, pulls up the relevant scans, and explains them to the patient. I would also argue that while patients may not be users, you could call them vital stakeholders in this interaction who have just as much investment in the imaging as the physicians.
Even if patients may not understand the fine details of the results of their imaging, it’s vitally important that they be given the opportunity to see them, and the results explained to them by a competent professional. Patients have a right to their own health data as they can use it to make informed decisions about their care. Additionally, you must consider that many of these imaging studies require that patients spend hours in uncomfortable imaging suites, in exchange for some valuable insight into whatever condition is afflicting them. Having been through an uncomfortable CT scan myself for my appendicitis, I wanted to know that my time and discomfort was being put to good use and that I would get some valuable knowledge on how to cure my ailment.
Week 2 - Intro to Storyboarding Heading link
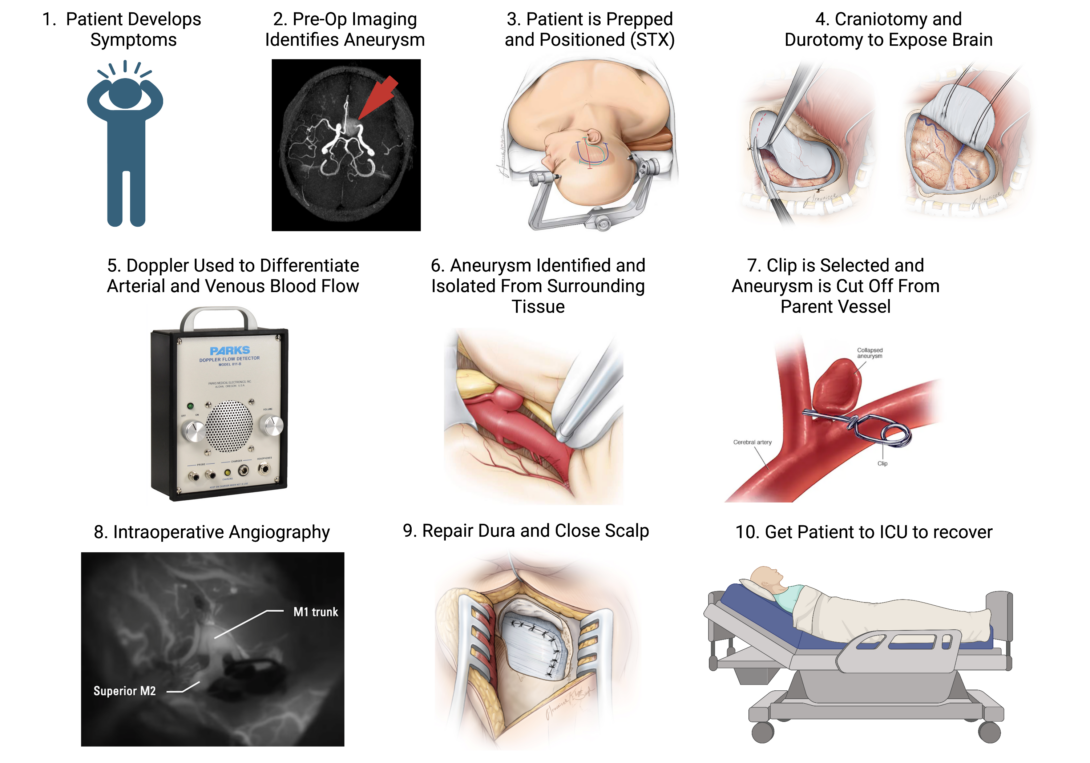
A standout case from this week was the clipping of a cerebral aneurysm. Not only was this the first case of intracranial surgery we’d seen since the beginning of the program, but also it was an excellent demonstration of several different devices put to use in a single case.
From aneurysm clips, to doppler ultrasound probes, to fluorescent microscopy, I only realized how complex this case was when I properly sat down and started storyboarding. To learn a bit more about the intricacies of these techniques, I searched the literature for some details on their individual applications. I found a prospective clinical trial by Gruber et al. 2011 which evaluated the efficacy of Doppler Ultrasonography and Intraoperative Fluorescent Microscopy on the success of aneurysm clipping. The authors make no concrete conclusions on the superiority of one technique over the other, but rather recommend that each was able to assist in different stages of the surgery (which will be elaborated upon in the storyboard):
Step 1: A patient develops the symptoms of a brain aneurysm. The literature tells us that these symptoms are quite broad and typically depend upon the location of aneurysm within the brain. Enraptured aneurysms, like our patient’s, may present with nausea, blurred vision, and various focal neurological deficits that reflect poor blood flow to the affected regions of the brain. Pain points for this part of the storyboard are really focused on the patient’s ability to recognize these symptoms, their access to healthcare, and readiness to pursue medical evaluation for an underlying aneurysm.
Step 2: Preoperative Imaging
Cerebral aneurysms are formally diagnosed using neurological imaging studies, notably MRI and its cousin magnetic resonance angiography (MRA), which is used to highlight the cerebral vasculature. Such imaging studies not only confirm the diagnosis of an aneurysm, but also assist surgeons in planning their approach and subsequent clipping.
Step 3: Positioning the Patient in the Stereotaxy
In our case, this was a surprisingly lengthy part of the surgery. Stereotaxy is a vital tool in intracranial surgery. It fixes the patient’s head securely in position and helps prevent intraoperative slipping, but additionally it gives surgeons a three-dimensional coordinate plane with which to navigate the complex anatomy of the brain. Pain points for this step are: the clamps for the stereotaxy can damage the patient’s skin and leave them with painful wounds or even scars; and positioning the patient can be cumbersome and time consuming. Once pinned in place, it’s VERY dangerous and complicated to move the patient, so the surgeons need to be very confident in their positioning and have to anticipate their surgical approach; Additionally, one needs to be careful when releasing the patient from the stereotaxy at the end of the surgery, because sudden movements or trauma could introduce new injuries.
Step 4: Craniotomy, Durotomy, and Dural Retraction.
Once in position and under anesthesia, you get started on the surgery proper. A craniotomy is an essential but stressful component of any intracranial surgery, allowing the surgeons to access the brain. Additionally, once past the skull, the surgeons must very carefully cut and retract the dura mater (the fibrous sac that surrounds and supports the brain). The dura is eventually stitched back together by the end of the surgery. Pain points for these steps include accidentally damaging the nervous tissue underneath the skull and dura, depressurizing the cranial vault and increasing the risk of brain herniation, possible infection or exposure to the outside world. Additionally, while the dura is a fairly fibrous tissue, it’s still possible to rip it in the course of retraction, which makes it difficult to bring edges of tissue into apposition upon the end of the surgery. The dura NEEDS to be water tight, because it houses the cerebral spinal fluid (CSF) that provides cushioning and nourishment to the brain. Leaks in the continuity of the dura are not uncommon adverse events following intracranial surgery and can result in additional morbidity for the patient.
Step 5: Identify Offending Vessel With Help From Doppler Ultrasonography
Aneurysms are always immediately apparent upon craniotomy and durotomy. Sometimes they’re found deep in the brain and one has to follow the parent blood vessel until the offending segment is properly identified. This can be tricky, since neurovascular anatomy has some idiosyncrasies between individuals, and additionally, veins and arteries are not always readily distinguishable by eye. However, there are inherent differences in arteriolar and venous blood flow that can be characterized aurally and visually via Doppler Ultrasonography. This technique involves placing a sterile ultrasound probe on top of a blood vessel of interest and listening to the sound of the resulting Doppler effect, as well as by visualizing waveforms on an adjacent monitor. Arteries and veins have characteristic waveforms that can be used to distinguish one from another, and thus the Doppler Ultrasound can help surgeons to identify vasculature of interest. Pain points for this step are that the Doppler requires some background knowledge and expertise to interpret.
Step 6: Identify The Offending Aneurysm
While we often present aneurysms with colorful cartoons that exaggerate their balloon-like geometry, in real life, they don’t always look like this. Aneurysms can take on all sorts of shapes and sizes, and occasionally, it can be difficult to distinguish them from the inherently tortuous (but normal) cerebral vasculature. Identifying aneurysms microscopically thus requires background knowledge and expertise, but can be aided by the aforementioned Doppler Ultrasound (aneurysms will sometimes “sound” different from the surrounding vasculature). Pain points for this step include having the expertise to identify the aneurysm microscopically and via ultrasound. Additionally, there’s always an inherent risk that the surgeon could accidentally rupture the aneurysm when isolating it from the surrounding tissue or when making their surgical approach.
Step 7: Clipping the Aneurysm
Finally, you get to the clipping. As its name implies, this literally involves taking a metallic clip and snapping it tight around the neck of the aneurysm. On its surface, this sounds simple, but it’s actually quite complicated. Just like aneurysms, clips come in all shapes and sizes to match the geometry of their targets. Surgeons need to select clips with a shape that best occludes the aneurysm without entirely compromising blood flow from the parent vessel. Additionally, clipping isn’t an exact science and depends upon the technique/approach of the surgeon. Sometimes the clip may only partially occlude the aneurysm, which predisposes the aneurysm to eventual rupture or the development of new aneurysms adjacent to the old one. Once clipped, aneurysms can sometimes be carefully re-clipped, but in attempting this you run the risk of bursting the aneurysm (which can be catastrophic). Additionally, you can only clip an aneurysm with the clips that you have, so if you eventually get down to the aneurysm and realize that you don’t have the right shape of clip on hand, then you have to make do with what you have.
Step 8: Confirm Aneurysm Occlusion With Angiography
If you’re happy with your clip placement, it can be difficult to asses if you’ve properly occluded blood flow to the aneurysm just using your eyes. To trace the flow of blood from the parent vessel to the hopefully-cut-off aneurysm, you can employ intraoperative fluorescent angiography. This requires administering to the patient a bolus of a fluorescent tracer dye called indocyanine green, which is only visible by fluorescent microscopy via the surgical microscope. Ideally, this should highlight the healthy, patent vasculature, but not a properly clamped-off aneurysm. Incompletely clipped aneurysms may show residual fluorescence that could indicate the need to re-clip.
Step 9: Repair the Dura and Replace the Bone
If you’re happy with your clipping, it’s time to get out! The surgeon has to bring the edges of the dura back into apposition and form a water tight seal. As mentioned earlier, leakage of CSG is a dangerous and common complication of brain surgery. This can be further complicated by damage to the dura itself, and sometimes synthetic replacements are employed to fill in the gaps.
Step 10: Get The Patient to the Neuro-ICU to Recover
Finally, when the patient is in recovery, you have to carefully position them in a way that doesn’t risk spiking their intracranial pressure, tearing a whole in the newly-sutured dura, or introduce new cerebral injuries during transport from the OR to the ICU.
References:
Week 3 - Making a Needs Statement Heading link
As a visitor in the OR, it becomes apparent to you pretty quickly that usually it’s better to just keep out of the way and to let the professionals do the heavy lifting. Sometimes though, this is more literal than you realize.
Last week I stepped out of a spine case to observe some intracranial surgery next door. When I arrived, the patient had only just been anaesthetized and was being positioned into the stereotaxic head rest. When I’d worked in neurosurgery previously at Northwestern, I’d always arrived at the OR around the time the team had started the craniotomy. I had therefore seen plenty of patients positioned in stereotaxic head rests, but I’d never actually seen them being secured into these head rests.
To be blunt, it’s not as graceful as I anticipated it to be. Your patient is typically anaesthetized while supine for easy access to the airway. But once they’re under, you may need to reposition them for the surgeons to have efficient and safe access to the skull. This was the case for this surgery, as there was a lesion that needed to be removed around the patient’s cerebellum, on the back of their head. The obvious problem here though, is that the patient can’t get up and move themselves: the OR staff need to move them.
Understandably, this can be difficult if there’s a size discrepancy between the staff and the patient or if there’s only one or two people available at the OR at the time. This was the scenario for our patient, who was pretty big guy and was evidently a lot to handle for the two smaller scrub nurses and the skinny resident. Moving someone that big can sometimes be cumbersome, but it could also be dangerous. The patient is positioned on a relatively narrow operating table several feet off the ground, and since they’re anaesthetized, they can’t correct themselves before falling off. The last thing you want to do is to have a patient fall over and give them a concussion right before they get brain surgery.
Additionally, you need to consider that the surgeons aren’t the only ones who need to access the patient during the surgery. Your anesthesiologists also need to be able to access the airway, and maybe to set up arterial and venous lines, and to have them in arm’s reach of their working stations. I noticed that several times during the case, the anesthesiologist needed to get down on their knees, crawl underneath the sterile drape to access the patient’s arterial line. Granted, she wouldn’t do this if it posed an incredible risk to the patient, but I can’t imagine it’s the most graceful way to work in a sterile environment while you’re close to the dirty ground.
While it’s likely that there exists no such thing as a perfect position for the patient to be in, I thought this case excellently demonstrated the give and take inherent to all surgery, between the needs of the surgical team, the needs of the anesthesiologists, and of course, the safety of the patient. These conflicting interests inspired this week’s blog post, and how I might develop a needs statement based upon this scenario:
Iteration 1:
OR staff require a method to safely position patients in stereotaxic headsets in preparation for intracranial surgery, without posing harm to the patient.
Population: OR staff (surgeons, anesthesiologists, scrub nurses, circulators, techs)
Opportunity: Increase the ease and efficiency of positioning a patient for intracranial surgery.
Outcome: Reduce the chance of injury a patient while positioning them for intracranial surgery.
Iteration 2:
OR staff require a method to safely position patients in stereotaxic headsets in preparation for intracranial surgery, without harming themselves.
Population: OR staff (surgeons, anesthesiologists, scrub nurses, circulators, techs)
Opportunity: Increase the ease and efficiency of positioning a patient for intracranial surgery.
Outcome: Reduce the chances of OR staff straining or injuring themselves while positioning patients.
Iteration 3:
Anesthesiologists require a method to efficiently access the patient’s airway, arterial and venous systems during intracranial surgery.
Population: Anesthesiologists
Opportunity: Improve the efficiency of accessing the patient during surgery
Outcome: Reduce the risk of contamination to the patient or anesthesiologist
Week 4 - Intro to Patents Heading link
While in the OR this week, I attended a case that had to be cancelled before any incision was ever made. This was for a posterior cervical discectomy and fusion (PCDF), and there was a concern that the patient involved had some sort of compromised motor function while lying prone. For a good 30 minutes, the OR staff were playing with the EMG and concerned that they had injured his cervical spine while rotating him from the transport gurney to the operating table. They had to bring in the O-arm to confirm that his neck was unharmed, and then rotated him back into supine position to retest his motor function. In the end, it turned out there was an underlying condition regarding the patient’s cervical spine which made it difficult to assess his motor function while he was prone, but not supine (fortunately there was no injury).
The second rotation was a surprisingly lengthy ordeal. Many different wires and cords had to be removed, untangled, and organized while the patient was repositioned. It then took about 6 pairs of hands to secure the patient’s neck and breathing tube, while he was carefully rotated around his longitudinal access. In all it probably took 10 minutes just to get the patient from prone to supine, so they could retest his motor function while he was on his back. I noticed that during this second rotation, the staff devised a makeshift system of blankets and pillows to support the patient’s body and to initiate the rotation.
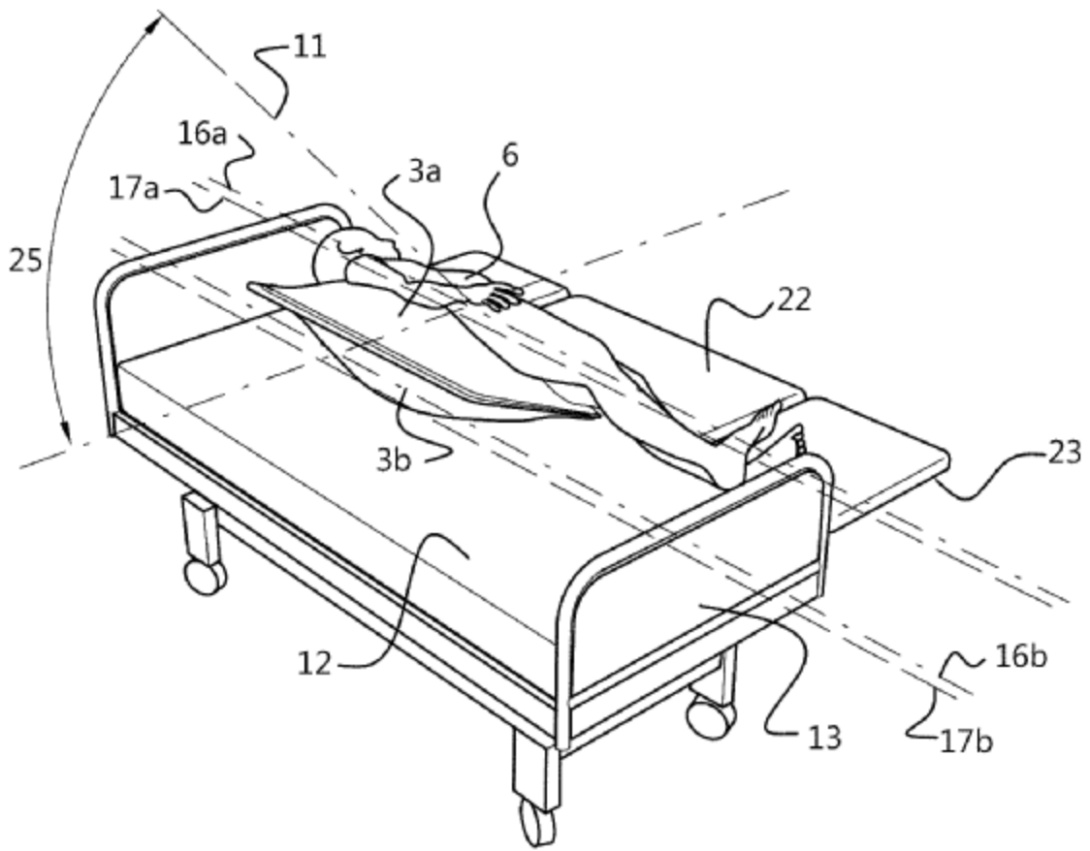
Seeing these items repurposed in such a way reminded me of a similar case (and blog post) I made previously on the positioning of patients in stereotaxic headsets. With these inspirations in mind, I wanted to explore patents for devices that aid in the rotation and transitioning of patients from surgical beds to travel gurneys, and vice versa. A need statement for such a device would go like this:
“OR staff require a method to rotate anaesthetized and intubated patients safely and easily from surgical tables on to transport gurneys (and vice versa) to minimize the opportunity for injury to the patient.”
After some digging around, I found an interesting series of devices manufactured by a Belgian company called Ergotrics. All of these devices are basically inflatable pillows of various shapes and sizes that can be used to support the patient’s body during surgery, but also to assist in the repositioning of patients in and outside of the OR. I was very interested in one of these devices (WIPO patent number US20190201263), which describes a flat device that can be wedged underneath a patient that is already lying supine or prone, and then inflated to gently support and rotate the patient to a supine or prone position (see figure, borrowed from the WIPO Website: (https://patentscope.wipo.int/search/en/detail.jsf?docId=US246621616&_cid=P12-LKK4DE-14330-3).
This patent claimed that the advantage of this device over others is that it can be deployed while the patient is already lying prone or supine, whereas others require the device to be in position and before the patient lies on top of it. This means that using the other devices requires planning in advance, and additionally these other devices can’t be used on anaesthetized and intubated patients (since they can’t get themselves up and out of bed to have a device put underneath them).
Additionally, the patent claimed that this device drastically reduced the number of staff required to rotate a patient, thus improving efficiency in the OR:
“A first object of the invention is to provide a system and method that reduces the manpower needed to accomplish the rotation with respect thereto, e.g. to a practical number of at most three team members—which results in a reduction, or elimination, of the waiting times and delays involved with the mobilization of health care workers.”
Based off the rotational episode I observed in the OR this week, a device such as this could be very useful. Rather than have 6 pairs of hands required to move a single patient, having only 3 would allow the other staff members to focus on other tasks. Based upon my observations, I’d envision that you’d still need at least one or two team members to support the patient’s neck during the rotation, and another to support (or rather to catch) the patient as they finish their rotation. From what I can tell, the patent doesn’t disclose how this device would interact with the tubing of patient who’s intubated, but at the same time I don’t think it ever claimed to be a “one fix for everything” type of device.
On its surface though, it seems like a plausible method to assist in the safe rotation of an anaesthetized patient, particularly in circumstances where you may be low on staff (or in situations where the staff members are simply smaller than the patient). Assuming it could also be deployed AFTER the patient has been anaesthetized and intubated (rather than before), then there’s an additional utility for scenarios like the one I observed, where there was never an initial plan to rotate the patient so frequently and the need only arose after EMG was problematic.
Week 5 - Estimating Total Addressable Market Shares Heading link
According to my estimate, in the year 2020 there were around 200,000 intracranial surgeries that might warrant cranial stabilization. Now I need to figure out the price for each individual unit of interest for a given procedure. Let’s assume I focus on hospital blankets. Apart from serving their primary function as blankets, I’ve seen these used to rotate patients, wedged underneath patients to cushion pressure points, and as literal pillows to secure patients’ heads. I was unable to figure out exactly what brand UIC throughout the hospital, so I did some quick googling for “hospital blankets” to get an estimate of how much a single cotton blanket may cost. I found one website (HY Supplies) that appeared to be selling cotton blankets that appeared pretty similar in size and material to those at UIC (https://hysupplies.net/100-cotton-snag-free-thermal-blankets), listed for $9.00. It’s more likely that these are being bought in bulk by a hospital (or through a GPO) for a discounted price. For the sake of the exercise, let’s just say $9 per blanket.
Assuming there are 200,000 intracranial procedures each year and each required a cranial stabilization unit that costs around $9.00, then the TAM for this need statement might be around $1.8M. Now, right off the bat, there are obvious problems with this estimate. The most immediate problem is that my calculations treat these blankets as single-use disposables (and they’re obviously not). Blankets are reused throughout the hospital and between cases over time until they wear out. It’s likely that a hospital hundred if not thousands of blankets. Additionally, lot of cervical spine procedures also require cranial stabilization, but I didn’t see any CCSR code that was specific for cranial spine separate from all spine procedures. Secondly, I also couldn’t see any codes for intracranial surgeries due to brain cancers. Granted, some of these surgeries could have been included in other codes related to meningeal repair, but that seems like a roundabout way of classifying glioma resections. So, if nothing else, I could say that my estimates are a minimum for the TAM, but the real value is likely higher.
Week 6 - Concluding Thoughts Heading link
The summer has flown by and I really enjoyed my time in CIP. Our group got along really well together, we observed some fascinating procedures, and I learned a lot about the design process. As the program draws to a close, it’s time to look back on the past 6 weeks. After our team decided to hone-in on minimally invasive spine surgery for our final proposal, we developed a working need statement to address shortcomings we’d observed in the OR. Coincidentally, within a few days of our first presentation, Dr. Mehta scheduled another endoscopic discectomy. With the prompt for this blog in hand, I decided to pay extra close attention during this case so I could use it as the basis for this blog. Additionally, I wanted to use this surgery as a case study in what I could recommend to future CIP participants.
I feel as though minimally invasive spine surgery (MISS) is an excellent topic through which to discuss key stakeholders. The most obvious stakeholder in any medical procedure is the patient, as they are quite literally the foremost recipient of the care being given. Their safety and wellbeing are paramount throughout the procedure, but particularly in the post-operative period. Having had an appendectomy myself, I can tell you that post-surgical recovery is an ordeal, and while my operation wasn’t as extensive as a multi-level discectomy and vertebral fusion, I certainly wasn’t fun. I can’t imagine how painful it must be to recover from open spine surgery. In a similar vein, the surgeons are also obviously important stakeholders. They’re the ones doing the procedure, but they also have an interest in minimizing complications throughout all stages of a procedure and the perioperative period. Therefore, MISS is an inherently interesting topic for innovation, not just because of its relative novelty, but because of the advantages that it can offer to key stakeholders (patients and physicians alike).
I’ll make a recommendation to future CIP participants using this former point on relative novelty. In many cases, innovation occurs when you improve upon inefficient old dogmas that people have simply accepted and suffered through for decades. However, sometimes it may be easier and more interesting to focus on “the cool new topic” for whatever specialty you’re in. If there’s a novel approach, like MISS, which is generating a lot of interest, you should investigate the reasons for why this approach is so compelling and what needs to be done for it to improve. For our team, we observed several MISS cases with Dr. Mehta and did some background research. Our secondary literature review corroborated with pain points that we had seen in the OR, and so we slowly generated a needs statement based upon our own observations and our readings from the broader spine surgery community. In a sense, I think we got lucky with MISS as this is an emerging topic in neurosurgery, but that doesn’t mean that this was a unique case. There are always cutting-edge technologies in any specialty, and if these novel approaches offer substantial benefit for key stakeholders, then think about what you can do to make it even better.