Megan Montinola
4th year Biomedical Engineering Student
Urology department
Email:
Week 1: Comparative Analysis of Medical Instrument Design

Good design: Cystoscope
The cystoscope is a disposable, sterile, and malleable instrument used to examine the urethra into the bladder with a camera attachment displayed by a monitor. There is a light to illuminate and a saline water passage to be able to look into a vesicle. The cystoscope is useful for procedures like cystoscopy and stent removal. Due to the cystoscope’s functionality, it can allow various surgical instruments to be used upon insertion–like graspers for stent removal. Cystoscopes have gained popularity as it provides a minimally invasive way to provide real-time images of the urethra and bladder for a more accurate assessment.
A (Activity): The procedure for a cystoscopy involves numbing the area with a local anesthetic for patient comfort, positioning the patient on the examination table, and inserting the cystoscope through the urethra into the bladder with the whole procedure lasting about 5 minutes.
E (Environment): The cystoscope is used in outpatient procedures at the urology clinic to assess the patient for any bladder stones, tumors, polyps, or enlarged urethra.
I (Interactions): The physician asks the patient if he or she would like to watch the monitor as the physician explains what he or she is seeing to help ease the patient. The physician also interacts with the assisting registered nurse whether or not the physician wants the lights dimmed to better see the monitor. The assisting nurse can also give any sterile tools to the physician if needed.
O (Objects): There is a tray with the cystoscope and possible instruments needed for a given procedure, a monitor connected to the cystoscope to display the camera, and a saline water bag attached to the cystoscope that runs fluid throughout the procedure out through the cystoscope.
U (users): The physician controls the cystoscope throughout the procedure, and an attending will assist with other instruments–for example, graspers and a guiding wire– if needed. The assisting nurse will hand the cystoscope to the physician as soon as the physician is finished numbing the area.
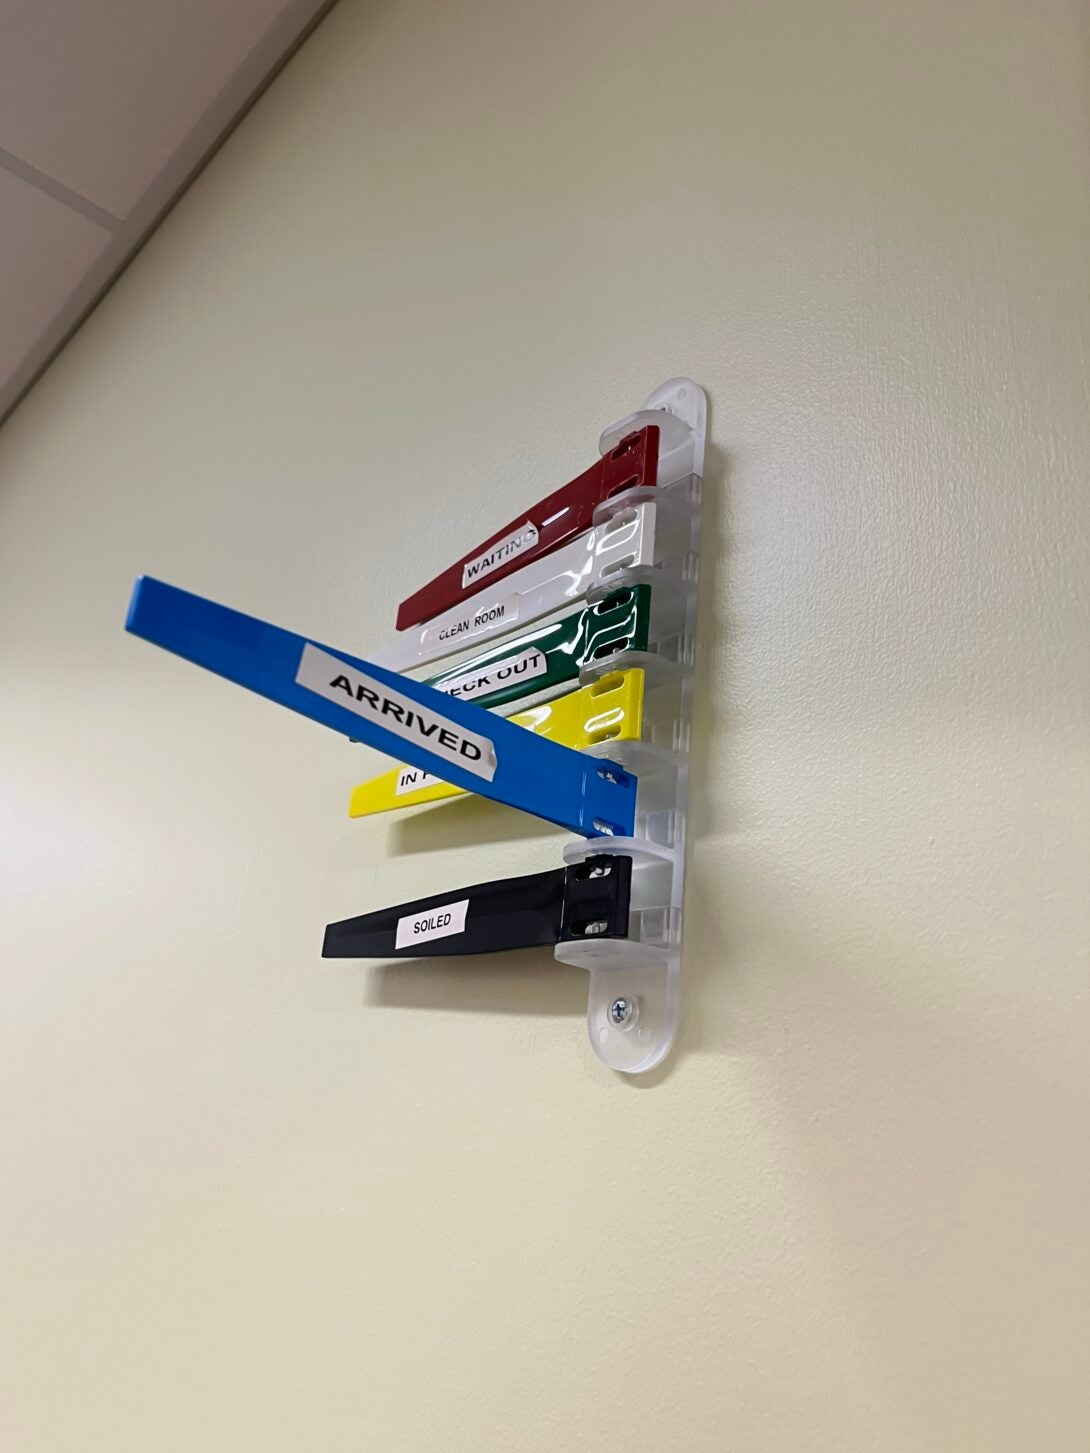
Bad design: Color-coded status tabs above the patient doors
Color-coded status tabs above patient doors in an outpatient clinic are common and are meant to be used as a quick visual communication system. The colors and meaning include: White (empty clean room); Blue (patient is arrived in room with a medical assistant doing vitals); Red (patient is waiting for provider); Yellow (patient is in room with provider); Green (patient is ready for checkout); Black (soiled). Color-coded tabs are meant to improve communication and efficiency, but if not used properly, can cause confusion and miscommunication.
A (Activity): Different colored tabs are used to indicate the status of the patient in the room. Pulling out a specific tab from the set signifies the current status.
E (Environment): The color-coded status tabs are located above eye level adjacent to the patient door when walking inside. The location of the tabs causes the user to overlook updating the status tabs.
I (Interactions): The concern is that there appears to be minimal interaction with the color-coded status tabs by the users. This leads to inefficiencies, such as physicians searching for medical assistants or nurses trying to locate physicians to ask about a patient’s status. Additionally, if the necessary person is unavailable, the lack of status tab usage results in wasted time and energy. Not utilizing the tabs as intended impedes effective communication and disrupts workflow.
O (Objects): The status tabs may be a trivial issue, but it is a small improvement that can enhance communication and better streamline the patient’s experience.
U (users): All staff involved in the patient’s care–including the person checking the patient in, the medical assistant, the physician, and the person checking the patient out–should interact with the color-coded tabs.
Week 2: Innovations in Surgical Positioning for Urologic Procedures

Secondary Research: “Prospective Assesment of Positioning-Related Pain in Robotic Urologic Surgery“
Surgical positioning is crucial for urological surgeons to guarantee proper exposure of the abdominal and retroperitoneal viscera. In the lithotomy position, the patient’s legs are placed in stirrups wrapped with compression cushions to prevent hip dislocation or muscle injury. Despite these precautions, patients often report post-operative pain related to positioning including numbness, weakness, soreness, neuropathies–damaged nerves (Martyn, C. N., and R. A. Hughes.), rhabdomyolysis–an injury in which damaged skeletal muscles break down rapidly (Zimmerman, Janice L., MD, FCCP, and Michael C. Shen MD.), and compartment syndrome–an injury that causes bleeding in a muscle compartment (Garner, Matthew R., et al.). Although there are current publications on proper positioning techniques, there is significant variability in how surgeons position patients.
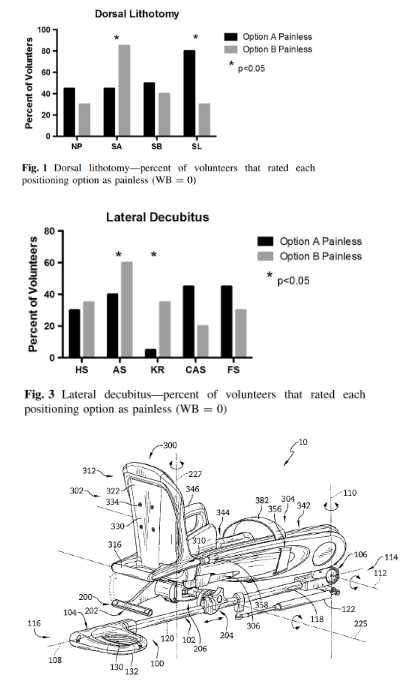
This article, “Prospective assessment of positioning-related pain in robotic urologic surgery”, analyzes the pain associated with positioning twenty awake volunteers in the dorsal lithotomy (DL) and lateral decubitus (LD) positions. Volunteers subsequently underwent a series of steps to rate the pain on the Wong-Baker scale (WB).
Participants preferred slightly pronated and flexed arms, their legs in stirrups then lowering to horizontal, and a raised head with a slightly flexed neck in the DL position. In the LD position, participants preferred a foam roll over a rolled blanket for axilla support, the table flexed without the kidney rest, and the overarm board over a stack of blankets for contralateral arm support.
Some limitations in this study include not having a sensitive WB scoring system to detect small differences in pain levels, varying lengths of different procedures that would increase any discomfort or pain, and not considering co-morbidity due to aging and disease than the patient population. This study demonstrates that assessing positioning with awake volunteers can benefit anesthetized patients by identifying less painful positioning options.
Garner, Matthew R., et al. “Compartment Syndrome: Diagnosis, Management, and Unique Concerns in the Twenty-First Century.” HSS Journal 10.2 (2014): 143-52. PubMed. Web.
Ginsburg, Kevin B., et al. “Prospective Assessment of Positioning-Related Pain in Robotic Urologic Surgery.” Journal of robotic surgery 12.1 (2018): 97-101. PubMed. Web.
Martyn, C. N., and R. A. Hughes. “Epidemiology of Peripheral Neuropathy.” Journal of neurology, neurosurgery and psychiatry 62.4 (1997): 310-8. MEDLINE. Web.
Zimmerman, Janice L., MD, FCCP, and Michael C. Shen MD. “Rhabdomyolysis.” Chest 144.3 (2013): 1058-65. MEDLINE. Web.
Patent: Boot Stirrup (US 10 , 188 , 573 B2)
The Allen Medical Systems Inc. Boot Stirrup is designed for use with a surgical table. It features a support arm, a surgical boot, and a lockable joint that connects the components. The support arm connects to the surgical table, allowing movement in multiple directions. The surgical boot supports and immobilizes the patient’s foot and leg. A lockable joint enables adjustable movement of the surgical boot along the support arm. Some of the key claims of the boot stirrup is its lockable joint, where a lever pivots around an axis. In one position, the lever is away from the boot handle, and in another position, it is next to the boot handle for release. The boot handle and heel support area are described to be formed as a single piece. The actuator unit includes a spacer assembly that can move between two positions: An expanded position, where it causes the clamp rod to engage the arm clamp and close it; And a compressed position, where it causes the clamp rod to disengage from the arm clamp and open it. The Allen Medical Systems Inc. Boot Stirrup is utilized in the urology operating room for procedures requiring the lithotomy position.
Moriarty, Joshua J., and Jesse S. Drake. Boot Stirrup. Patent US10188573B2. Jan 29,. <.”>https://worldwide.espacenet.com/publicationDetails/biblio?FT=D&date=20190129&DB=EPODOC&locale=&CC=US&NR=10188573B2>.
Week 3: Creating a Need Ensuring Reliable and Effective Tissue Collection
During a prostate resection surgery, excess prostate tissue is removed and collected for laboratory culture. To maintain sterility, interaction is solely between the urologist and the scrub nurse. During the procedure, the urologist uses a disposable bladder evacuator to suction the tissue from the patient by repeatedly squeezing the device. If the connection is poor, pressure can build up and potentially cause the bottle to explode. In addition, there is a filter inside the bladder evacuator. I observed that the scrub nurse takes an extra precaution by filtering the contents of the bottle again to ensure all tissue specimens are collected. The collection process involves using a disposable bladder evacuator, an extra basin of saline water, a filter, and a specimen cup.
The issue of the disposable bladder evacuator exploding due to pressure buildup has not been widely reported, but interviews with experienced urologists indicate that it is not an uncommon occurrence. Various types of bladder excavators are used in surgical settings. In the UIHealth operating room, I observed a device which features a cyclical bottle and a mesh filter with porous openings of approximately 1mm. This device has a rubber connection to the cystoscope, allowing for fluid introduction and withdrawal from the cavity [2].
The Ellik Bladder Evacuator is a reusable device that employs a pump bulb to generate pressure, creating a turbulent flow through the upper irrigation section. Both devices operate on the principle of using pressure to evacuate fluid from the cavity and collect tissue with a mesh filter. However, this does not fully address issues related to proper tissue collection and maintaining consistent pressure throughout the device [1].
In a study comparing bladder evacuator pressures, the Ellik Bladder Evacuator performed better than disposable evacuators, but had issues with unintentional leaks [3].
NS iteration 1: Urology surgeons require a reliable and secure method for using disposable bladder evacuators that ensures proper connection and effective filtration during tissue sample collection following a resection procedure.
P (Population): Urology surgeons
O (Opportunity): require a reliable and secure method for using disposable bladder evacuators
O (Outcome): ensure proper connection and effective filtration during tissue sample collection following a resection procedure
NS iteration 2: Urology surgeons need a reliable and secure method that ensures a proper connection and effective filtration to accurately collect tissue samples during resection procedures.
P (Population): Urology surgeons
O (Opportunity): need a reliable and secure method that ensures a proper connection and effective filtration
O (Outcome): to accurately collect tissue samples during resection procedures
Rationale for changes:
- The first needs statement points into the direction of creating another evacuator device as the solution.
- The aim is proper filtration which is achieved by also having a proper connection, so it is unnecessary to include in the outcome.
References:
[1] BARZELL, W., E, & WHITMORE WILLET F. III. (2010). SYSTEM AND METHOD FOR IRRIGATION AND TISSUE EVACUATION AND COLLECTION
[2] CLEMENT, T. P., & ROTH, R. A., MD. (1989). Bladder Evacuator
[3] Ravichandran, S., Reddy, G., & O’Sullivan, D. (2006). UP-03.03: Disposable bladder (Ellik) evacuators: are they different? Urology (Ridgewood, N.J.), 68, 286. 10.1016/j.urology.2006.08.860
Week 4: Revising Needs Statements and Addressing Blockages In Suction Catheters
Revised NS: Urology surgeons and scrub nurses need a reliable connection method and a single-step filtration process to accurately collect tissue samples during resection procedures, avoiding pressure explosions and ensuring all samples are retrieved efficiently.
My previous needs statement lacks a clear statement of what my outcome would solve. I wanted to highlight that solving this need would minimize steps taken and relieve pressure buildup to accurately collect tissue samples during resection procedures.
Focusing on IDEO:
Desirability focuses on user appeal. A device ensuring a secure connection between a tissue collection device and the cystoscope would alleviate surgeons’ concerns about pressure buildup, facilitating a smooth collection process. Additionally, a one-step filtration system would reassure scrub nurses that all tissue samples are collected, reducing the number of surgical objects used, minimizing medical waste, and saving time during surgery.
Feasibility assesses whether the solution can be achieved with available resources. Implementing a method for tissue collection is feasible in an in vitro setting before clinical trials. Numerous existing methods and devices can be analyzed to identify weaknesses and develop an improved device.
Viability emphasizes the long-term economic sustainability of the solution. Resection surgeries are prevalent across various surgical departments and will continue to be necessary as long as cancer remains a concern. Further research into a proper device can lead to long-term improvements for surgeons, nurses, and patients.
Addressing Blockages in Suction Catheters
During open surgeries utilizing the Da Vinci Robotic Surgical System, a common issue is blood clotting and tissue particles blocking the flexible suction tube. This problem has been observed in almost all the surgeries I’ve witnessed. When the tube clogs, the suction stops working, causing blood to pool in the surgical area and obstructing visualization. The assisting resident must then remove the tube and unclog it by running saline water through, hoping the clots will thin and force the tissues out. A resident I interviewed confirmed that this issue is more common with flexible tubing but still occurs with rigid tubing. This problem is frustrating for the surgeon and causes delays during the procedure.
Different measures to prevent this issue have been researched. One method involves placing a small swab over the suction tubing to draw out debris like clots and tissues [2], but this approach is still time-consuming and requires removing the suction tube from the patient for cleaning. Ongoing research focuses on the shape of the suction tip to prevent clogging, with a study showing that a two-slot 5mm suction tip performed best among four models in a clinical trial [1]. While 3D printing technology can develop new suction tips and reduce production costs, it is impractical for large-scale production due to variability. The time taken to clean suction tubing during surgeries can range from 38 to 72 seconds [1], which can be crucial depending on the surgery’s stage and can disrupt the surgeon’s focus. Although there are studies on preventative measures for blockages, there is limited research on how to clean the device in vivo to minimize time lost during surgery.
NS: Surgeons experience blood clotting and tissue blockages in suction catheters during surgery, and need an in vivo method to clean the tubing to minimize time delays during surgery.
P (population): Surgeons
O (opportunity): experience blood clotting and tissue blockages in suction catheters during surgery
O (outcome): need an in vivo method to clean the tubing to minimize time delays during the surgery.
[1] Ahmed, U., & Al Aswad, F. (2014). A practical tip to prevent intraoperative blockage of suction tubing. Journal of Surgical Technique and Case Report, 6(1), 43-44. 10.4103/2006-8808.135165
[2] Wang, J., Yang, L., Ma, M., Li, G., Xu, S., Li, Q., Xu, Z., Liu, J., & Ye, C. (2018). Development and Application of a No-Clog Surgical Suction Tip Using 3D Printing Technology. Medical Science Monitor, 24, 6765-6773. 10.12659/MSM.909900
Week 5: Storyboard Analysis of Prostate Resection Surgery: Identifying Key Pain Points and Areas for Improvement

Need statement: Urology surgeons need a reliable and secure method that ensures a proper connection and effective filtration to accurately collect tissue samples during resection procedures.
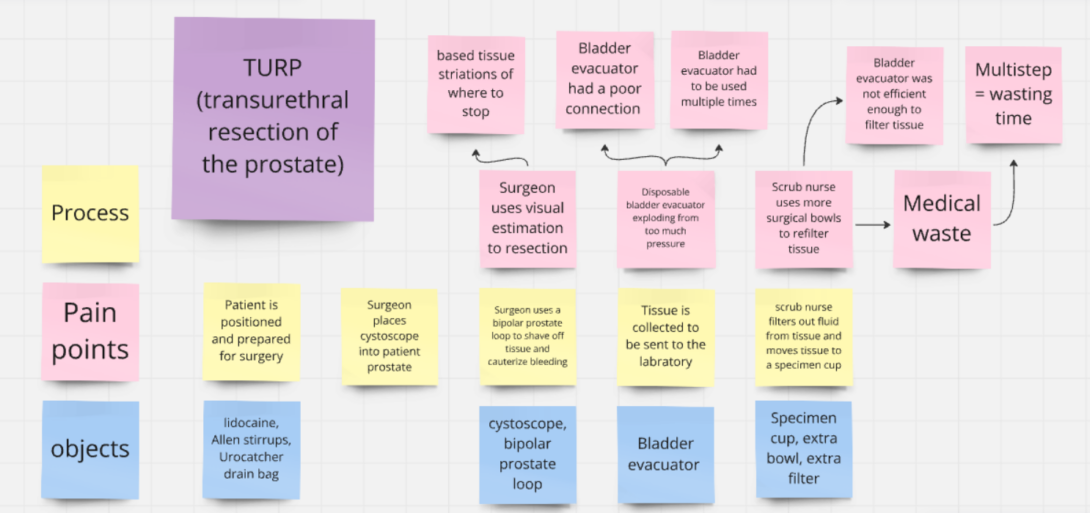
To better visualize the process, objects, and pain points of tissue collection, I created a storyboard for prostate resection surgery. Key areas for improvement include:
- Visual estimation of resection
- The repeated use of the bladder evacuator
- Poor connections between the cystoscope and bladder evacuator
- Effective filtration of specimen tissue to reduce medical waste
Addressing these pain points is crucial, as the procedure is common in various urological surgeries, including hematuria management, postoperative bladder irrigation, bladder tumor resection (TURBT), and transurethral resection of the prostate (TURP). This storyboard provides a cohesive overview to identify the successes and failures during the surgery and pinpoint when they occur.
Week 6: Closing Reflections and Advice from the UIC Clinical Immersion Program

During the UIC Clinical Immersion Program, I had the privilege of observing the exceptional care and dedication that the UIC doctors, nurses, and hospital staff provide to their patients. I am deeply grateful to the entire urology department for their warm welcome, for patiently answering all of my team’s questions, and for accommodating our eagerness to learn.
I would like to extend a special thanks to Dr. Garvey, Dr. Acar, and Dr. Crivellaro for allowing me to observe their work. Through them, I experienced a wide range of surgeries, procedures, and specialties that urology has to offer. This firsthand clinical exposure allowed me to gain a deeper understanding of the applications of various devices in both outpatient clinics and operating rooms.
The weekly didactic meetings were particularly insightful, teaching me the process of need statement development and emphasizing the importance of thoroughly understanding a problem before attempting to address it. Through this program, I enhanced my observation, critical thinking, research, and presentation skills, all of which I hope to apply in future problem-solving settings.
Advice to future CIP participants:
- Don’t hesitate to reach out to other attendings and residents in your department—they are often open to having students shadow them, as they understand the educational mission of our institution.
- Make sure to maintain a shared folder with your groupmates, organized with pictures, notes, and secondary research. This will make finding information much more efficient.
- Most importantly, have fun and make connections! The six weeks will fly by faster than you think. Remember, you get out of this program what you put into it. As a biomedical engineer, it is a rare and invaluable experience to be in the clinic or operating room, witnessing medical devices in action. Take every opportunity to gain as much exposure as possible.