
Sam Winters
Student Participant
Neurosurgery
Week 1: Exploring Careers & Good and Bad Design Heading link
The first week of the Clinical Immersion Program has taught me more about working in the medical field than ever before. Ever since middle school I dreamed of going into medicine as an anesthesiologist. Reason being is that I chose it after taking a “What Career Fits My Personality” Quiz in 7th grade and it just kind of stuck. A few years later I realized med school was not for me. So, I changed gears and changed that dream to becoming a physician’s assistant. When college started I entered as a Kinesiology Pre-PA major but learned that the program lacked the mathematical rigor that engineering provided. Though the change in major left me without a clear understanding of what career I wanted to pursue after college.
The first day in the hospital shadowing Dr. Ankit Mehta in the neurosurgery department changed my perspective of the medical field. My team and I showed up to the hospital early that day to shadow rounds around the NeuroICU before any procedures that morning. To be honest, I do not have much to take away from rounds that morning because they were very similar to a previous shadowing experience. That day, we observed 4 procedures–a posterior decompression of the spinal cord, a bullet removal, a craniotomy, and a discectomy/fusion. For each of the procedures, I made observations of how the room was set up and differing equipment/devices. If there was any new device used my group mates and I would try and figure out the purpose it served, and how it worked. I also took note of who, and how many people were in OR during procedures. At one point I counted 23 people including my group members, nurses, and medical tech vendors. The latter were assisting the nurses with setting up devices, as well as facilitating their use. I never knew that a job like that existed. After a couple of questions about the position, it reignited my excitement of engineering–reminding me that it is possible to work in the medical field outside of a hospital setting.
Aside from observing quantitative data, my team and I made sure to observe processes, and any complication that occurred. In the posterior decompression surgery, before the patient was transferred into a different bed, the nurses and anesthesiologist had to make sure no electrodes connected to monitoring nerves were crossing the patient. If a wire was crossed during transfer, it risks entanglement, and removal from the patient. It’s a simple fix, but a complication nonetheless. We also made sure to point out any form of good and bad design within the clinical setting:
Good Design
An example of good design that I witnessed in the OR was from a device used to drill larger burr holes. Burr holes are small holes that the neurosurgeon makes in the skull in order to relieve pressure when fluid builds up and to access the brain. When the surgeon was performing the craniotomy, he was using a drill that was designed to cut a continuous hole large enough to grant access to the brain, and stop as soon as it made contact with the dura mater; similar to a table saw’s failsafe when the blade comes into contact with a finger. This way, the surgeon does not have to wonder if they cut through, without damaging the dura mater.
Bad Design
The bad design that I encountered this week was not in the OR, but in my kitchen. I was doing the dishes when I went to add dish soap to a sponge. Imagine my surprise when no soap came out. The nozzle is clogged with soap that got stuck. I am assuming the issue is due to surface tension. The diameter of the nozzle is too small so it allows remnant soap to pool and dry up. In the process of trying to clean the clog, my hands got soapy so I was unable to get a good enough grip to twist the bottle cap off, and broke the nozzle cap in the process. I did clean it by running hot water through it, but now my dish soap bottle is broken
Week 2: Pedicle Screws Heading link
Neurosurgical ICU
For the second week of CIP, Dr. Mehta encouraged our team to venture outside the operating room and observe the neurosurgical ICU (NSICU). Last time I had even stepped foot in an ICU was from previous shadowing experience where I stayed with the same nurse for a couple hours. This time around my team and I followed neurosurgery and neurologist rounds. While observing rounds I noted how different the NSICU is from a general ICU, and the ICU environment is rapidly changing, dormant, and volatile; whichever you experience is all chance. For both days my teammate Nora and I were in the NSICU together, neurologist rounds consisted of the Attending Physician asking medical questionnaire to the current resident. Although our objective as BME students is to think about holistic process rather than medical knowledge, I gained so much insight into what it takes to be physician. The questionnaire served as a way for the resident to justify their medical decisions to the attending, and understand everything down to the pathological mechanisms that facilitate the resident’s decision.
Operating Room
Our last day was spent in the OR where my team and I shadowed a fusion of the cervical spine with a posterior approach. Even though this procedure was a long one (~7 hours), I quite enjoyed seeing how certain devices were used–specifically Medtronic’s StealthStation. The StealthStation is a device that allows for real time navigation of the brain and spine. All a surgeon needs to do is calibrate the machine by using a “Origin point” and an IR reflecting marker, and the StealthStation will link the position of any IR reflecting tags to preoperative CT images. Moving the marker across the patient will be reflected on its monitor, as well as an orthogonal view of the CT scans in relation too the reference point.
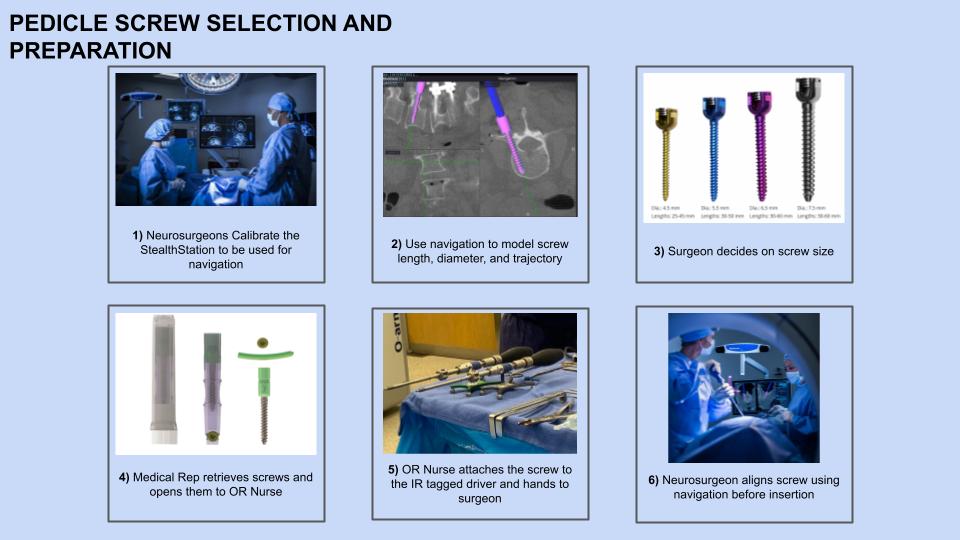
In this fusion procedure The StealthStation was used to aid the trajectory and size of pedicle screws being inserted to the posterior spine. The process of selecting which screw to use and its trajectory is shown in the simplified story board above, but I’ll now go into more detail about the processes, and state any “Pain Points” that might occur with each step. First the neurosurgeon and a medical representative (Med Rep) calibrated the device.
1. Neurosurgeon Calibrates StealthStation
With the help of a medical representative, the neurosurgeon uses a patient reference (origin) instrument, as well as a blunt tip pointer to start the calibration process. After “zeroing” the pointer on the origin, the neurosurgeon places the pointer on predetermined marker locations along the patient’s anatomy. After all anatomical reference points have been initiated, the system is calibrated.
- Pain Point: The surgeon might need to restart the calibration process if the reference instrument is knocked out of place or if any anatomical reference points get forgotten.
2. Use navigation to model screw and its path
Once calibrated, the Med Rep is able to add a model pedicle screw to navigation screen on the end of the blunt tip pointer. The Med Rep is able to adjust the screw’s size at any point so that the surgeon and another Med Rep can determine what length and diameter of screw is best before any holes are made in the spine. Once the trajectory of the screw is determined, the Med Rep working the Stealth Station locks that position on the monitor.
- Pain Point: If any other IR reflecting instrument is nearby/being picked up by the StealthStation, no image is shown on the monitor. Any IR reflector not in use must be turned face down to solve this issue (see the screw drivers in image 5)
3. Screw Size Decision
After viewing the model, a decision is made. Screw size is primarily determined by the amount of bone it is able to attach too. Since this was a cervical procedure, smaller pedicle screws were used compared to say a lumbar procedure.
- Pain Point: The perfect pedicle screw might not be available in the OR. The Med Rep assisting the screw size determination needed to know exactly which size their screws came in. The length of the screw set in the OR increased by increments of 2mm, some sets increase by 5mm. more issues can arise with the 5mm increment set because the surgeon would potentially need to compromise and use a smaller screw (effecting total stability of the finished contraption)
4.) Med Rep Retrieves Screw and Helps Open it
Each screw was packaged individually and sterilized. In the Med Rep opens first layer of packaging, allowing for the OR nurse to grab the second layer. She was then able to open it fully thereon.
- Pain Point: This process has to be done by two people as to not break sterile field. Issues occur someone not scrubbed in alters the only remaining screw of its size.
5.) OR Nurse Attaches Screw to Driver
After fully opening the pedicle screw, the OR nurse attaches the screw to the screw driver that has an IR Reflector attached to it, and hands it to the surgeon.
- Pain Point: The nurse must make sure that the screw is fully attached before the hand off. The screw gets attached a lip off the driver is wrapped around the screw. If the lip is not fully secure, the screw will fall off. This isn’t as much of an issue for experienced nurses, but those training aren’t used to the feedback that the driver gives to let the user know the screw is on fully.
6.) Neurosurgeon Aligns Screw
The final step before integration with the spine is to align the screw driver with the trajectory already determined.
- Pain Point: I did not catch the reason, but right before the neurosurgeon aligned one of the screws, he noticed that the CT image was off from where the screw driver actually was. The StealthStation needed to be recalibrated to ensure accuracy.
But is this the best option?
Pedicle screws are vital in spinal surgeries. They provide extra support for the vertebrae being fused as well as serve as attachment sites for rods. After the device needed to be recalibrated, I started to think about the margin of error the StealthStation allows. Knowing that The device is marketed for Neurosurgeries specifically, I assumed that the discrepancy between the trajectory of the screw shown in the monitor, and in anatomy needed to be small. I was surprised to find out just how accurate the StealStation is. In patients undergoing pedicle screw fixation in the lumbar spine, “Of the 172 pedicle screws inserted, 1 of them had an intraop pedicle breach” (Hadgaonkar et al.). About 99.5% if the screws inserted were accurately implanted using this O arm guided technique.
Citations
Hadgaonkar, Shailesh, et al. “Accuracy of ‘o Arm’ Guided Pedicle Screw Placement in Osteoporotic Spine with the ‘Precious Pedicle.’” Interdisciplinary Neurosurgery, vol. 27, 2022, p. 101430., https://doi.org/10.1016/j.inat.2021.101430.
https://www.youtube.com/watch?v=7Wvpokjjw1s
Images
https://www.sciencedirect.com/science/article/pii/S221475192100342X
https://www.gpcmedicalusa.com/MAS42T/monoaxial-pedicle-screws.htm
https://ryortho.com/breaking/spinal-balance-libra-system-contains-first-to-market-features/
https://cdaspine.com/stealthstation-surgical-navigation-system/
Week 3: Pedicle Screws Cont. Heading link
This week, we were tasked with creating needs statements based on issues observed during immersion. During a TLIF (Transforaminal Lumbar Interbody Fusion), the neurosurgeon was worried about the quality of bone in the patient’s lumbar spine. Weak bone within the vertebral body makes pedicle screws more difficult to fixate properly to the spine. In some cases, the screws can migrate–requiring revision surgery. Although solutions to poor pedicle screw fixation exist (HA coated screws and expandable pedicle screws to name a few) I decided to use this problem to drive the process of refining a needs statement.
Needs Statements
1. Spinal Fusion Patients can experience poor pedicle screw fixation to the spine and require a method to decrease screw loosening rates
Population: Spinal Fusion Patients
Opportunity: Poor pedicle screw spinal fixation
Outcome: decrease screw loosening rates
When I first wrote this one I immediately knew that the scope of the population was too broad. Not every patient requiring a spinal fusion experiences screws loosening. In fact, poor pedicle screw fixation is shown to occur mostly in osteoporotic patients (Rometsch et al.). If our desired outcome is to decrease screw loosening rates, then we should focus on a patient population where there is a greater risk of loosening. Also, the scope of the outcome only drives the design process towards screw based solution rather than looking at modifying any other part of the fusion apparatus.
2. Poor pedicle screw spinal fixation often occurs in patients with osteoporosis; who require a decrease in screw loosening rates.
Population: Osteoporotic Patients
Opportunity: Poor pedicle screw spinal fixation
Outcome: decrease screw loosening rates
In the second iteration, we keep the narrow scope of the outcome, but reduce the population scope to only include patients diagnosed with osteoporosis. However this might be scoped too small as not all patients experiencing a level of bone degeneration have osteoporosis. Osteoporosis is usually diagnosed after an incident–like a fall–some patients don’t even know they have it until then. In the operating room last week, the patient receiving a spinal fusion had weakened bone in their lumbar spine despite not being diagnosed for osteoporosis.
3. Patients with low bone mineral density often experience decreased pedicle screw spinal fixation and need a way to reduce the chance for revision surgery.
Population: Patients with low BMD
Opportunity: Poor pedicle screw spinal fixation
Outcome: Reduced chance of revision surgery
In the final iteration, the scope is broadened to include patients who still experience weakened bone, but not always to the extent of osteoporosis. The Outcome was also broadened; changed to reduce odds of a revision surgery from happening. The reason being is that since our population deals with complications of a patient, our outcome should affect and be streamlined for the patient. “Decreasing screw loosening rates” drives solutions geared towards equipment rather than an improvement of patient health post operation.
Citations
Rometsch, Elke et al. “Screw-Related Complications After Instrumentation of the Osteoporotic Spine: A Systematic Literature Review With Meta-Analysis.” Global spine journal vol. 10,1 (2020): 69-88. doi:10.1177/2192568218818164
Week 4: Pedicle Screws Cont. Cont. Heading link
Synonymous with last week, this week my group and I worked to expand our problem space within the OR to try and narrow down a feasible problem space. Since most of the procedures performed were craniotomies, we garnered more insight into the use of Mayfield head clamps in the OR. Surgeon ergonomic based difficulties were also apparent and got us thinking about possible needs for device development.
This week, I’ll be investigating the needs statement “Neurosurgeon’s inserting pedicle screws into patients with low bone mineral density often experience decreased pedicle screw spinal fixation and need a way to reduce the chance of a revision surgery.” Note: although screws are not the main observation of my group this week, I still find them interesting and want to learn more about the mechanisms and innovation
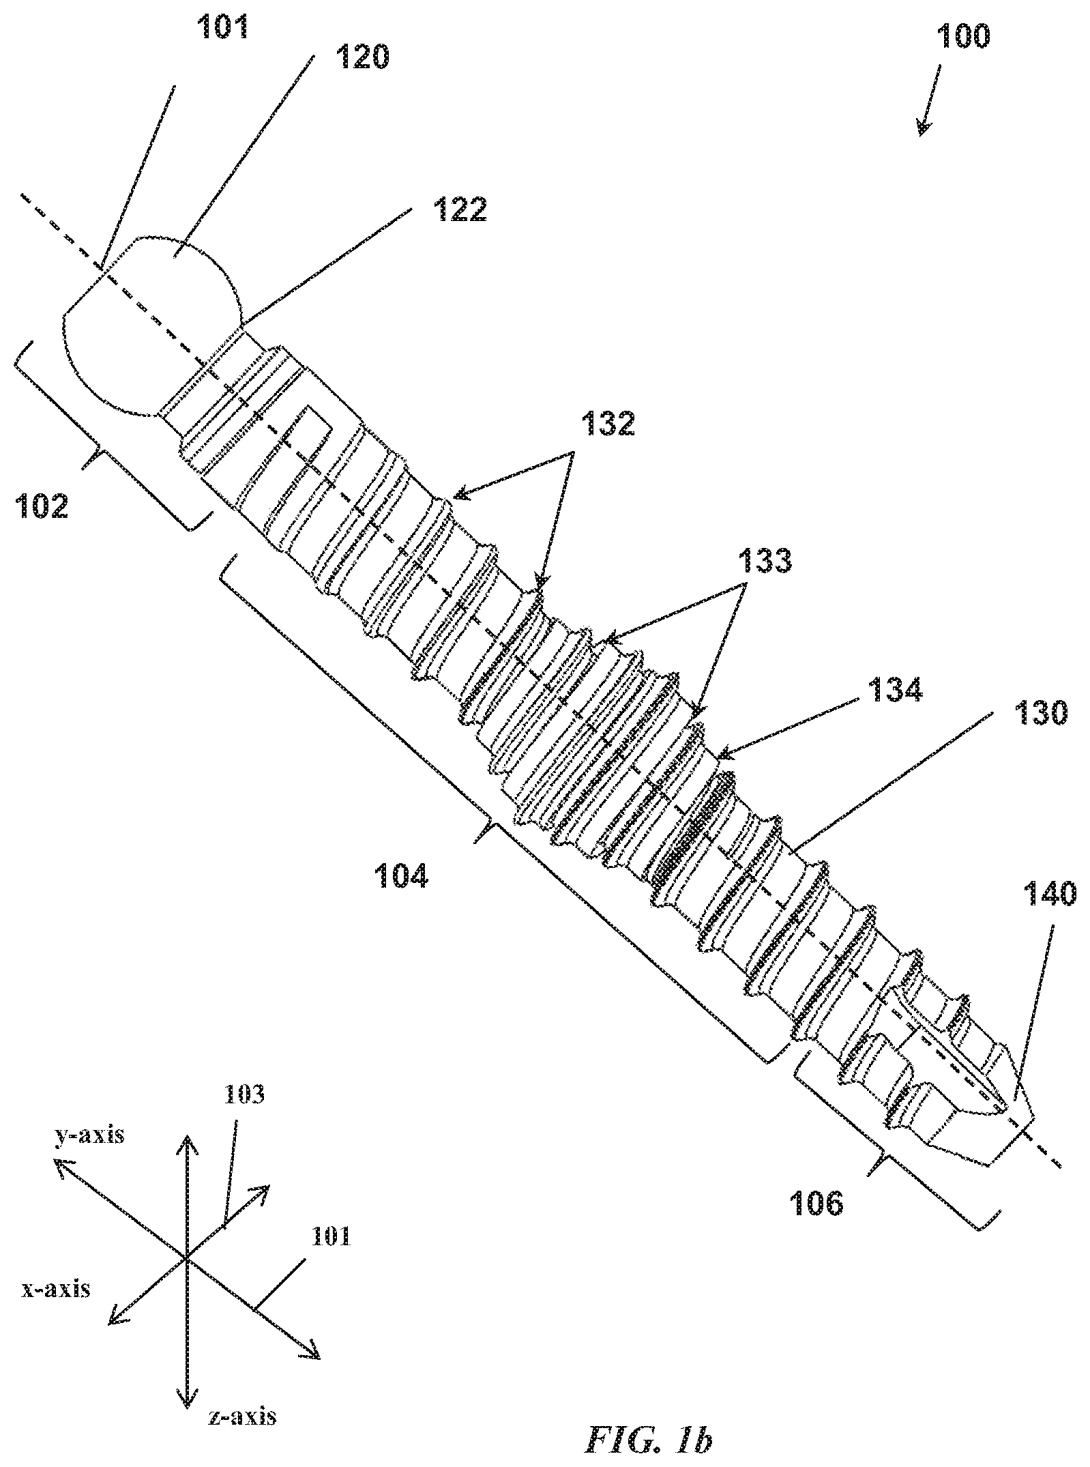
Patent Name: Expandable screw and methods of use
Patent Number: US10695115B2
Inventor: William Reimels
Claims
The screw consists of an expandable region within the longitudinal middle of the screw with a channel (lumen) running throughout the screw. The lumen is closed off and sealed to prevent bone from growing in the screw post operation. The expandable region can be at anypoint distally or proximally along the screw The screw exists as two states: expanded and unexpanded, each have their own separate radii. There is an angled spiral slit along the shaft of the screw within the expandable region called the “cut pattern.”
Satisfying needs:
Complications with pedicle screws–including loosening, mispositioning, and infection–can lead to additional revision surgery. In patients with low bone mineral density (BMD), pedicle screws have a greater chance to loosen over time or even migrate if an unsecure spinal connection is formed. Expandable pedicle screws aim to increase pull out strength of the screw by increasing bone/screw surface area. This is necessary for low BMD patients as their bone is more brittle. In week 3, my group and I observed pedicle screw implantation in the lumbar region. As the surgeon was inserting the screw he stated how the bone “felt weak.” But when he expanded the screw the connection felt much more secure and he was able to continue the operation.
Week 5: Total Addressable Market Heading link
During this week, my team and I needed to narrow in on a specific problem space to address. When deciding between ergonomics of surgical devices, or issues during skull clamp attachment, we decided on the later. Skull clamp complications are easier to address than the ergonomics of every standard surgical device. We then derived this needs statement:
Surgeons preparing for cranial and cervical spine procedures face challenges in positioning and stabilizing the head and require an ergonomic and secure way to reduce patient complications and increase ease of surgeon usability.
This week we were tasked with finding the Total Addressable Market (TAM) of a specific needs statement. TAM is defined as the overall revenue opportunity that is available to a product or service if 100% market share was achieved. And is calculated taking the number of units per year, and multiplying it by its cost.
TAM of Skull Clamps:
The skull clamp apparatus is composed of 3 components: skull clamp, rigid arm, 3 skull pins. Unlike the skull clamp and rigid arm, the skull pins are disposed of after each procedure. So we must take into account both the population of neurosurgeons–who are using the skull clamp and rigid arm–and the number of cranial and cervical procedures performed to determine skull pin cost. In 2018, there were 49,940 certified neurosurgeons across the globe (1). And in 2021, about 8.8 million people received neurological surgery (2). Since two populations are considered, two TAMs need to be calculated
TAM of skull clamp & rigid arm (Skull Clamp System)
Since the 2 most popular manufacturers of skull clamps specialize in either Cranial (Integra) or Cervical (Black Forest Medical Group), each neurosurgeon (~50,000) is assumed to have 2 skull clamp systems. Through market research, an Integra A-1108 skull clamp system retails for $4,600 and has a lifespan of 7 years.
If every neurosurgeon has 2 skull clamp systems that are replaced every 7 years, that gives us a TAM of
TAM = [ (2*50,000)/7 ] * $4,600 = $65.7 million
TAM of skull pins
Each head clamp requires 3 disposable pins. Hospitals most commonly purchase skull pins in packs of 36 at $1037.99 or $28.83 per skull pin. With an estimated 8.8million neurological procedures performed each year, if all of them used a skull clamp then the Skull address a market of:
TAM = 8.8 million patients * (3 * $28.83) = $761 million
Therefore, the Total Addressable market of skull clamps is around $827 million.
Sources
2.) https://thejns.org/view/journals/j-neurosurg/130/4/article-p1055.xml